
Distance Calculation Using Google Maps Setup with Dr Cart Shipping Rates & Rules Shopify App
GENERAL
ADVANCED SHIPPING SETTINGS
SHIPPING PROFILE & ZONES
SHIPPING RULE/RATE SETUP
SHIPPING RULE/RATE SETUP USING CARRIER RATES INTEGRATION
SHIPPING RULES IMPORT/EXPORT FUNCTIONALITY
MERGING MULTIPLE SHIPPING RULES
PRODUCT DIMENSIONS SETUP
HISTORY/AUDIT TRAIL
COMMON ISSUES & FAQs
In this this article you will learn:
How to setup Google Maps integration
Difference between Distance Calculation Modes
How to use distance calculation in conditions
How to use distance calculation in calculations
How to Setup Google Maps Integration
The first step in using our Distance Calculation features is to set up a Google Maps API account.
Integration with Google Maps allows you to utilize functionalities in our system that require calculating the distance between the sender and the receiver. These include, for example, calculating the shipping rate incrementally based on distance, or displaying a given shipping rate only when the distance between the sender and the receiver is less than a specified threshold.
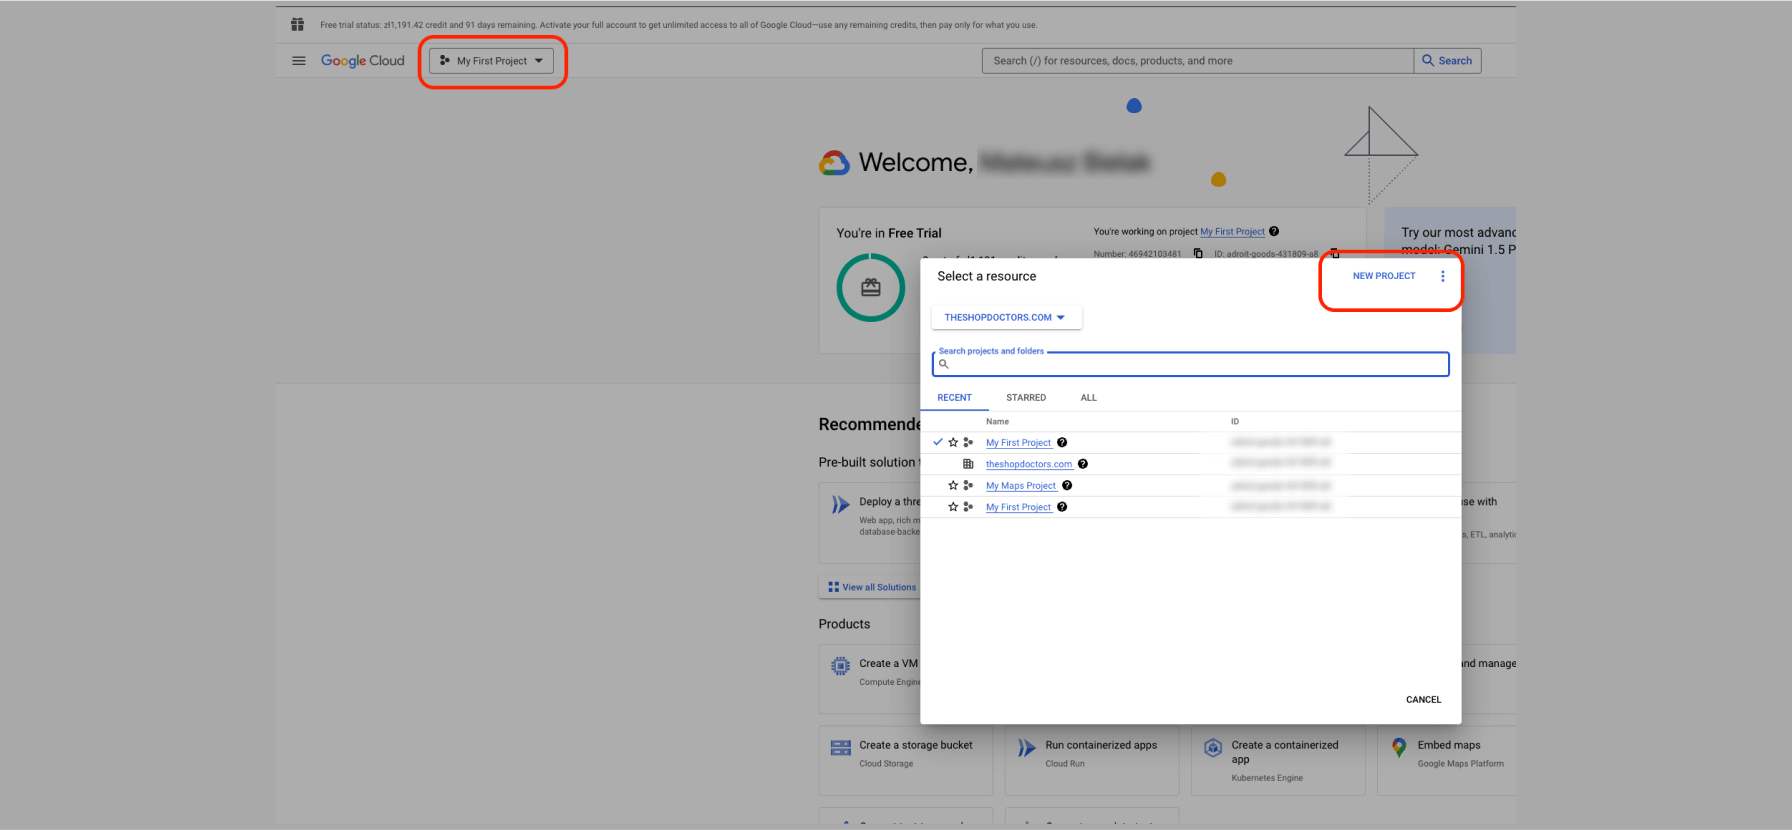
Once you have a Google Maps API account, you need to set up a Google project or select a project to use with our app.
Here’s how:
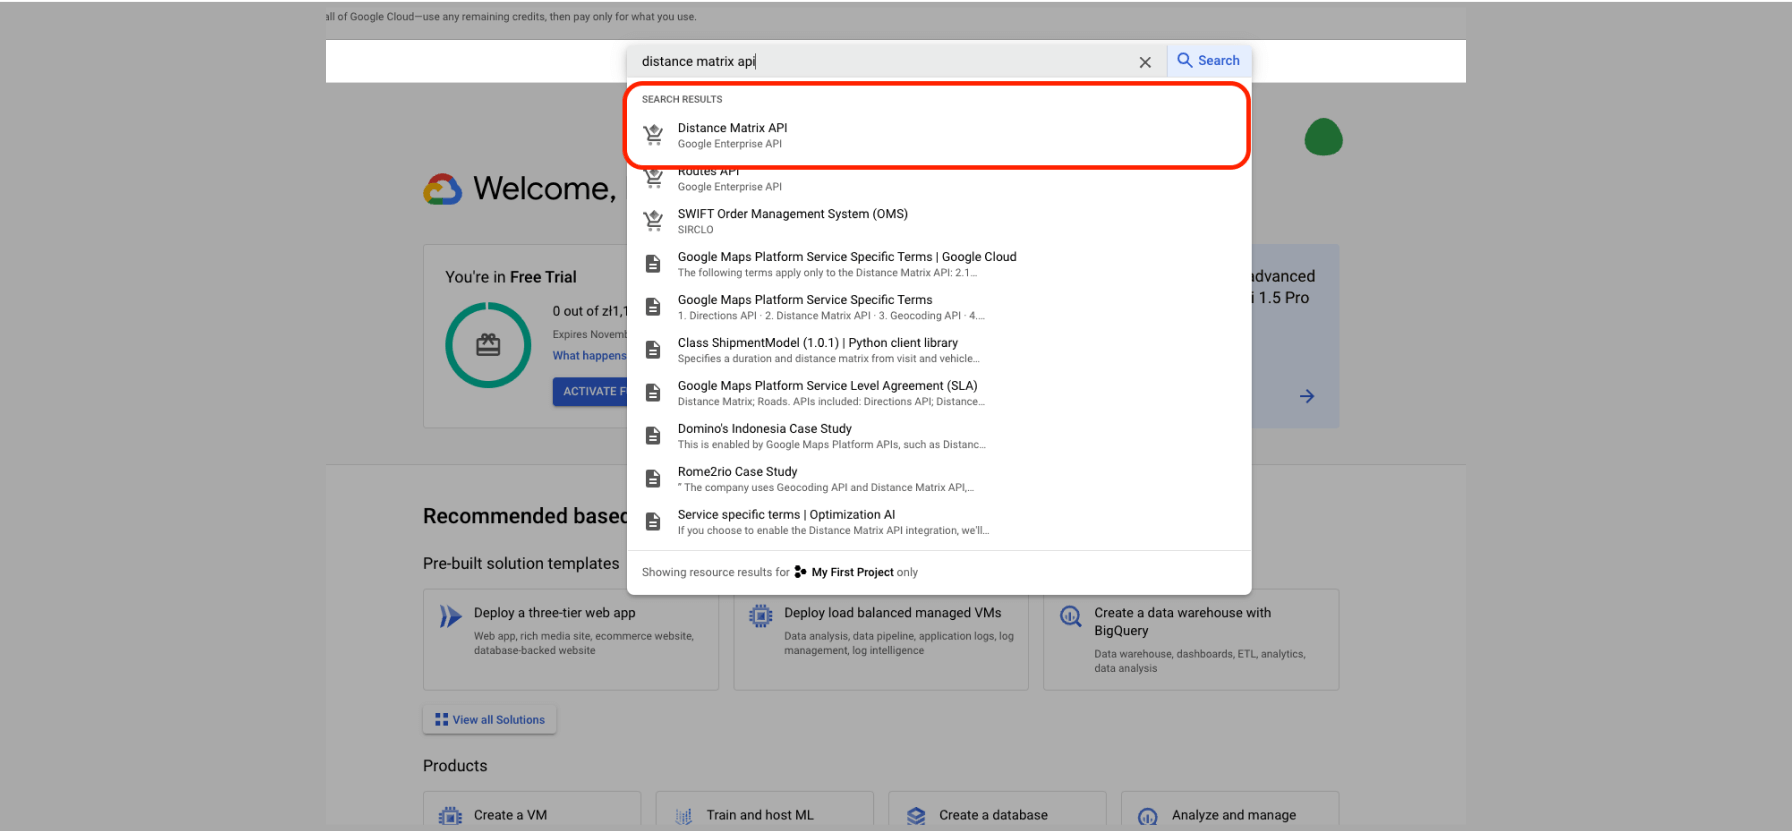
2. Using the search bar, search for “Distance Matrix API”, and select this value from search results.
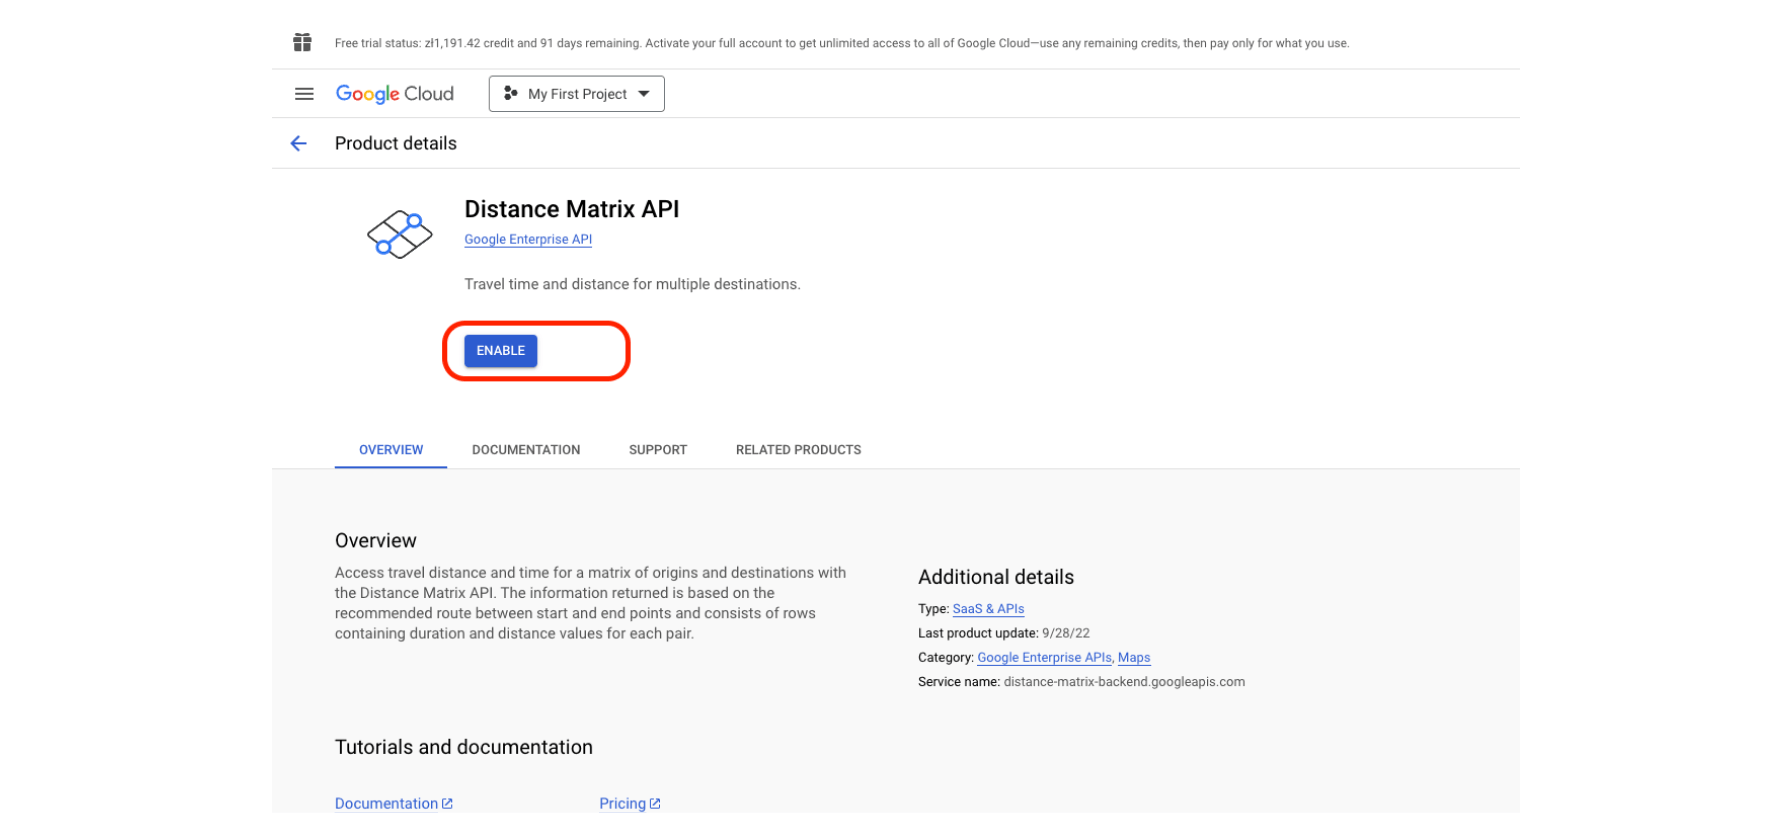
3. Enable Distance Matrix API for your given project
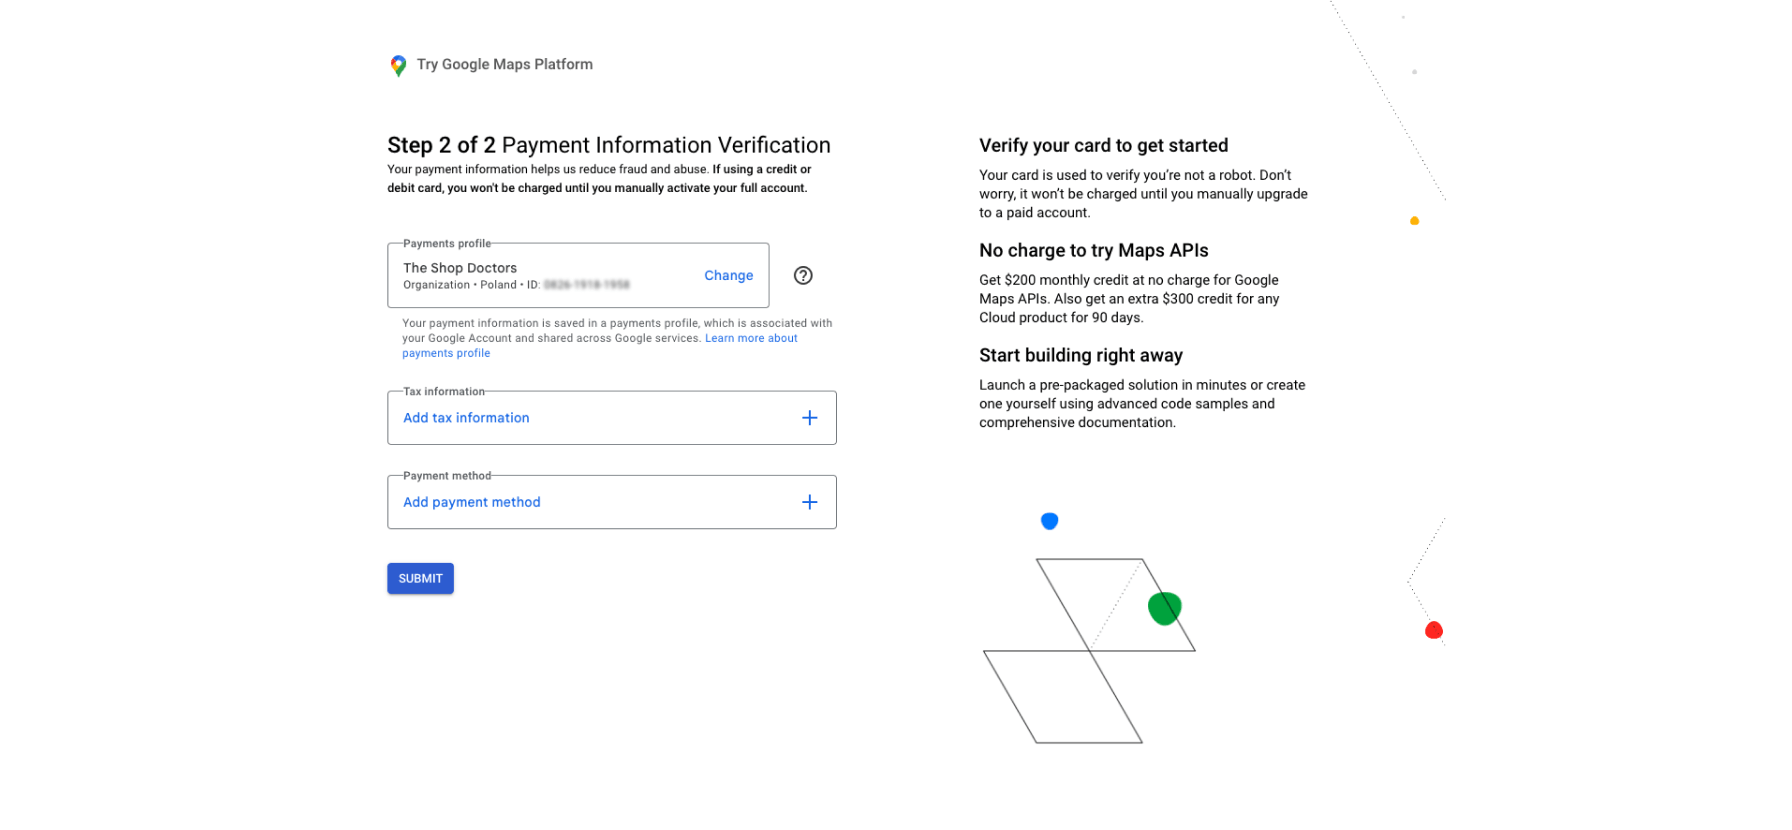
4. (Optional) If you don’t have a payment account connected to your Google developer account, you will be asked to connect to a new one.
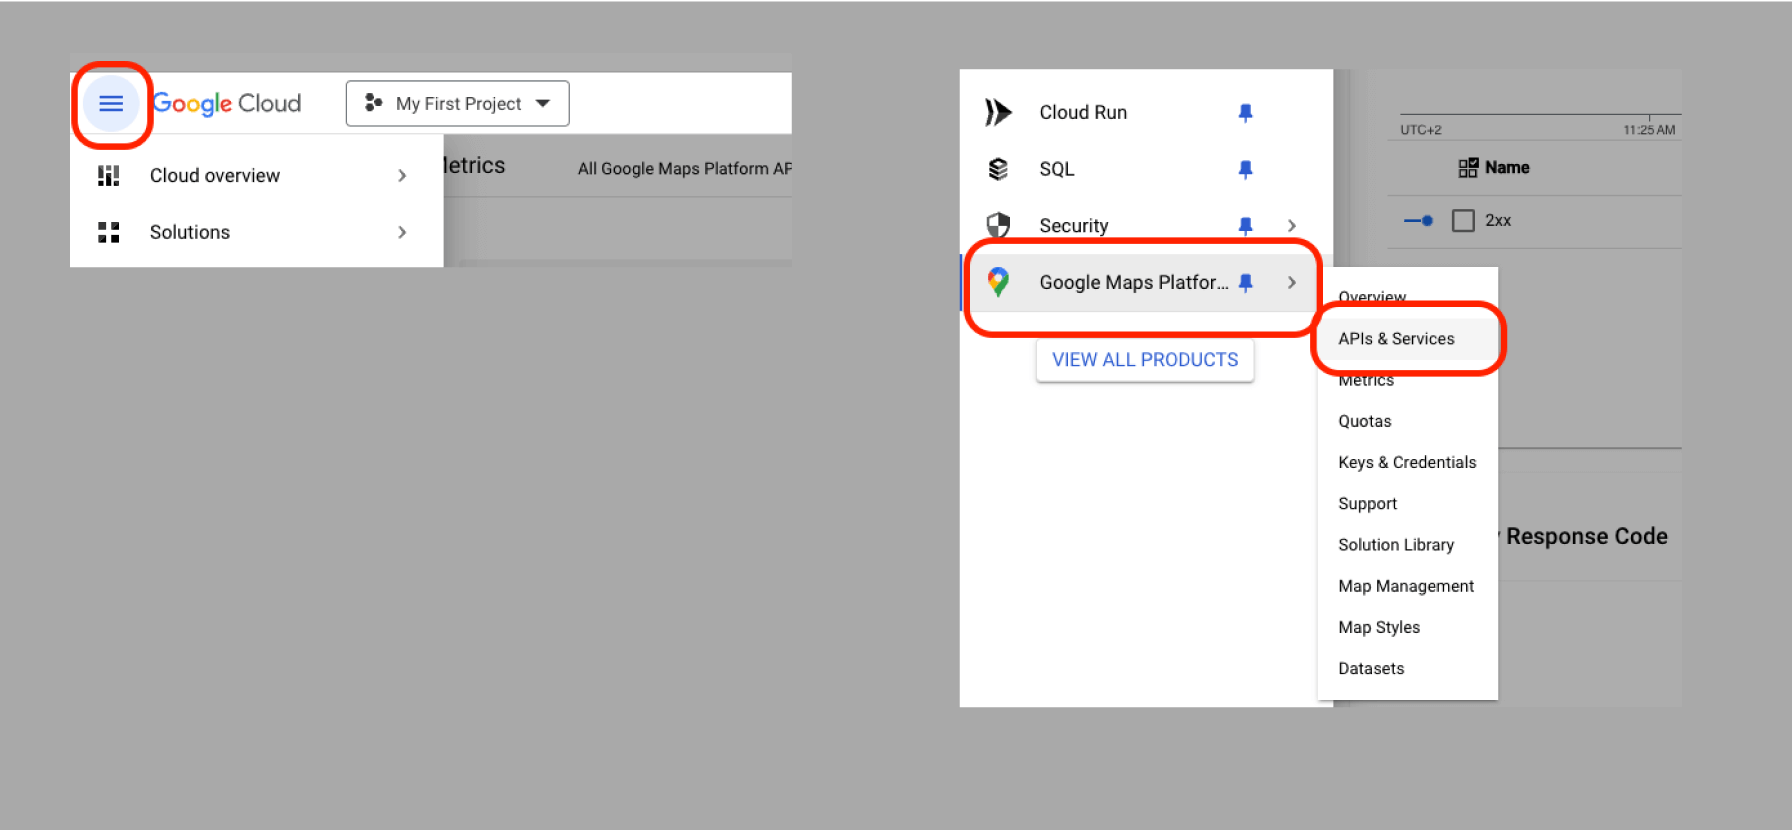
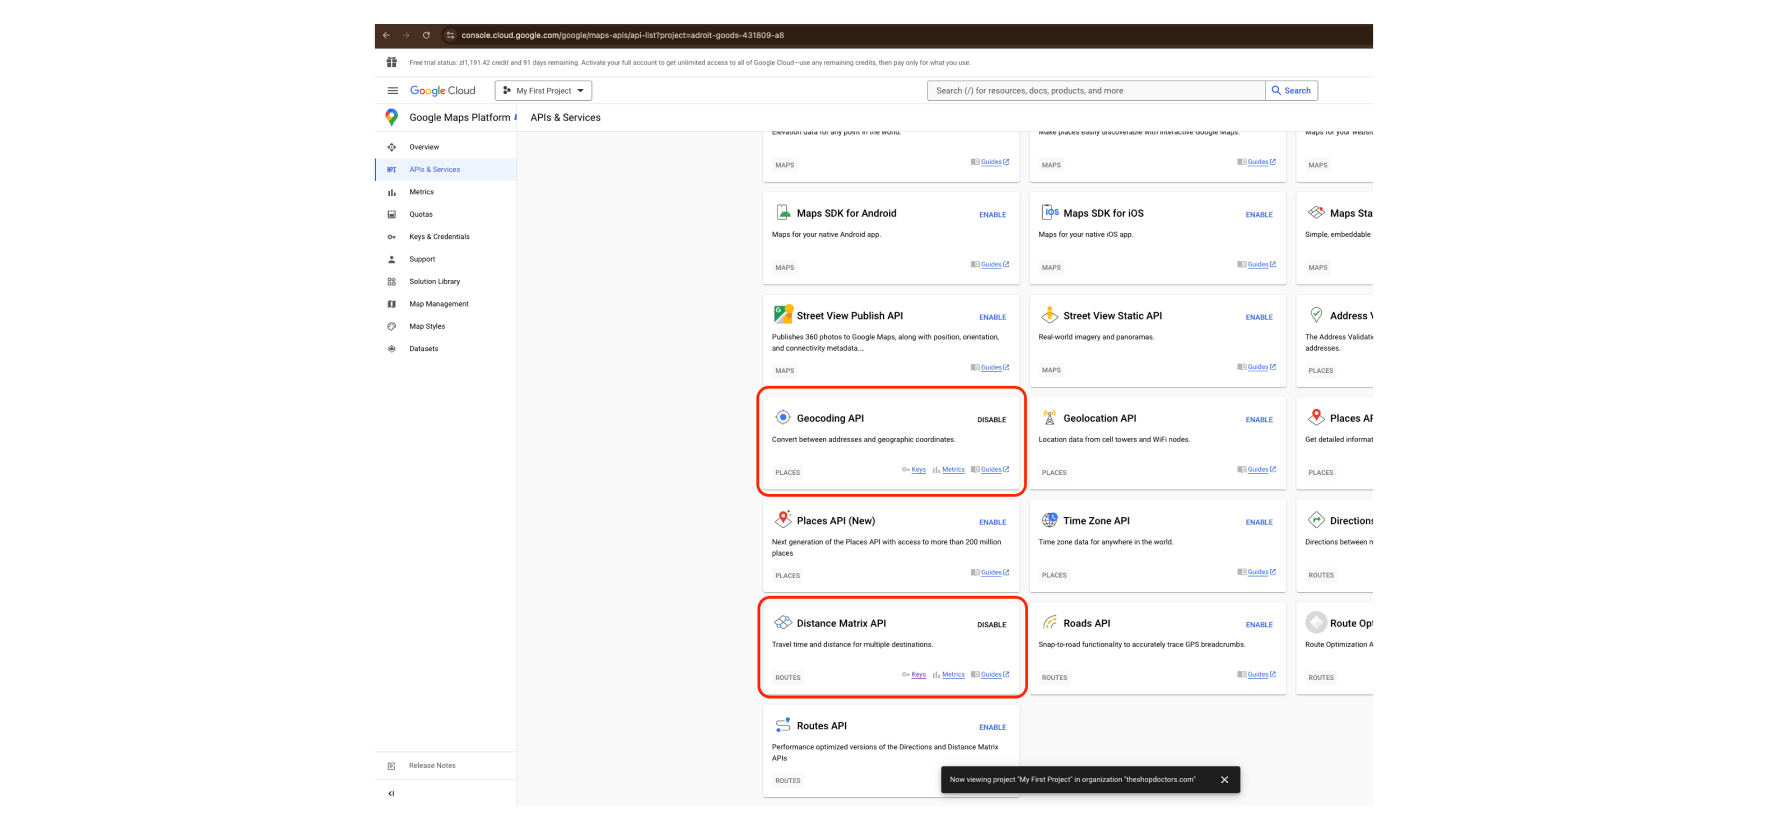
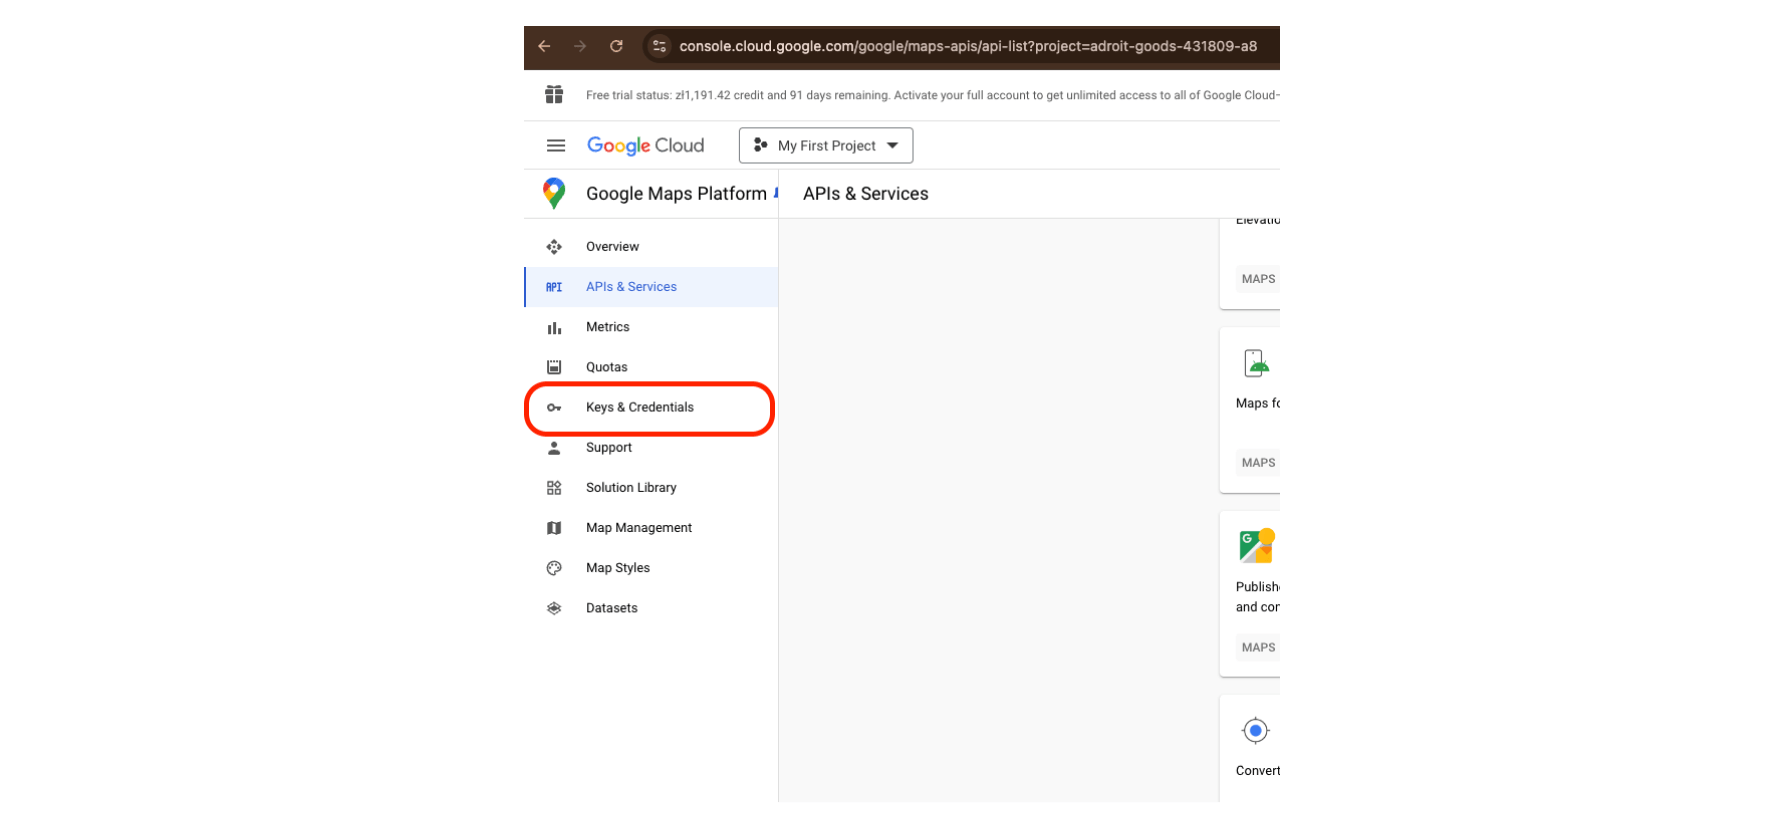
7. After ensuring you have Distance Matrix API and Geocoding API enabled, go to “Keys & Credentials” that is located in the left-side menu.
8. Create a new API Key by clicking on “CREATE CREDENTIALS” and “API Key”. When your API key is created, we encourage you to rename it to clearly indicate that it is being used in our application, e.g., ‘Shop Doctors Shipping.'”
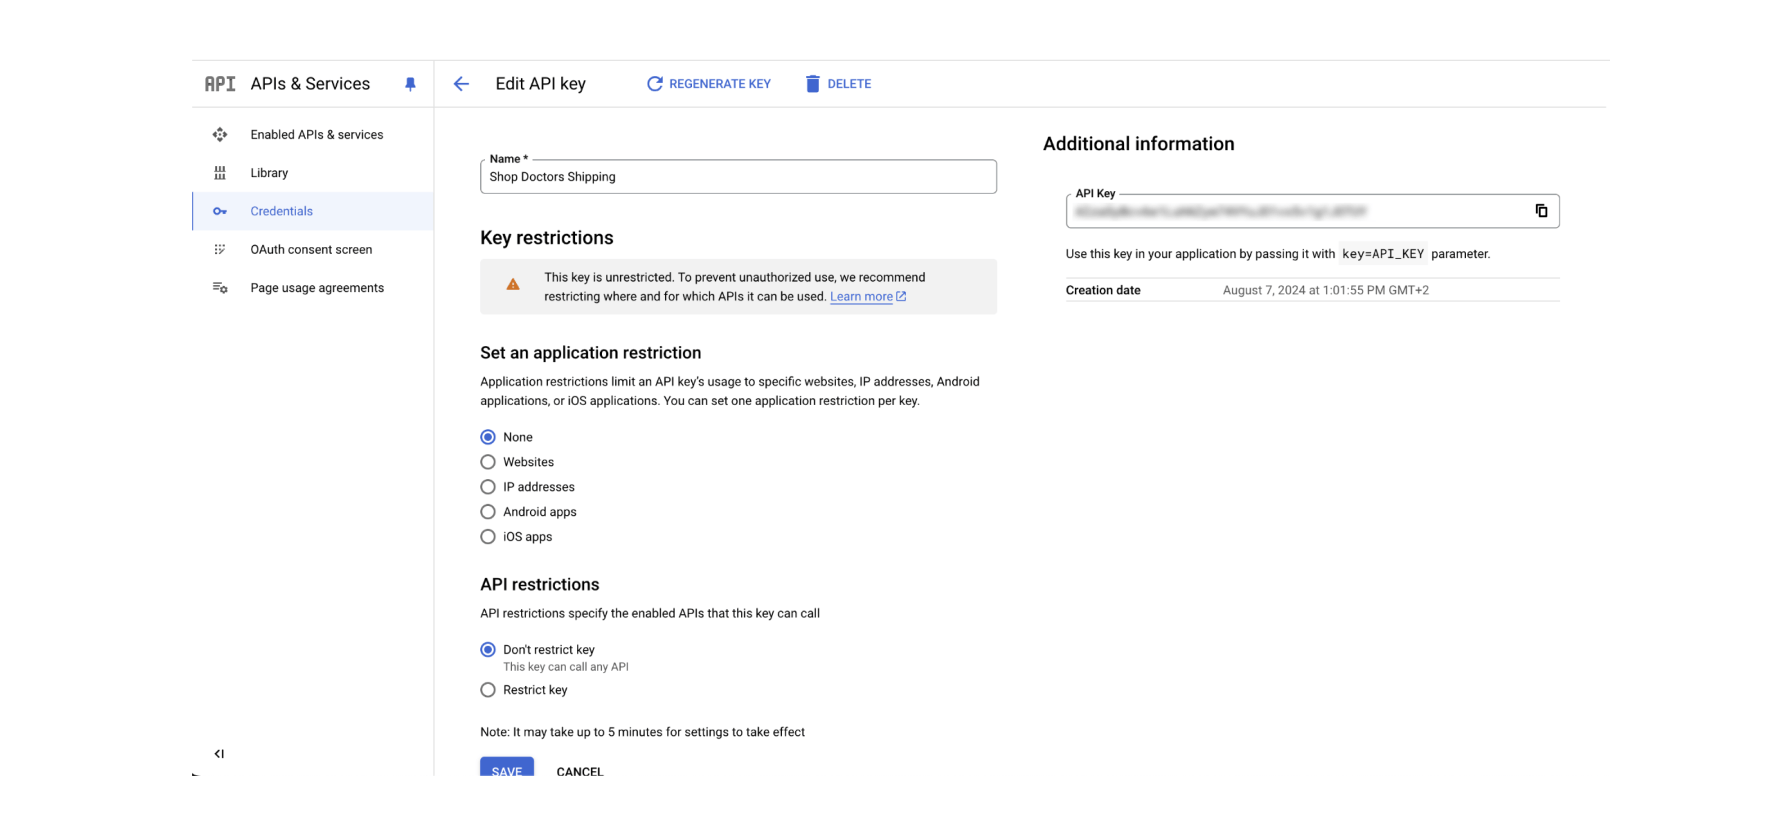
Once you have the API Key, you can integrate the Google Maps API with your Advanced Shipping configuration in our UI.
9. Once you have the API Key from Google, copy the API Key (see screenshot above), navigate to and open our app, then go to “Advanced Shipping Calculator” and click “Advanced Shipping Settings”.
10. On the Advanced Shipping Settings page, scroll down to the “Distance Calculation Setting using Google Maps” section.
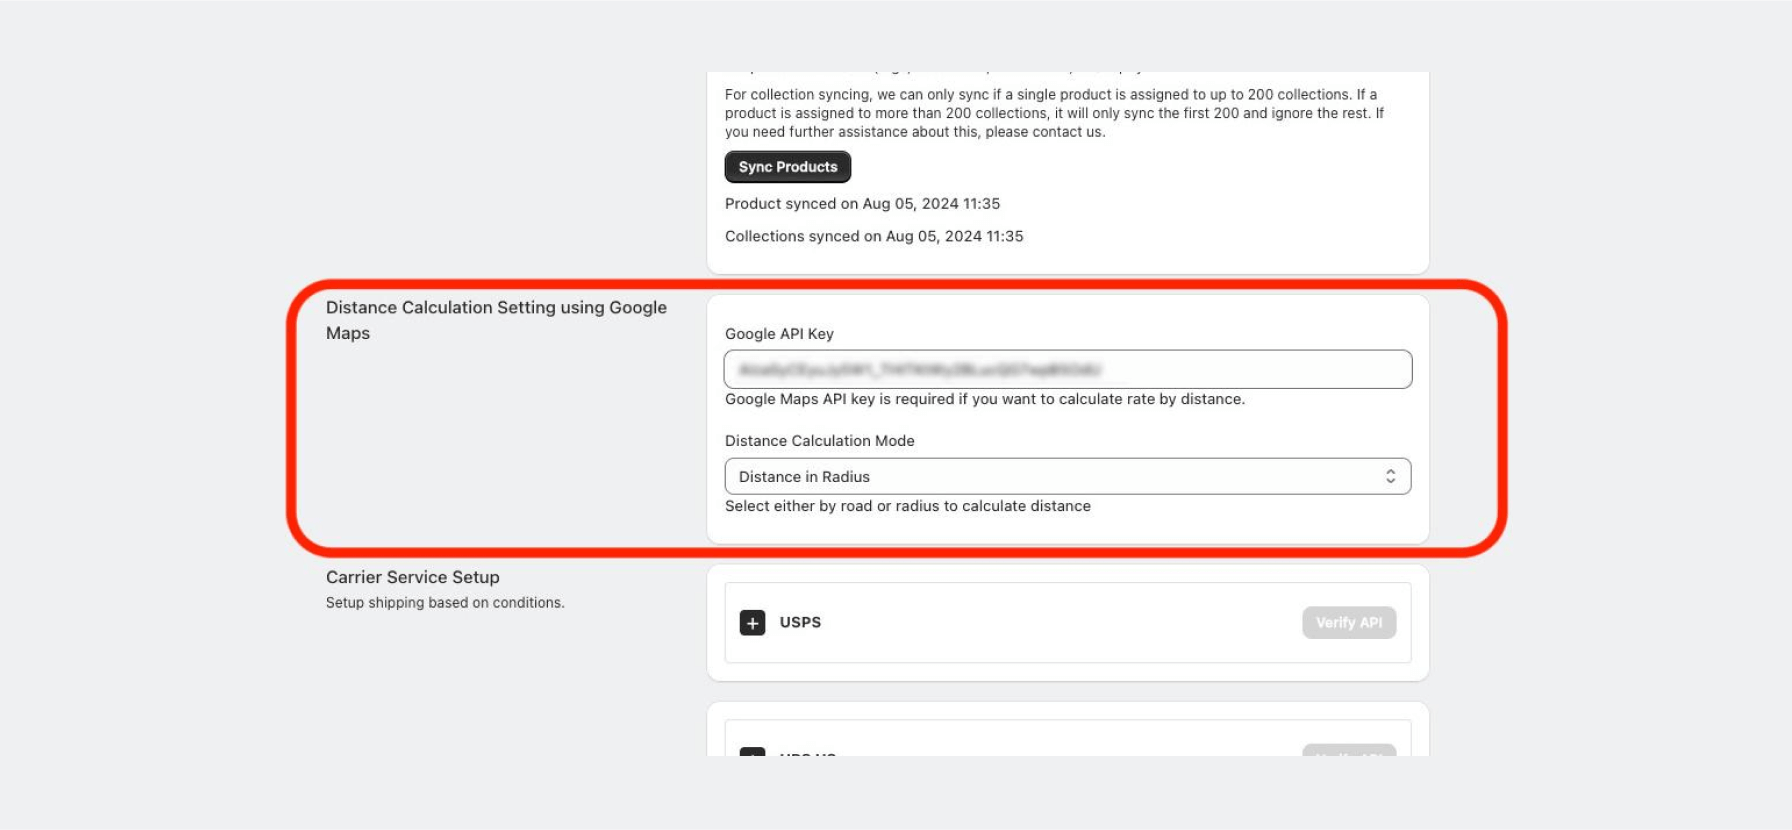
11. Paste your API Key into the “Google API Key” input box.
Difference between Distance Calculation Modes
Our application supports two types of distance calculations, “Distance by Road” and “Distance in Radius.”
- Distance by Road – We use Google Maps’ distance matrix to calculate distance between the origin address (where you’re shipping from) and destination address (where you’re shipping to). We use “Driving Mode,” which means we calculate the distance and estimated time of travel using driving routes and conditions. This mode takes into account the current traffic conditions, road types, and driving restrictions. It is suitable for getting the best route and travel time for vehicles on the road.
- Distance in Radius – In Distance in Radius calculation mode, the goal is to determine how far a point is in terms of straight-line radius from a center point (while factoring in the Earth’s curve).
Components of the Calculation:
Center Point: Origin address, this is the fixed reference point from which the distance is measured. It is specified by its coordinates (latitude, longitude). Our app uses Google API to get these coordinates.
Target Point: Destination address, this is the point whose distance from the center point you want to calculate. It is also specified by its coordinates (latitude, longitude). Again, our app retrieves this data from Google’s API after the customer enters the address.
Radius: This is the maximum distance from the center point within which the target point should lie to be considered “within the radius.”
We calculate radius distance using the Haversine Formula. This formula considers the distance between two points on the surface of a sphere, such as the Earth. By taking into account the curvature of the Earth, the Haversine Formula provides an accurate measurement of the shortest distance between two points specified by their latitude and longitude coordinates.
To change this setting go to “Advanced Shipping Calculator” and then to “Advanced Shipping Settings”. Then find the “Distance Calculation Setting using Google Maps” section and change value in “Distance Calculation Mode” field.

How to use Distance Calculation in your Shipping Rule Conditions
Let’s say you want to create a shipping rule for customers who are within less than 50 miles from your warehouse location.
To create such a rule, go to the “Conditions” section and select “Location Distance” from under Condition Parameter.
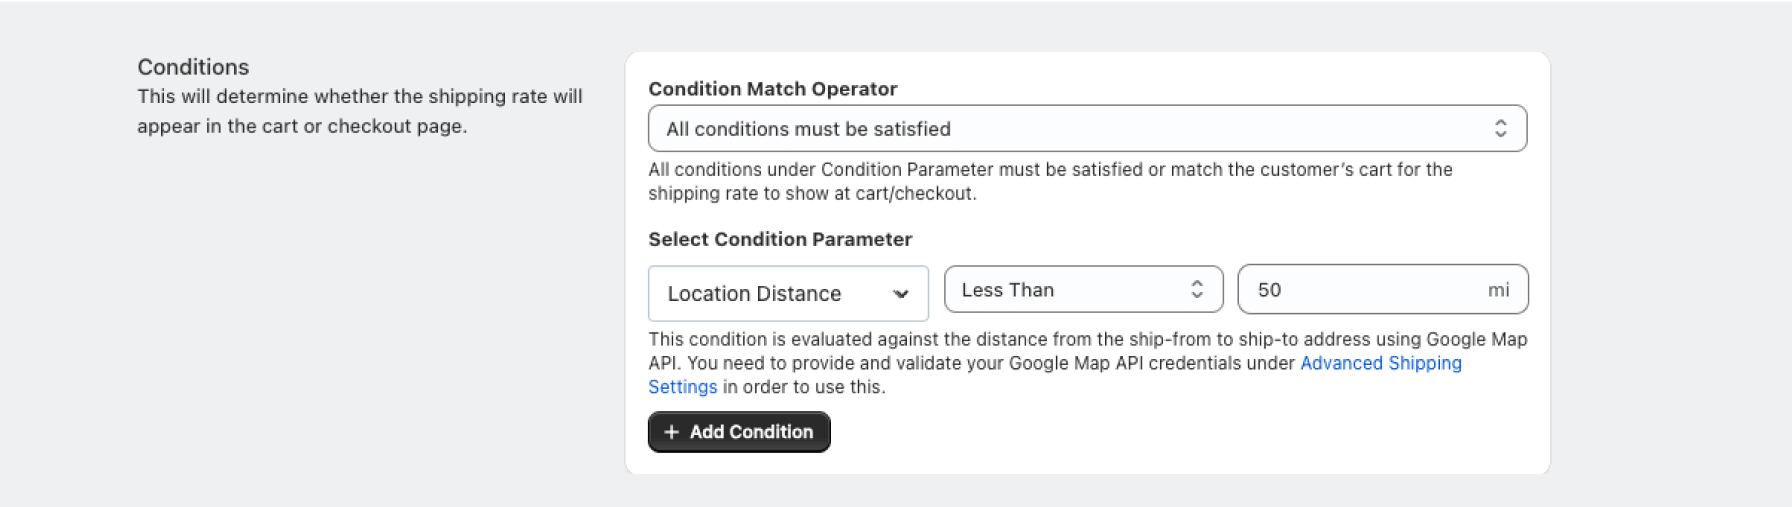
Then specify the type of Condition Parameter Operator (equals, greater than, less than etc…).
In our example, since we want to create a shipping rule for customers within less than 50 miles, we’ll select “Less Than” under the Condition Parameter Operator. Then enter the distance in the input field, which is 50 miles. (see screenshot above)
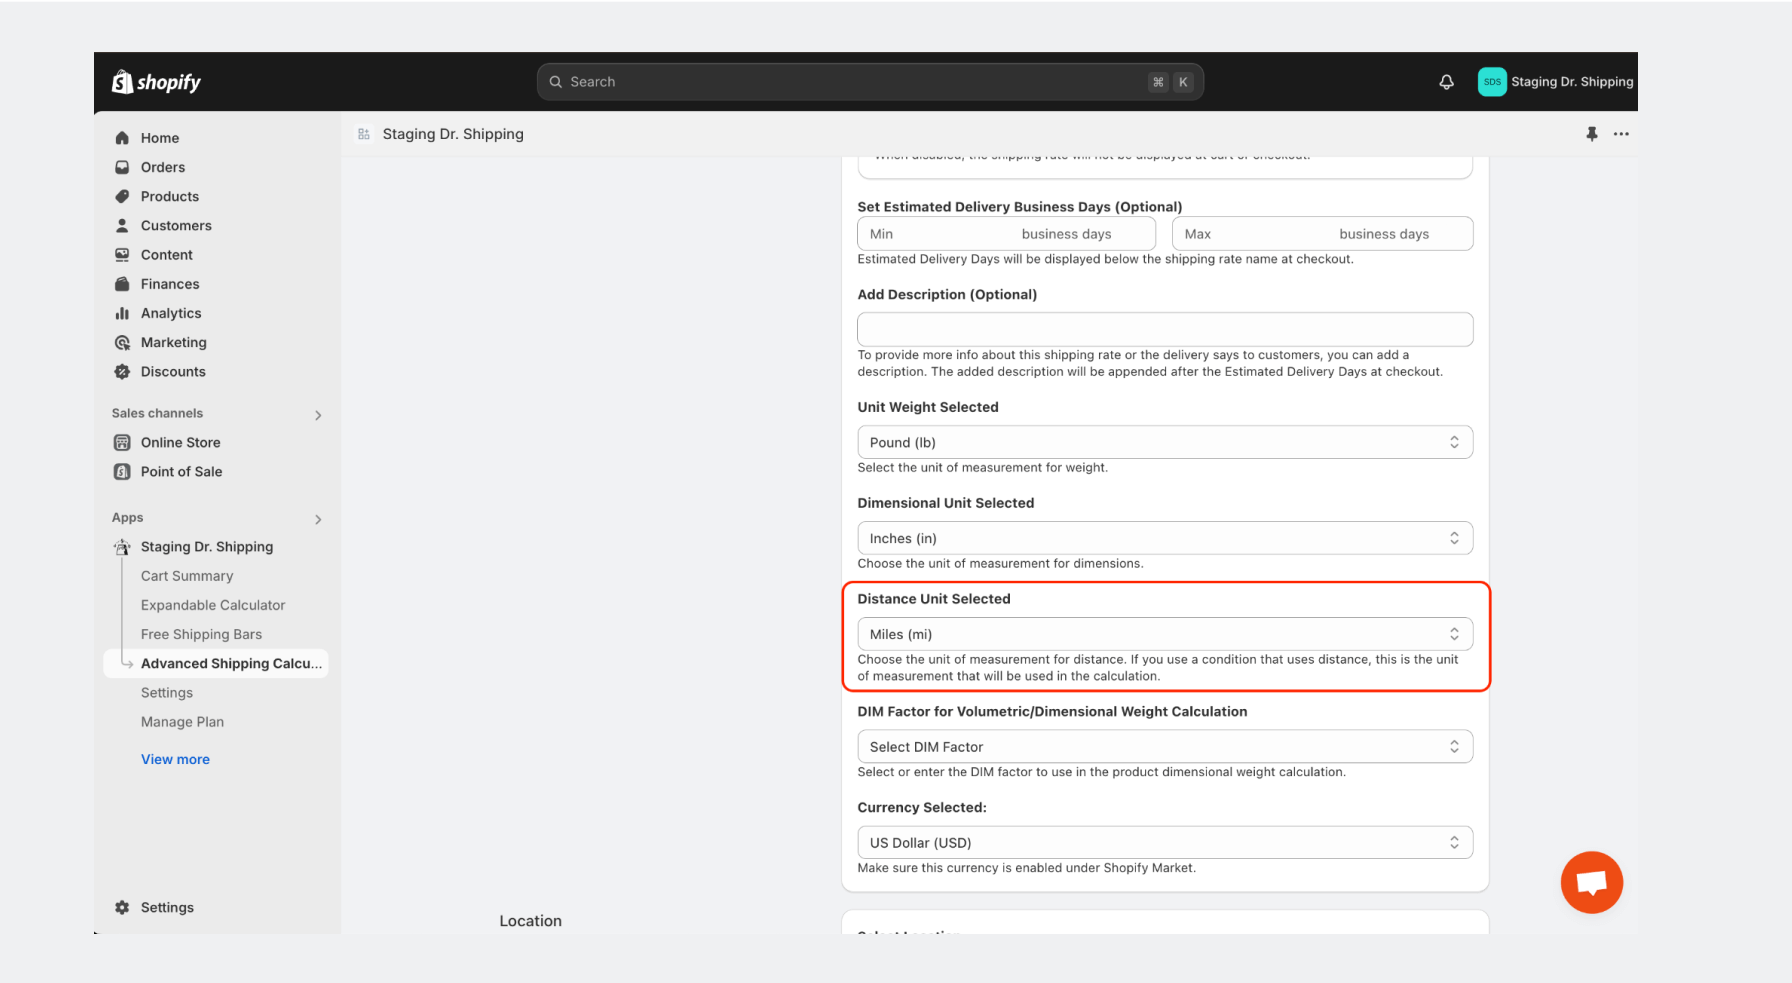
The unit used for calculating the distance is specified in the distance field. You can change it in the General settings of the Shipping Rule. (see below)
How to use Distance Calculation in Calculations
When configuring a Shipping Rule, you may want to base the rate calculation on the distance between the sender and the recipient.
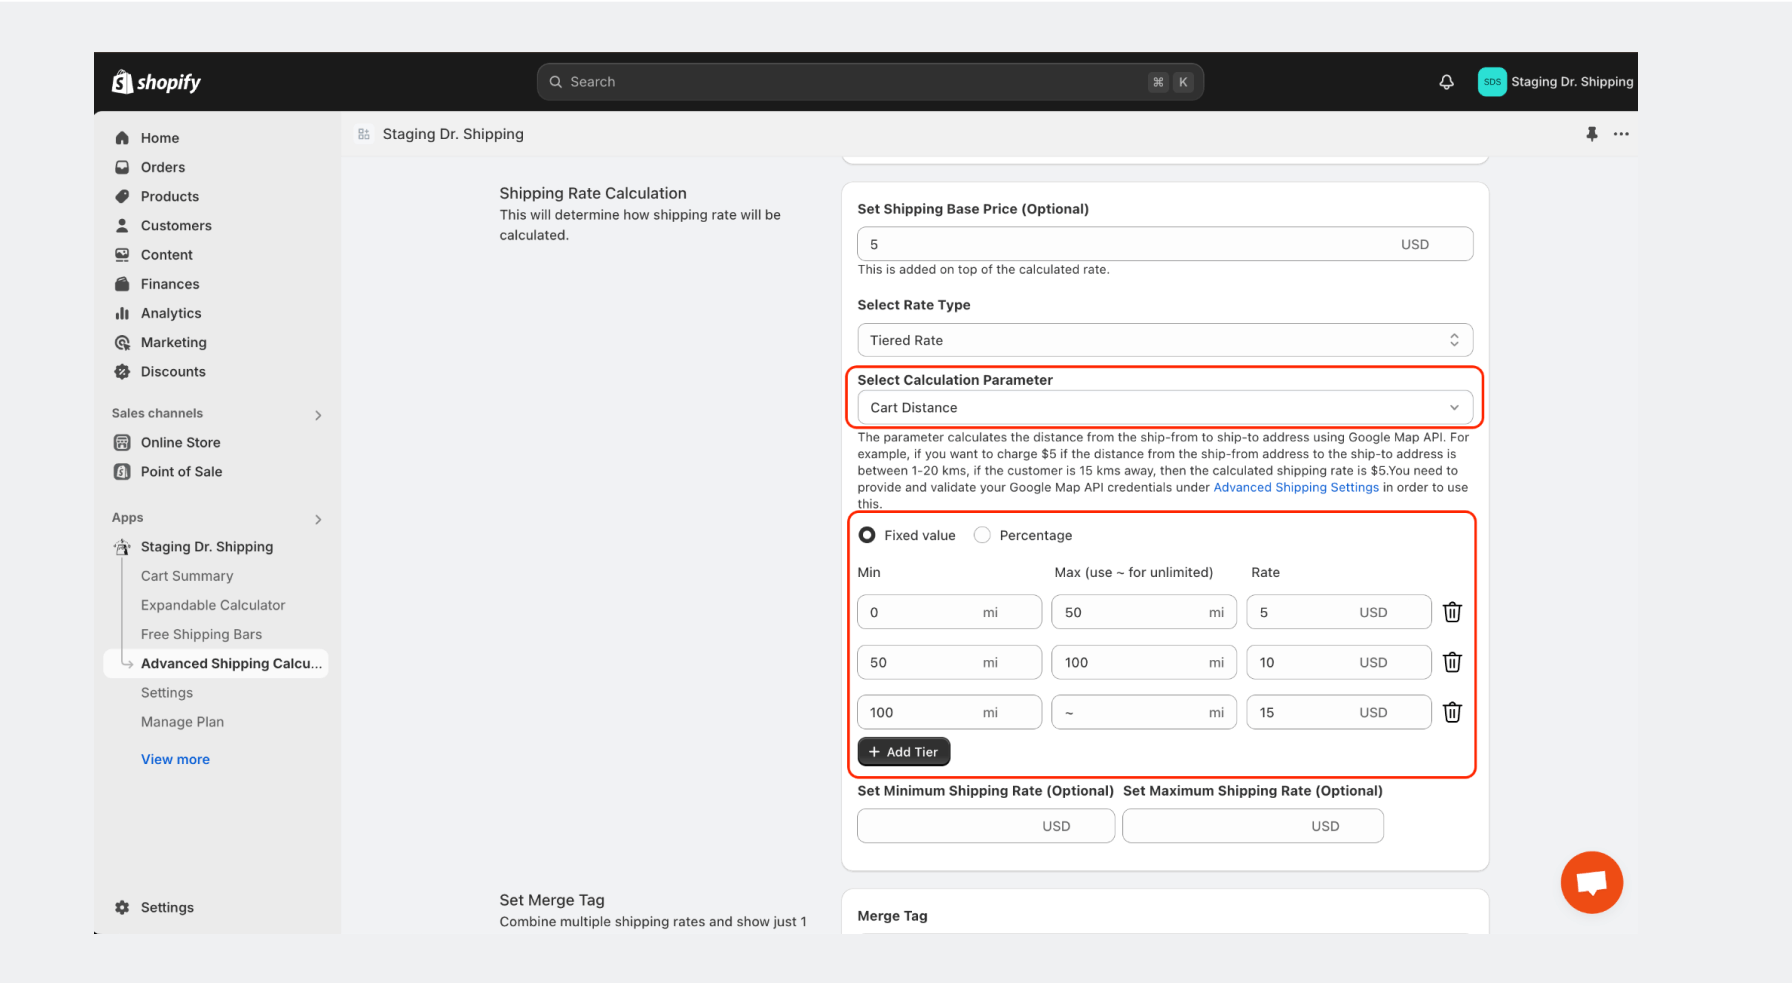
To create such a rule, go to the “Shipping Rate Calculation” section and select either the “Tiered” or “Incremental” type. Only these two calculation types allow rate dependency based on distance. Then, in the “Select Calculation Parameter” field, choose the “Cart Distance” option. From this point, all rate calculation settings will be based on the distance calculated between the sender and the recipient
For example, suppose you want to create a shipping rule with a tiered rate that will charge the customer $5 for locations 0 to 50 miles from your origin warehouse, $10 for 50 to 100 miles distance, and $15 if the customer is more than 100 miles away.
To create such a rule, go to the “Shipping Rate Calculation” section and select “Tiered Rate” from under “Select Rate Type.” Then select “Cart Distance” under the “Select Calculation Parameter” field.
Select “Fixed Value” from the radio button options and put 0 as the Min value and 50 as a Max tiered value in the first tier.
Then build out your pricing tier table. Specify the Rate to be $5 in the first tier.
Then click “Add Tier” and populate the second tier with 50 miles as a Min, 100 as a Max, and $10 as the Rate.
Finally, add a third tier and put 100 in Min and put a “~” sign in the Max field. Set the Rate to be $15
See an example of a distance-based shipping rate configuration.
Important Note
Remember that for distance calculation, we use both the sender’s and receiver’s addresses.
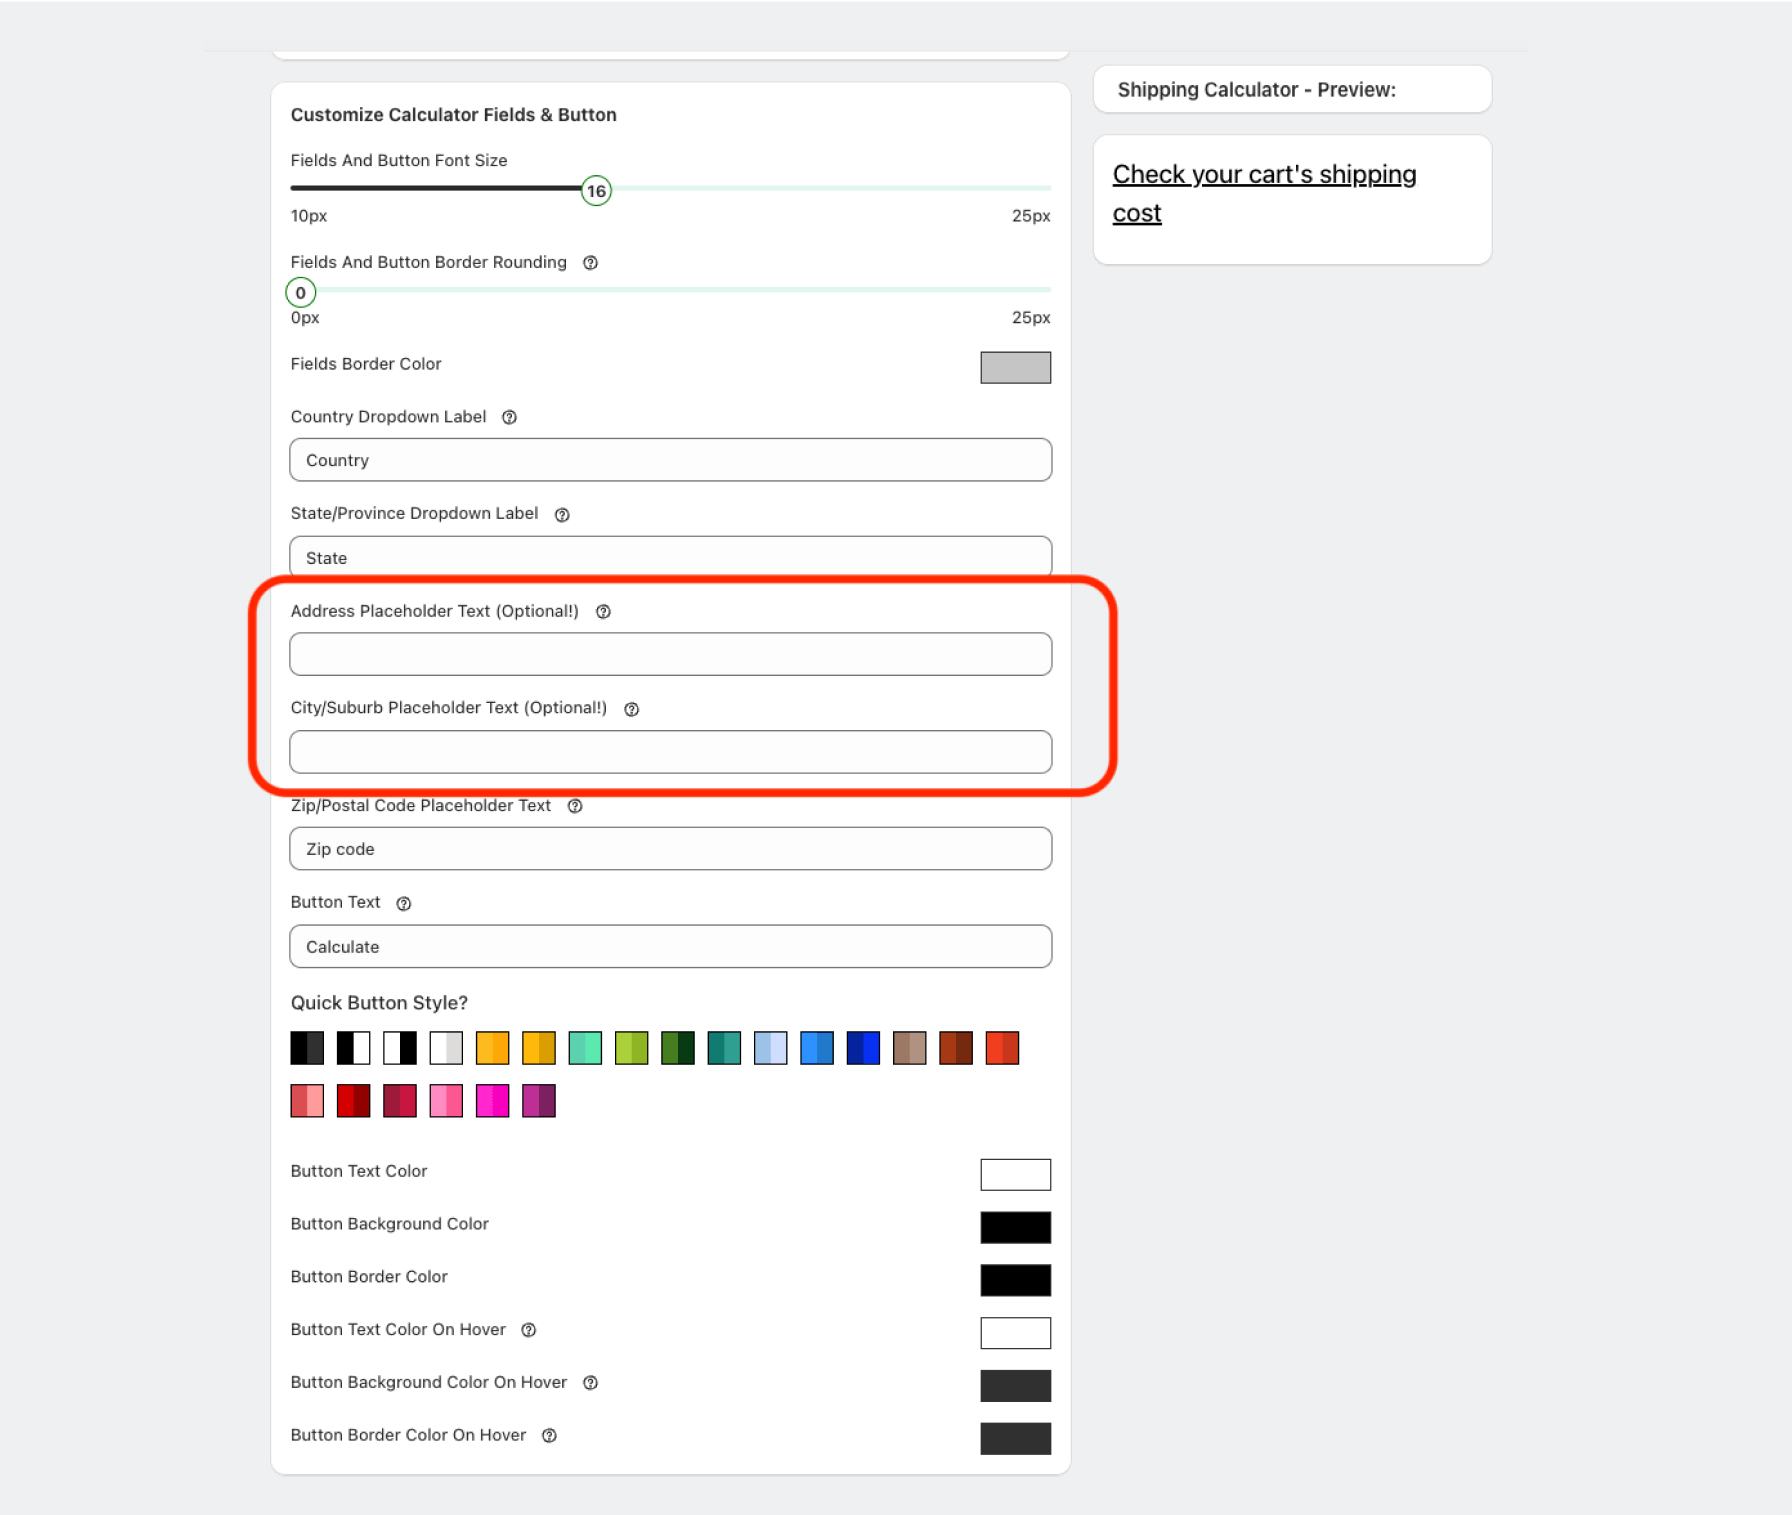
By default the Address and City field is not enabled in our widget (Cart Summary & Expandable Calculator). We recommend enabling the City and Address fields in order to calculate the distance accurately. Otherwise, if the City and Address field is not enabled, the displayed shipping rate on cart for distance-based shipping rules may be different from the displayed shipping rate at checkout.
You can change this setting by navigating to “Cart Summary” => “Customize” => “All Available Options” => “Customize Calculator Fields & Button“
Cart summary widget configuration
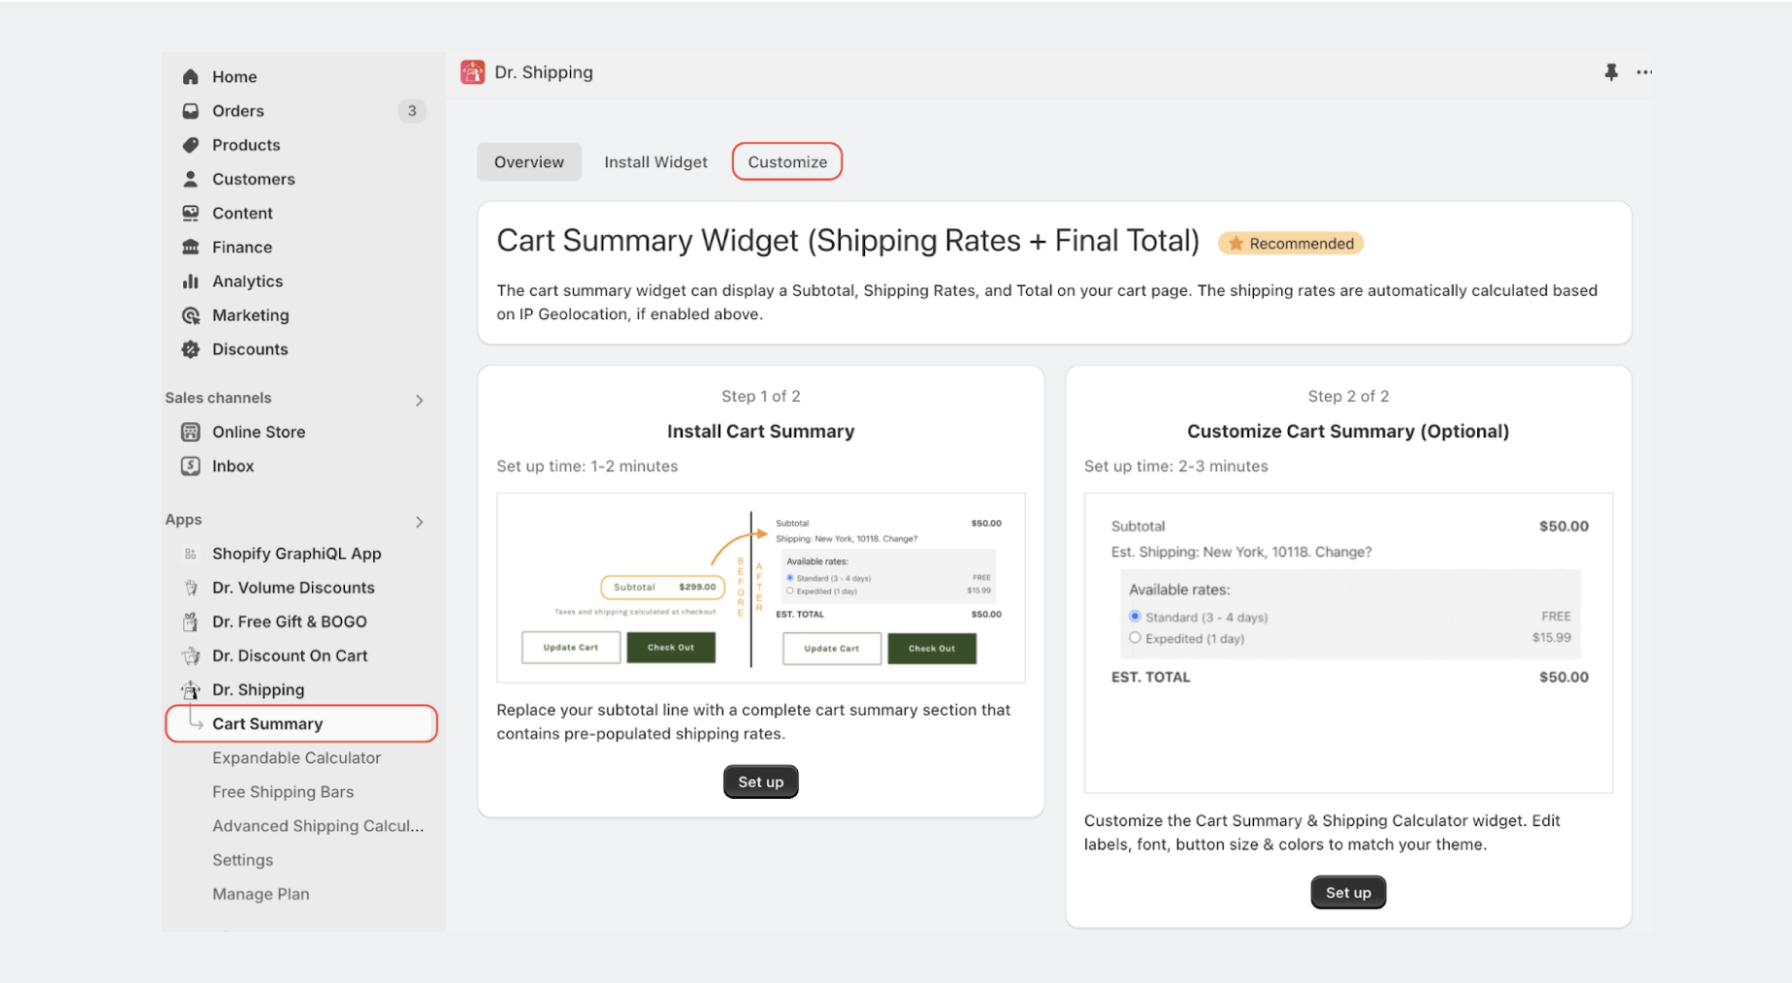
1. Navigate to settings
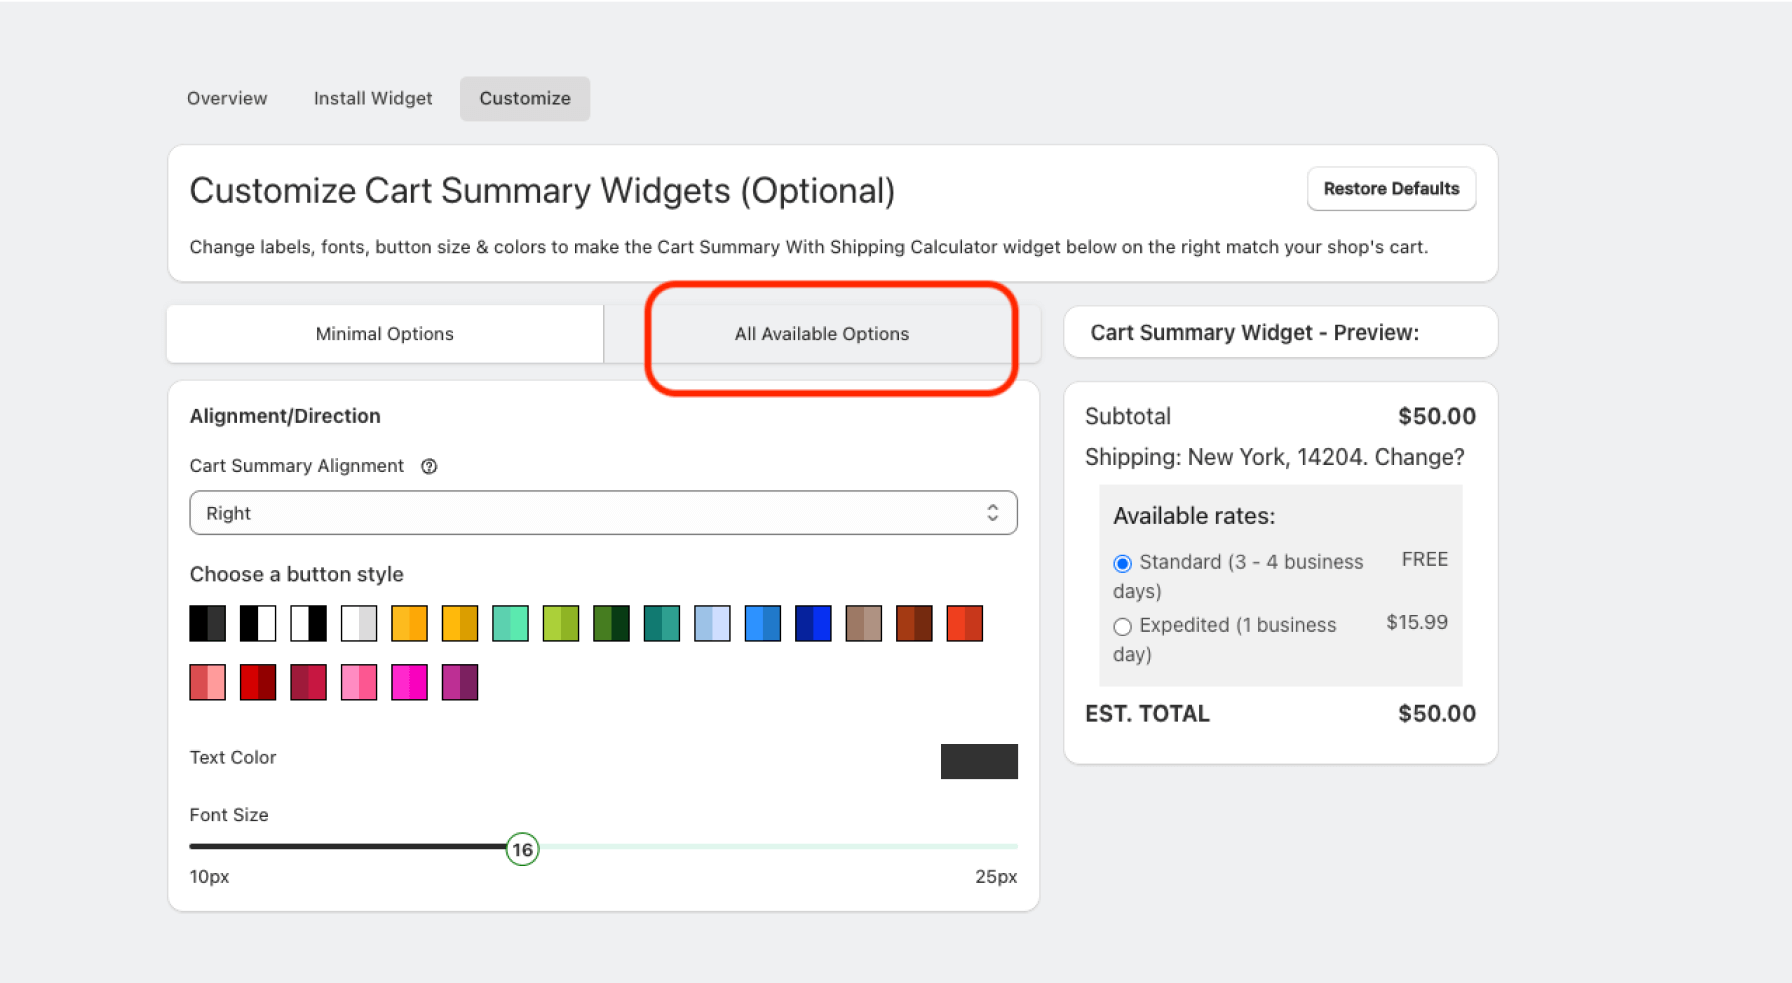
2. Click All Available Options
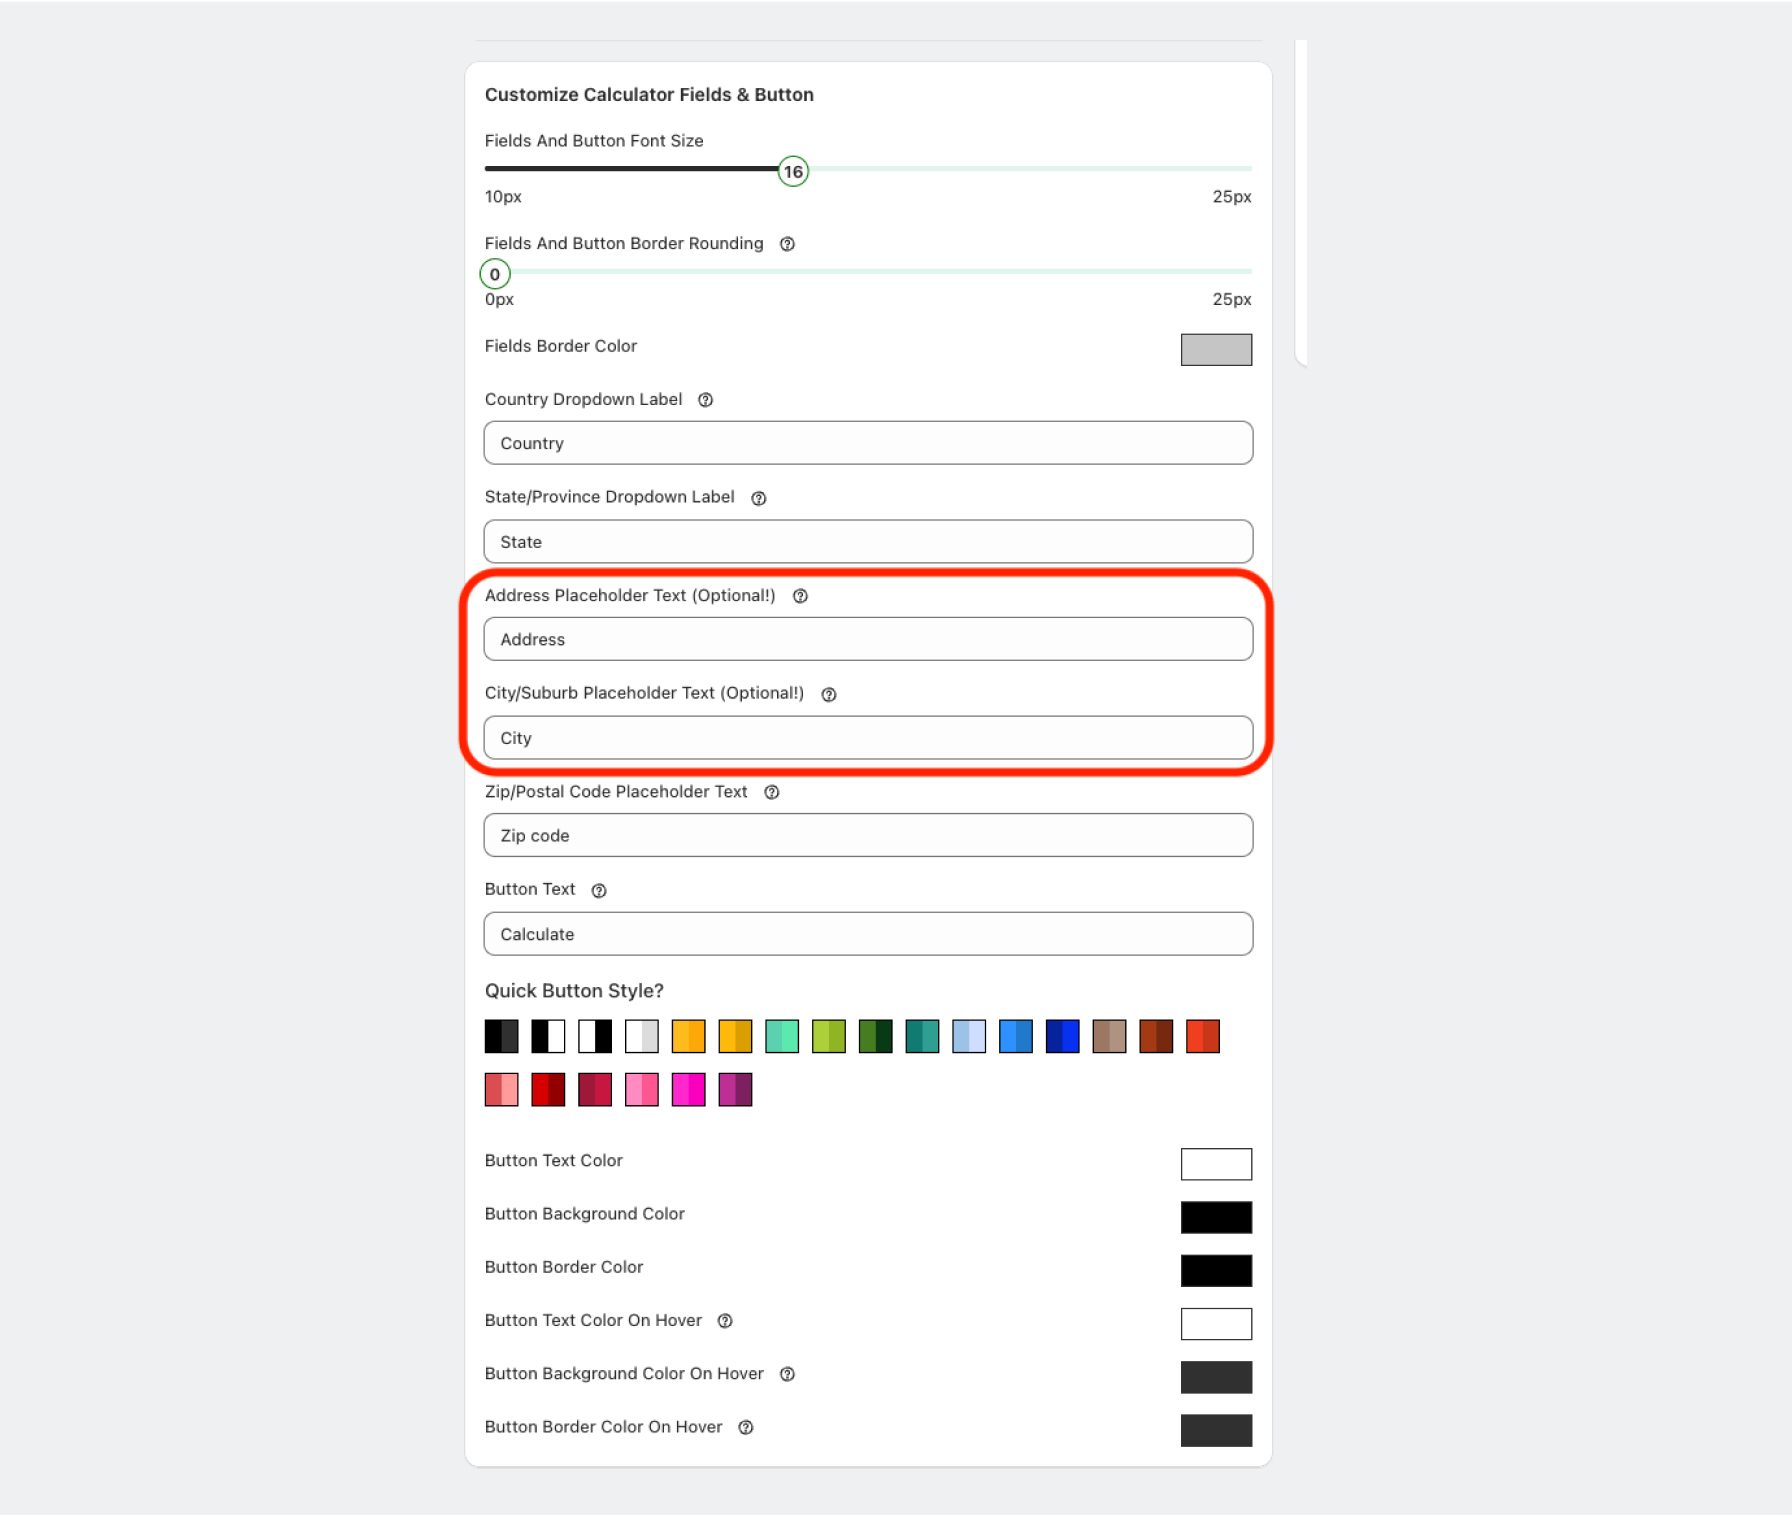
3. Set up Address Placeholder Text and City/Suburb Placeholder Text
Expandable Calculator Widget
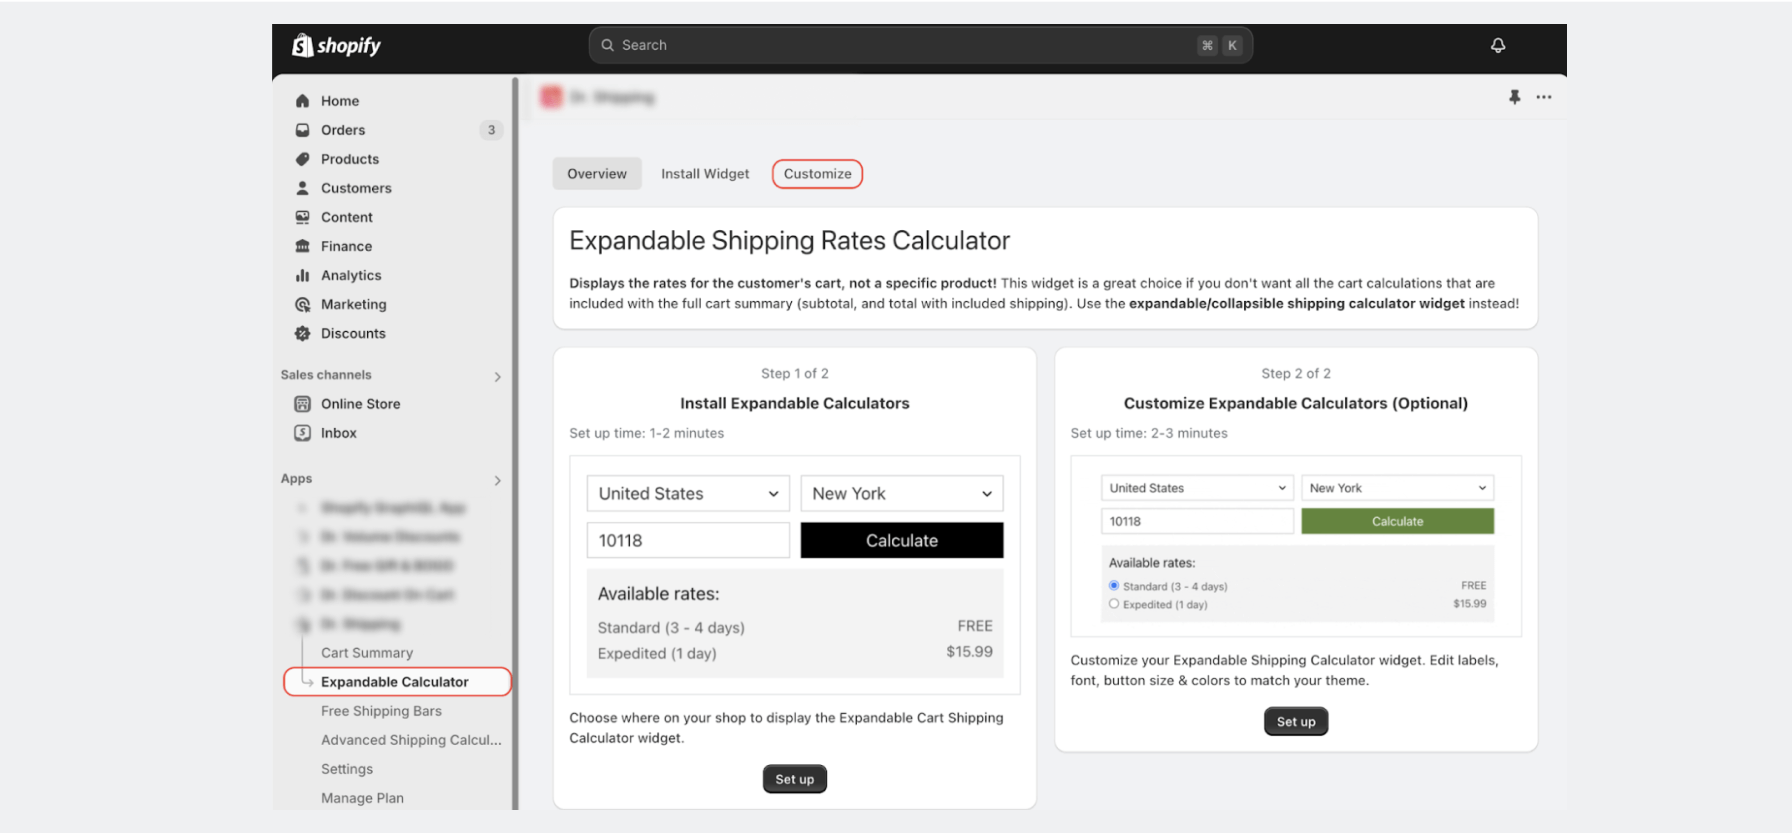
1. Go to Expandable Calculator widget customization page
2. Set up Address Placeholder Text and City/Suburb Placeholder Text
Troubleshooting
If you don’t see shipping rates based on the distance between the sender and the recipient on the checkout page or in the cart, or if your calculated rates do not match your expectations, check the following:
- Ensure that your Google API Key settings are correct, and verify your distance calculation settings.
- Verify that your cart widget, which allows for the calculation of the shipping rate, includes an address field. If it does not, you can enable this option in the widget settings.