
How to Create Tiered-Based Shipping Rules Using Import in Shopify Advanced Shipping Calculator
GENERAL
ADVANCED SHIPPING SETTINGS
SHIPPING PROFILE & ZONES
SHIPPING RULE/RATE SETUP
SHIPPING RULE/RATE SETUP USING CARRIER RATES INTEGRATION
SHIPPING RULES IMPORT/EXPORT FUNCTIONALITY
MERGING MULTIPLE SHIPPING RULES
PRODUCT DIMENSIONS SETUP
HISTORY/AUDIT TRAIL
COMMON ISSUES & FAQs
How to Create Tiered-Based Shipping Rules Using Import in Shopify Advanced Shipping Calculator
In this article, you will learn about:
- How data entered during import is reflected in the admin panel.
- How to create shipping rates based on the “Tiered” calculation type using the import feature.
For more basic information about import/export, please refer to this article: Understanding the shipping rules import file.
For more details on creating shipping rates based on the “Tiered” type, check out this article.
How is the data entered during import reflected in the admin panel?
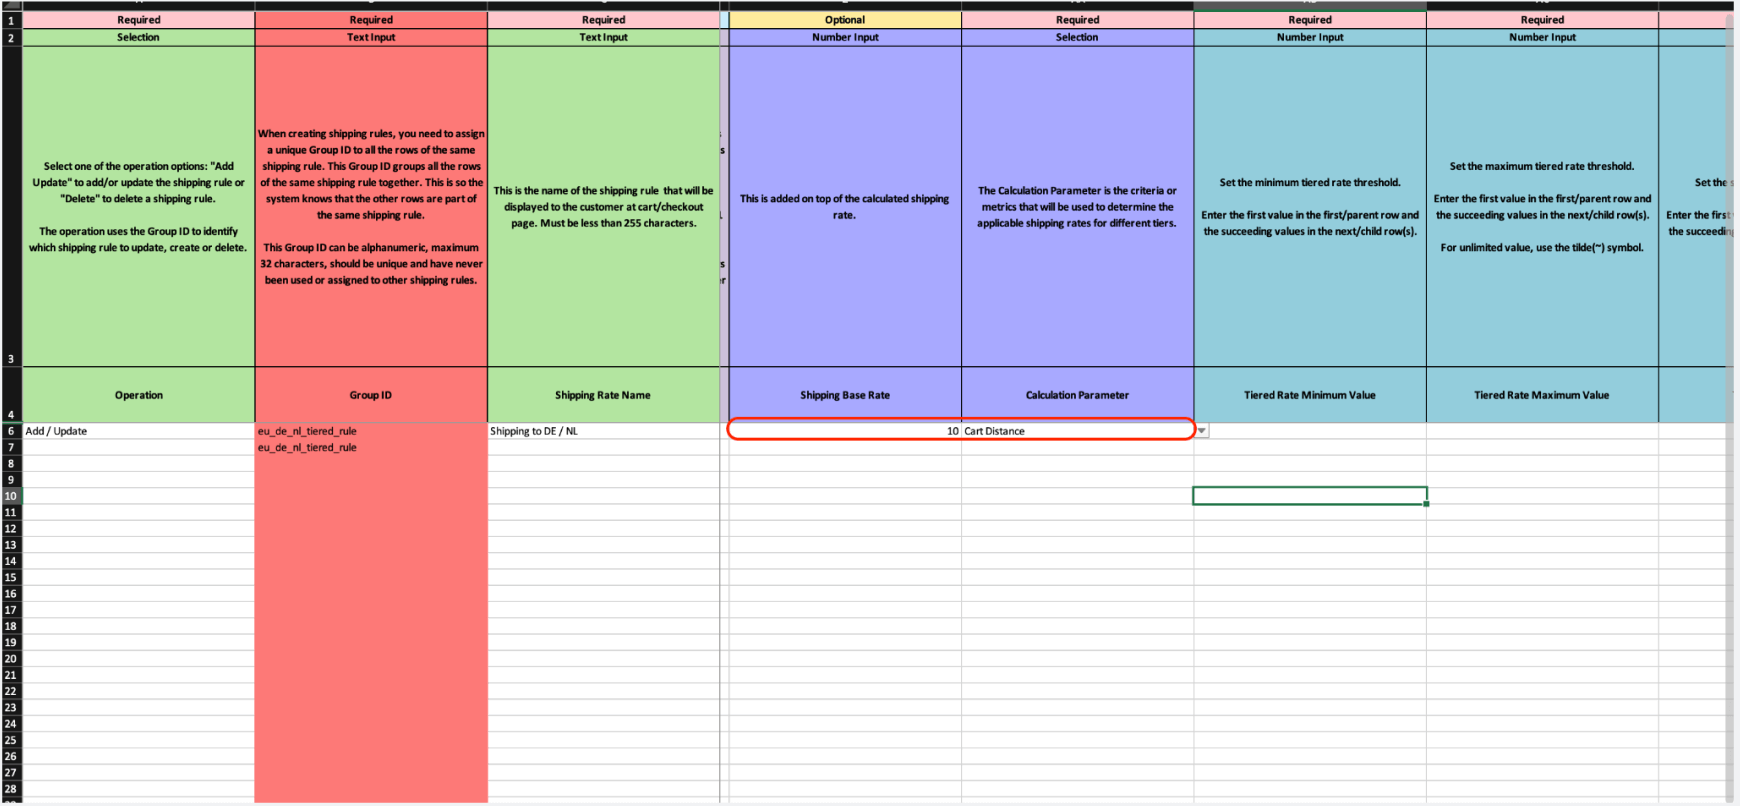
Let’s take a look at the calculation section in the import file. All fields related to rate configuration and promoting free shipping are located within the range from “Shipping Base Rate”
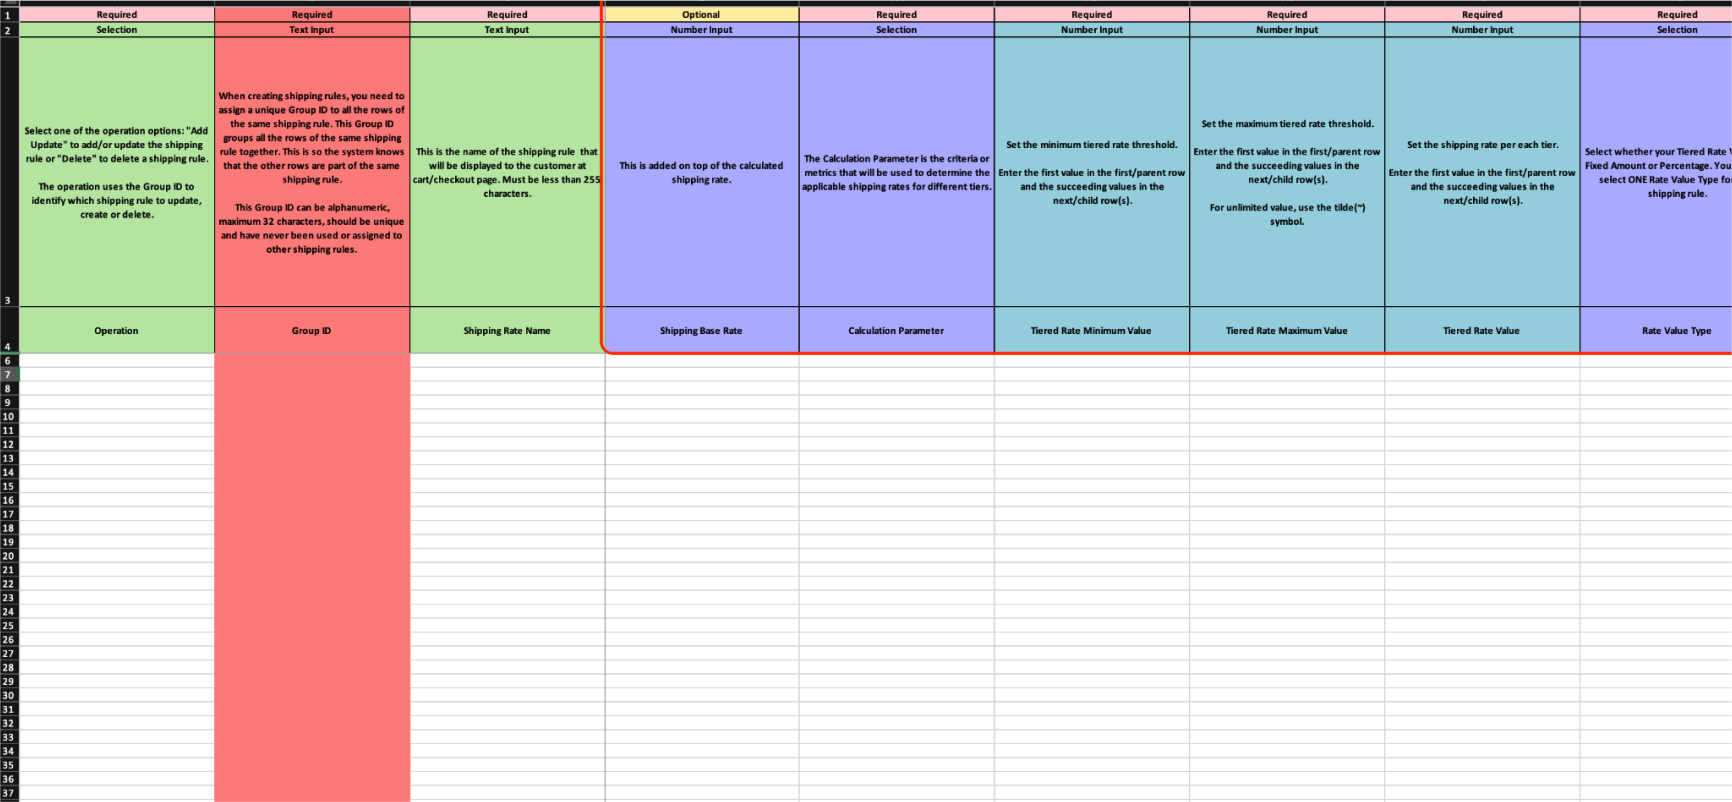
to “Label When The Cart Is Still Empty”.
Now, let’s go through each of these fields:
- The “Shipping Base Rate” field in the import corresponds to the “Set Shipping Base Price” field in the admin panel.
- The “Calculation Parameter” field in the import corresponds to the “Select Calculation Parameter” field.
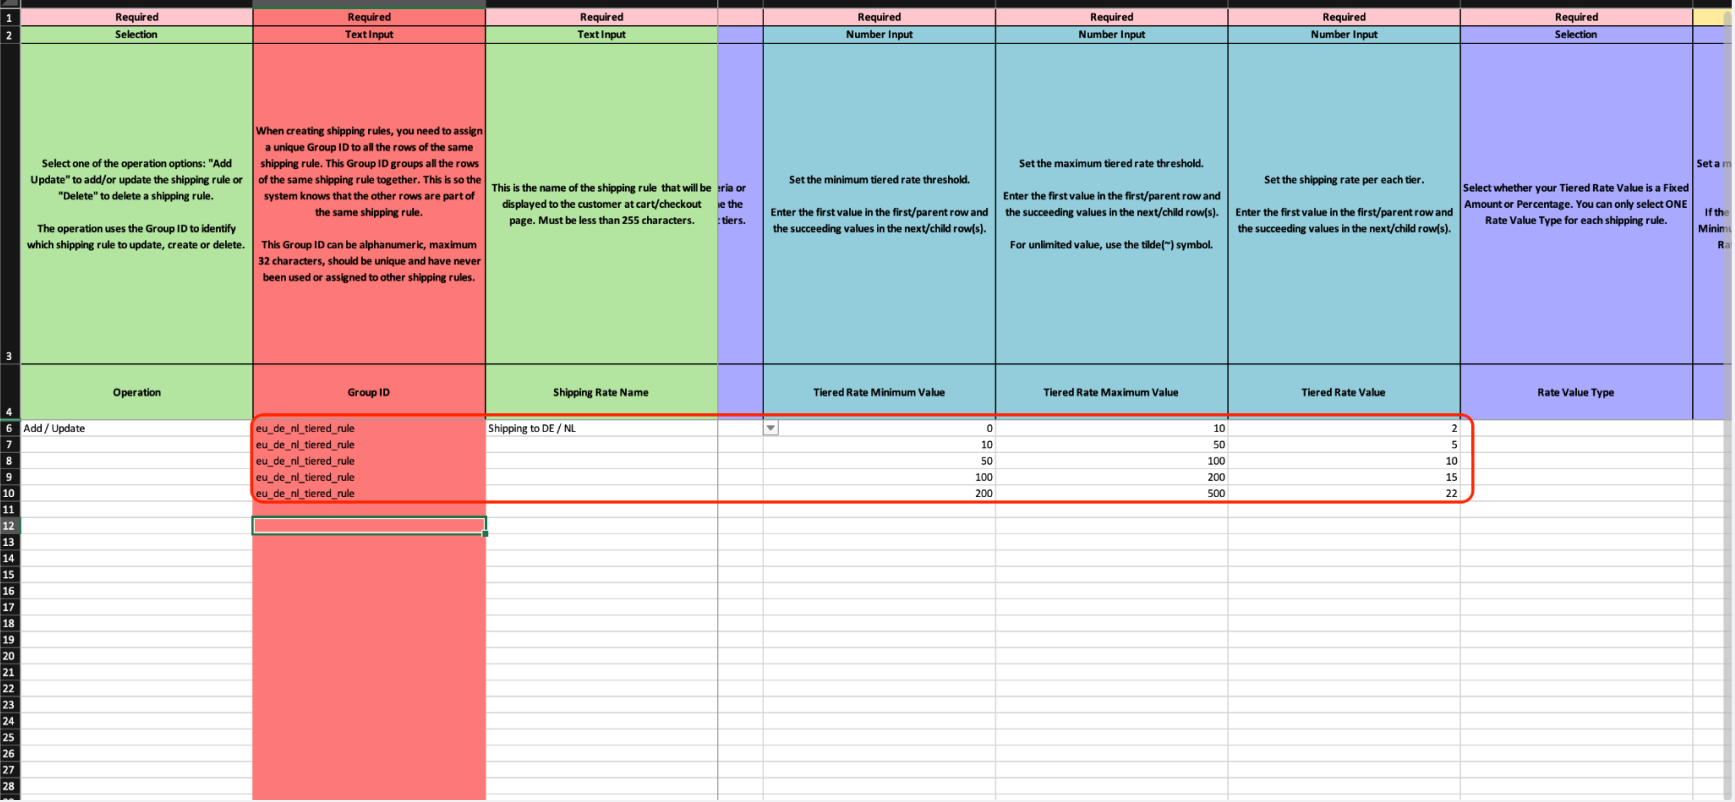
- The “Tiered Rate Minimum Value” field in the import corresponds to the “Min” field for each Tier in the configuration.
- The “Tiered Rate Maximum Value” field in the import corresponds to the “Max” field for each Tier in the configuration.
- The “Tiered Rate Value” field in the import corresponds to the “Rate” field for each Tier in the configuration.
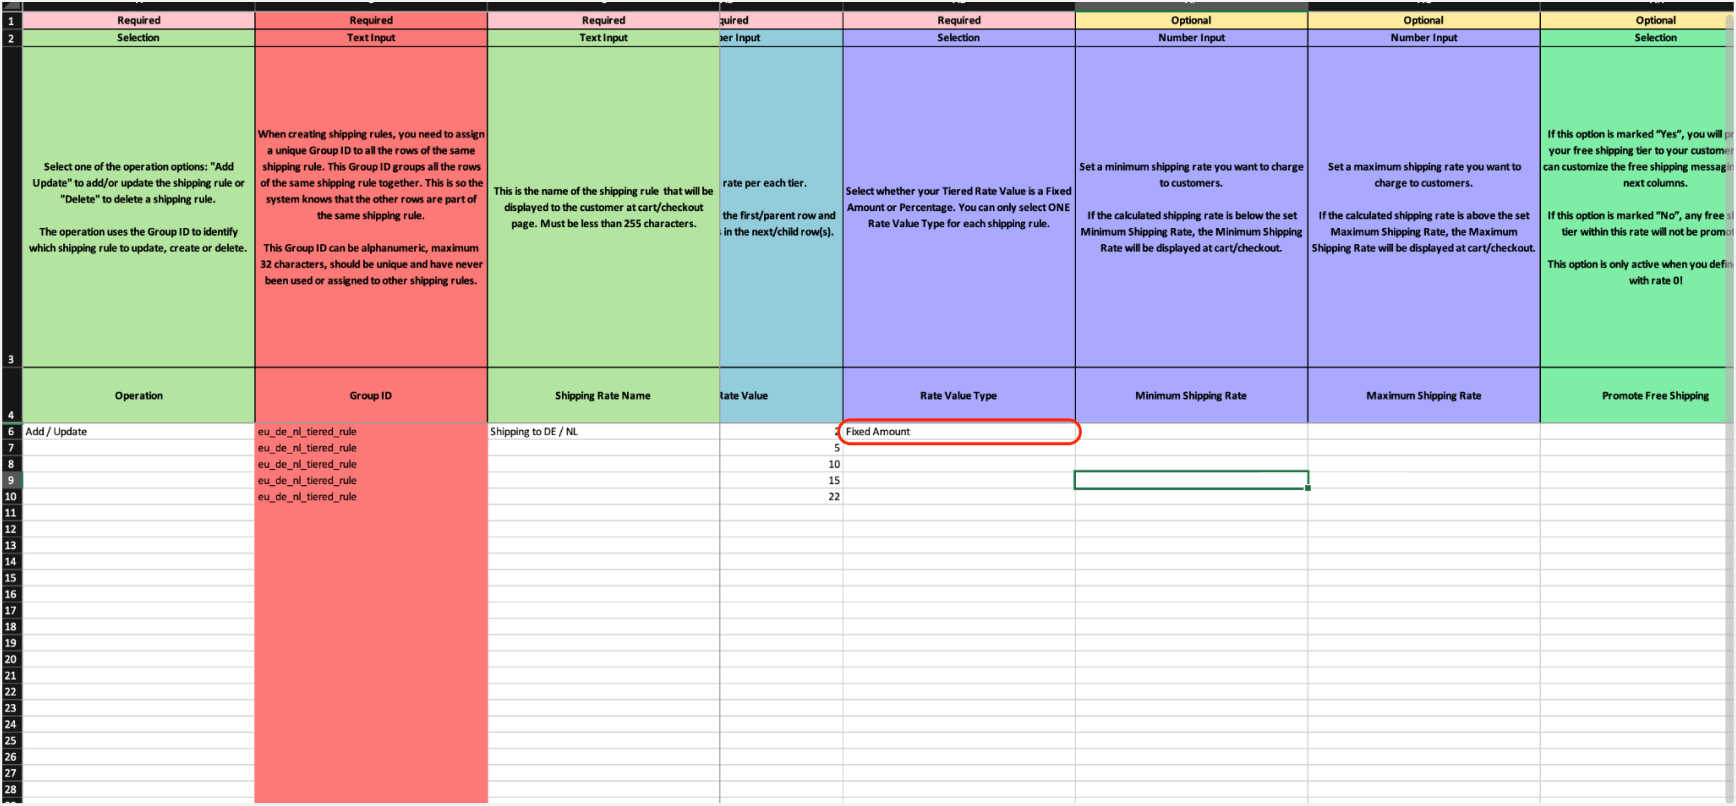
- The “Rate Value Type” field in the import corresponds to the “Fixed value / Percentage” field located above the “Tiers” section in the configuration.
- The “Multiply Product Shipping Value By Product Quantity” field in the import corresponds to the “Multiply Product Shipping Value By Product Quantity” in the configuration.
- The “Exclude Specific Products From the Calculation” field in the import corresponds to the “Exclude Specific Products From the Calculation” field in the configuration.
- The “Exclude Products Filtered By” field in the import corresponds to the “Excluded Products Filtered By” field in the configuration.
- The “Products to Exclude” field in the import corresponds to selected resources in the configuration.
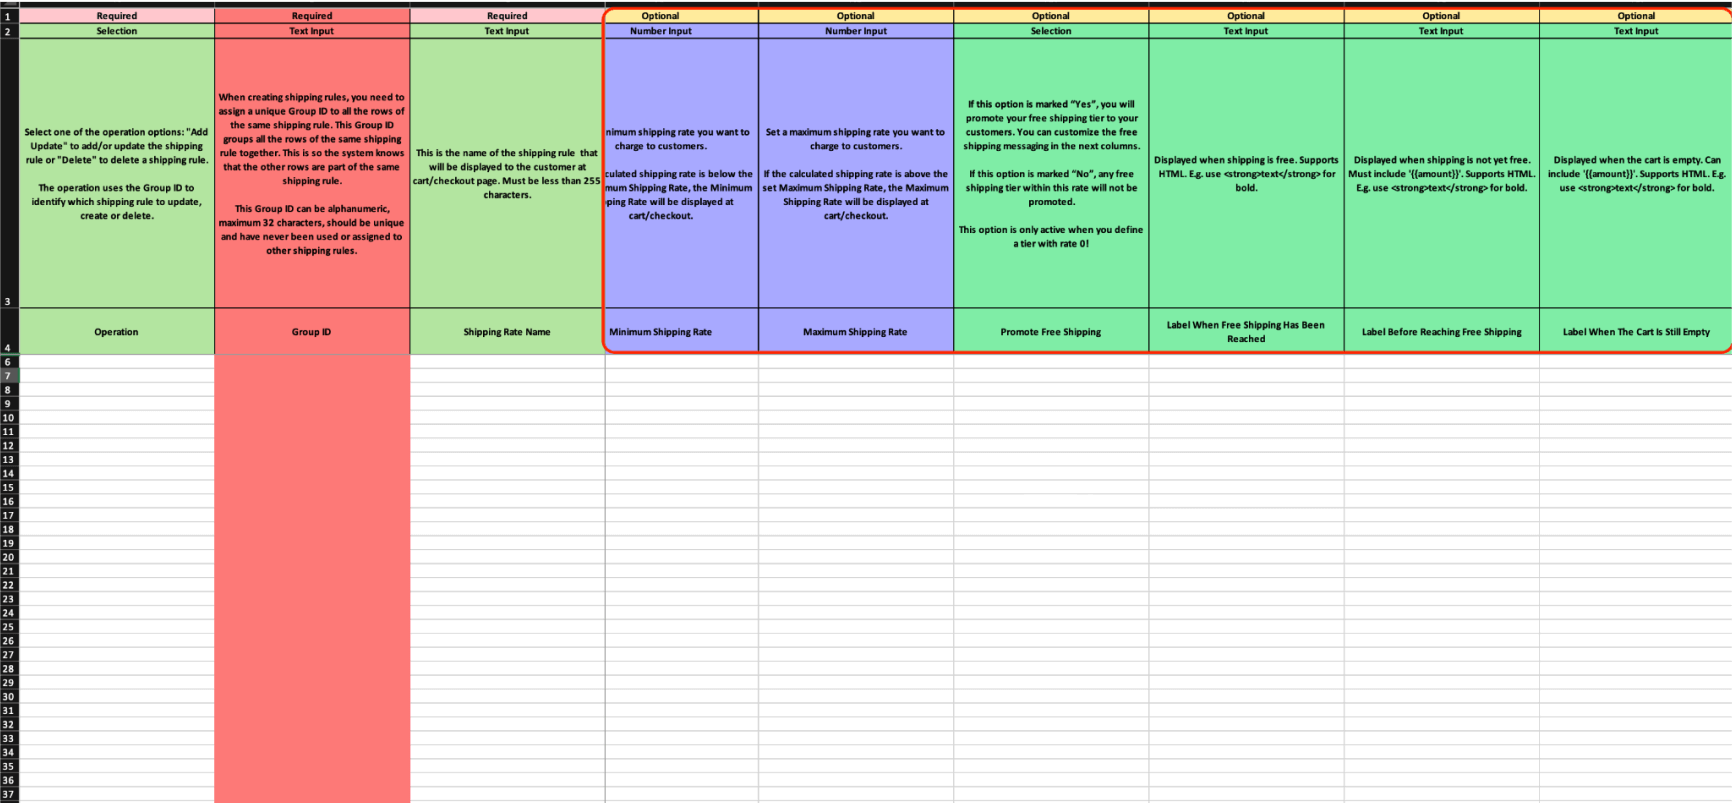
- The “Minimum Shipping Rate” field in the import corresponds to the “Set Minimum Shipping Rate (Optional)” field in the configuration.
- The “Maximum Shipping Rate” field in the import corresponds to the “Set Maximum Shipping Rate (Optional)” field in the configuration.
- The “Promote Free Shipping” field in the import corresponds to the “Promote Free Shipping in the Free Shipping Bar (Optional)” field in the configuration.
- The “Label When Free Shipping Has Been Reached” field in the import corresponds to the “When Free Shipping Has Been Reached (optional)” field in the configuration.
- The “Label Before Reaching Free Shipping” field in the import corresponds to the “Before Reaching Free Shipping (optional)” field in the configuration.
- The “Label When The Cart Is Still Empty” field in the import corresponds to the “When The Cart Is Still Empty (optional)” field in the configuration.
How to create shipping rates based on the "Tiered" calculation type using the import feature?
To create a “Tiered” shipping rule using the import feature, you first need to download the base file where you will start working on the import. If you are unsure how to download the base file, please refer to our article explaining this process.
Once you have the file, you can begin editing it.
Make sure that you have the file open on the “Tiered Rate Template” sheet
Let’s start by creating the main row (parent row—if you are not yet familiar with the parent/child row concept, read this article).
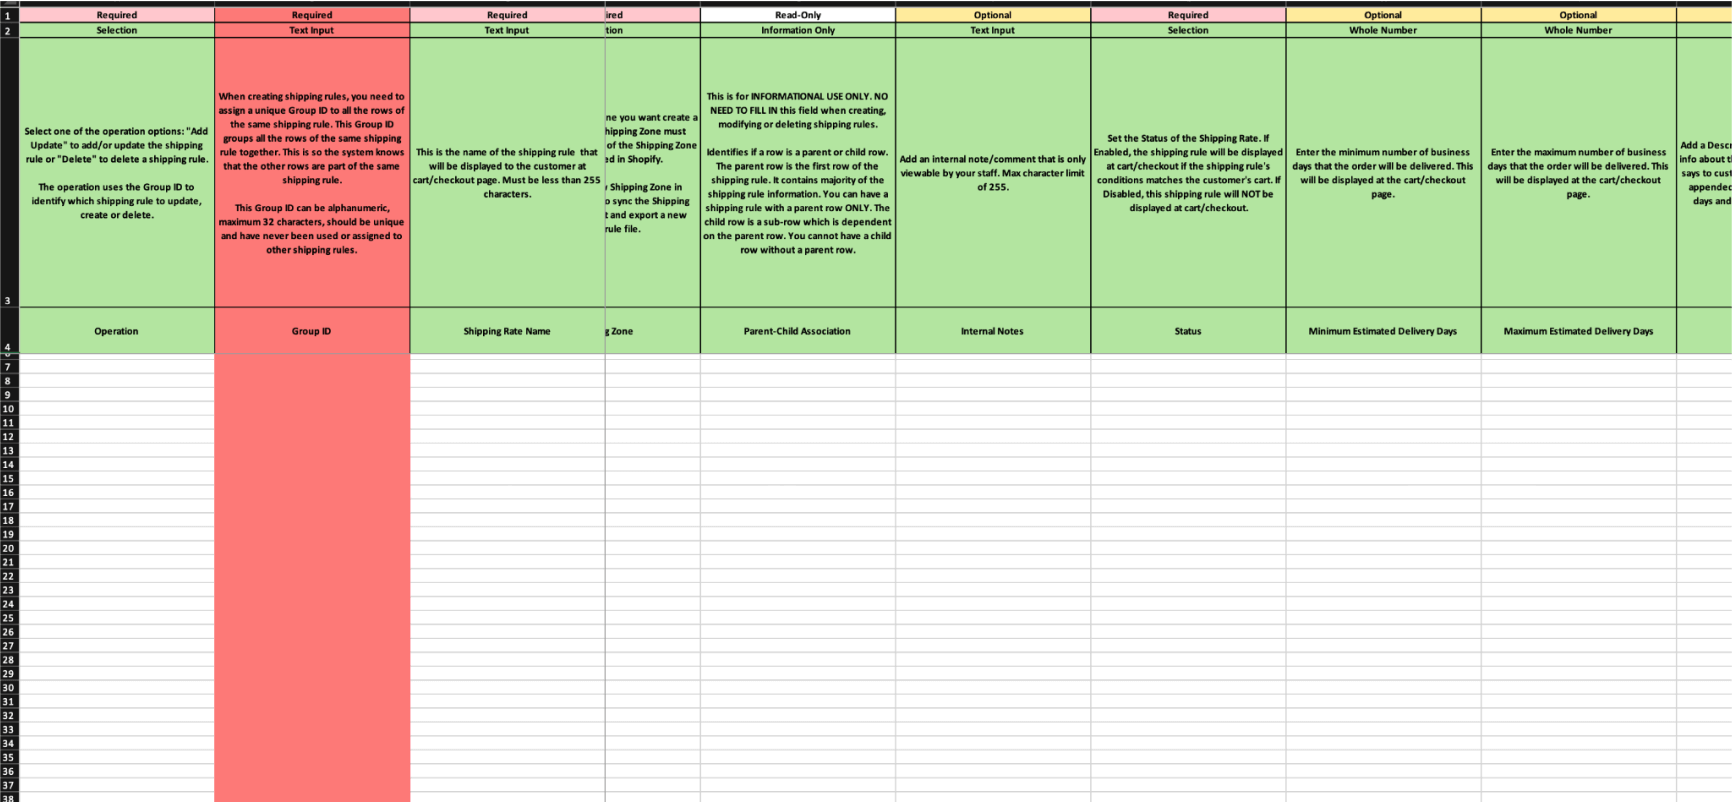
Begin by selecting “Add / Update” in the operation field, then specify the group_id (this can be any value you choose, but make sure it doesn’t duplicate an existing one).
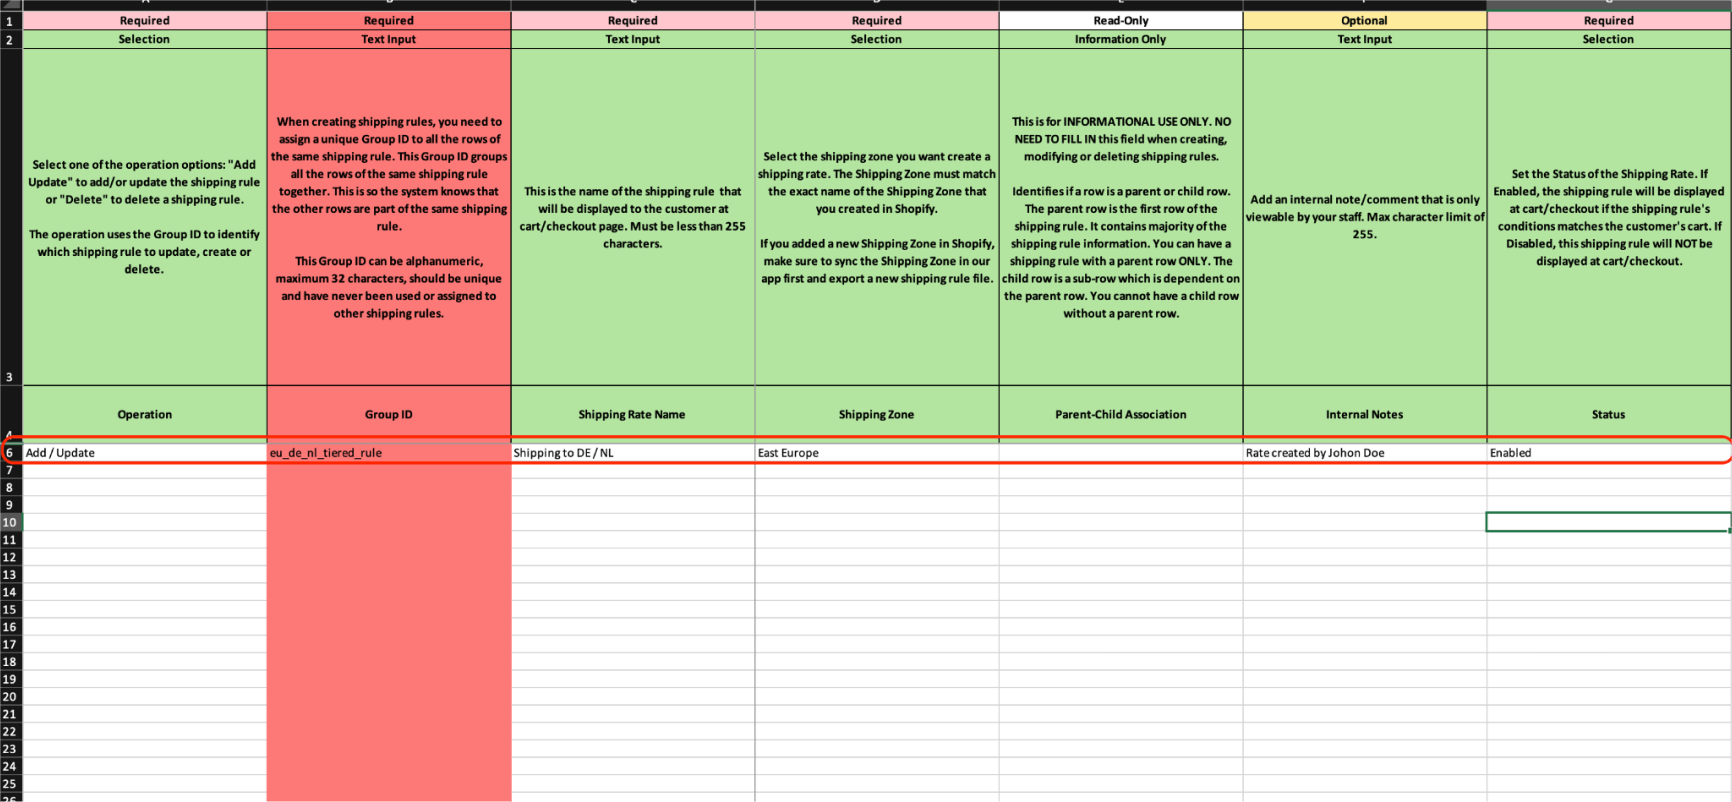
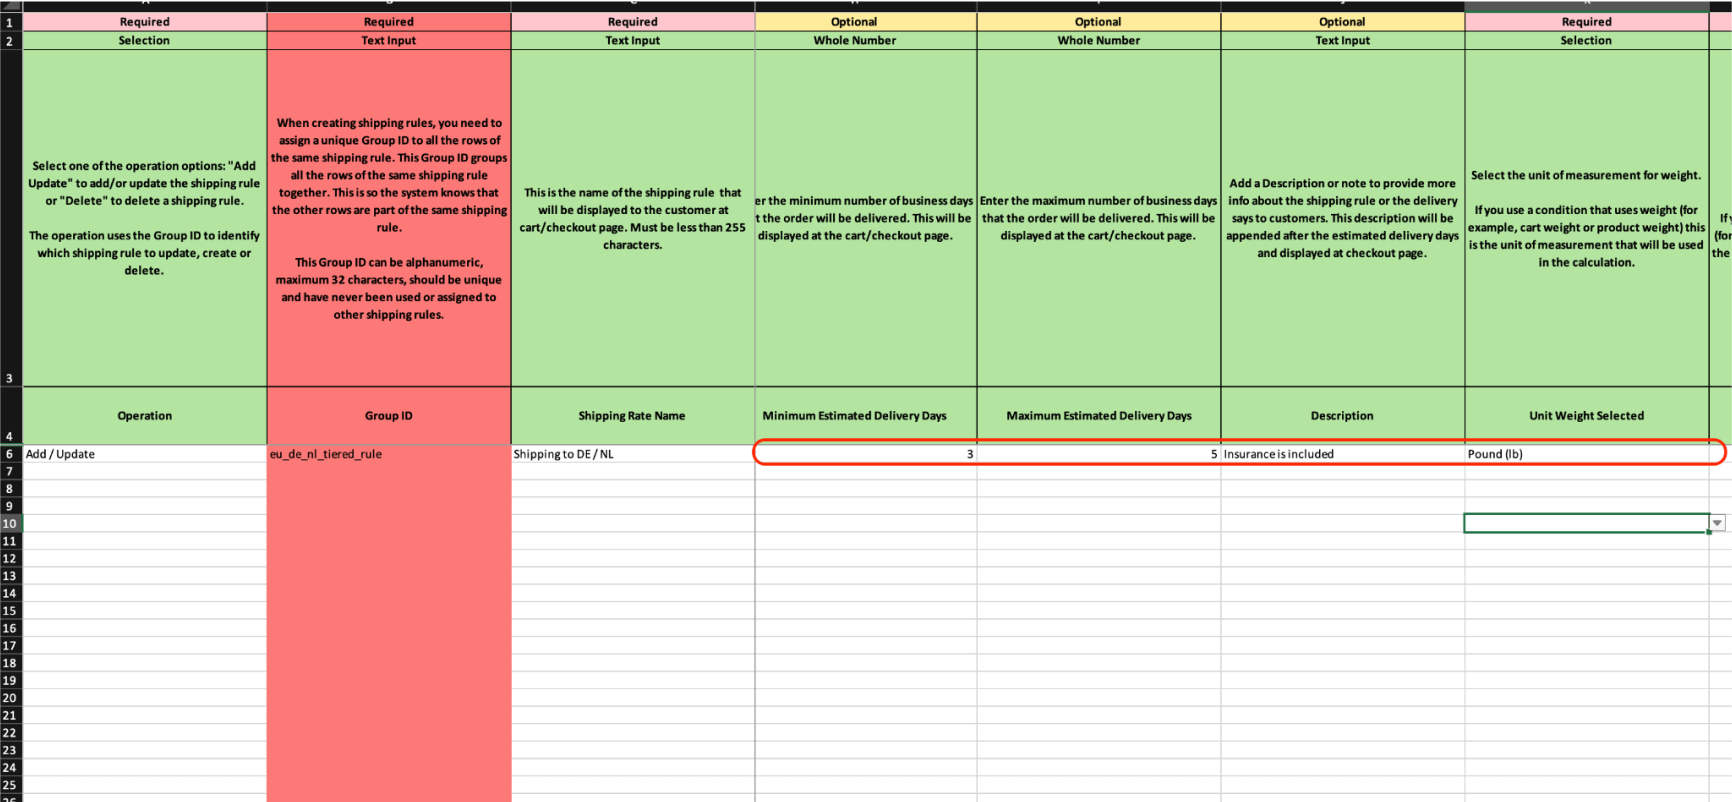
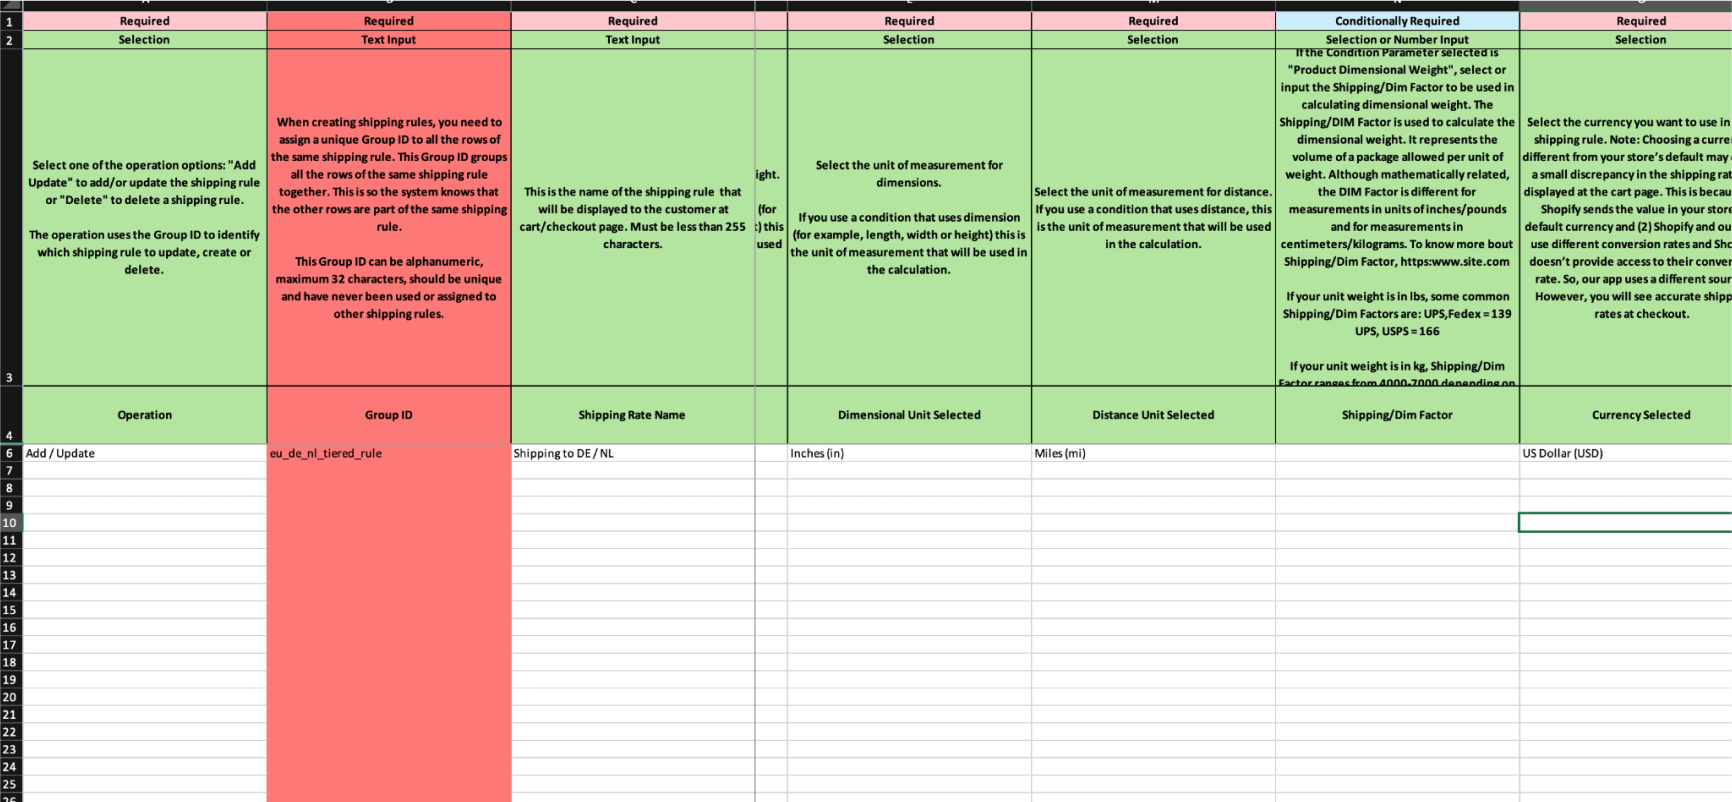
Next, fill in the basic information about this shipping rate, such as “Rate Name,” “Shipping Zone Name,” “Internal Description,” “External Description,” “Status,” etc.
The next section is for selecting the location for this rate. For example, let’s choose two countries, and note that regions and postal codes will not be included in the filter.
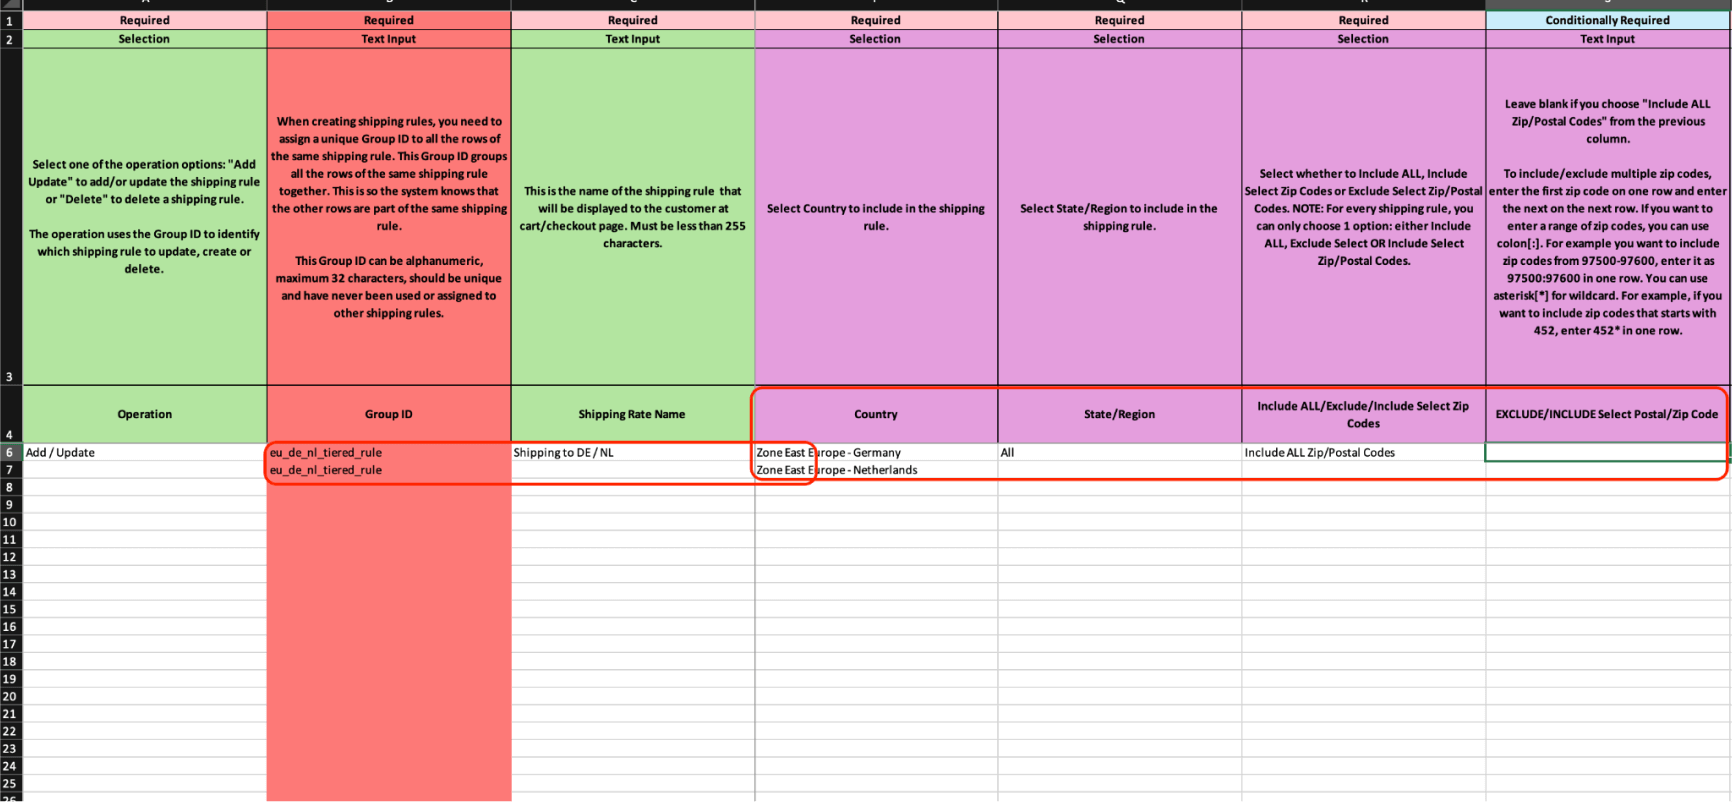
Note that when adding a new row, you should also add the group ID to that row.
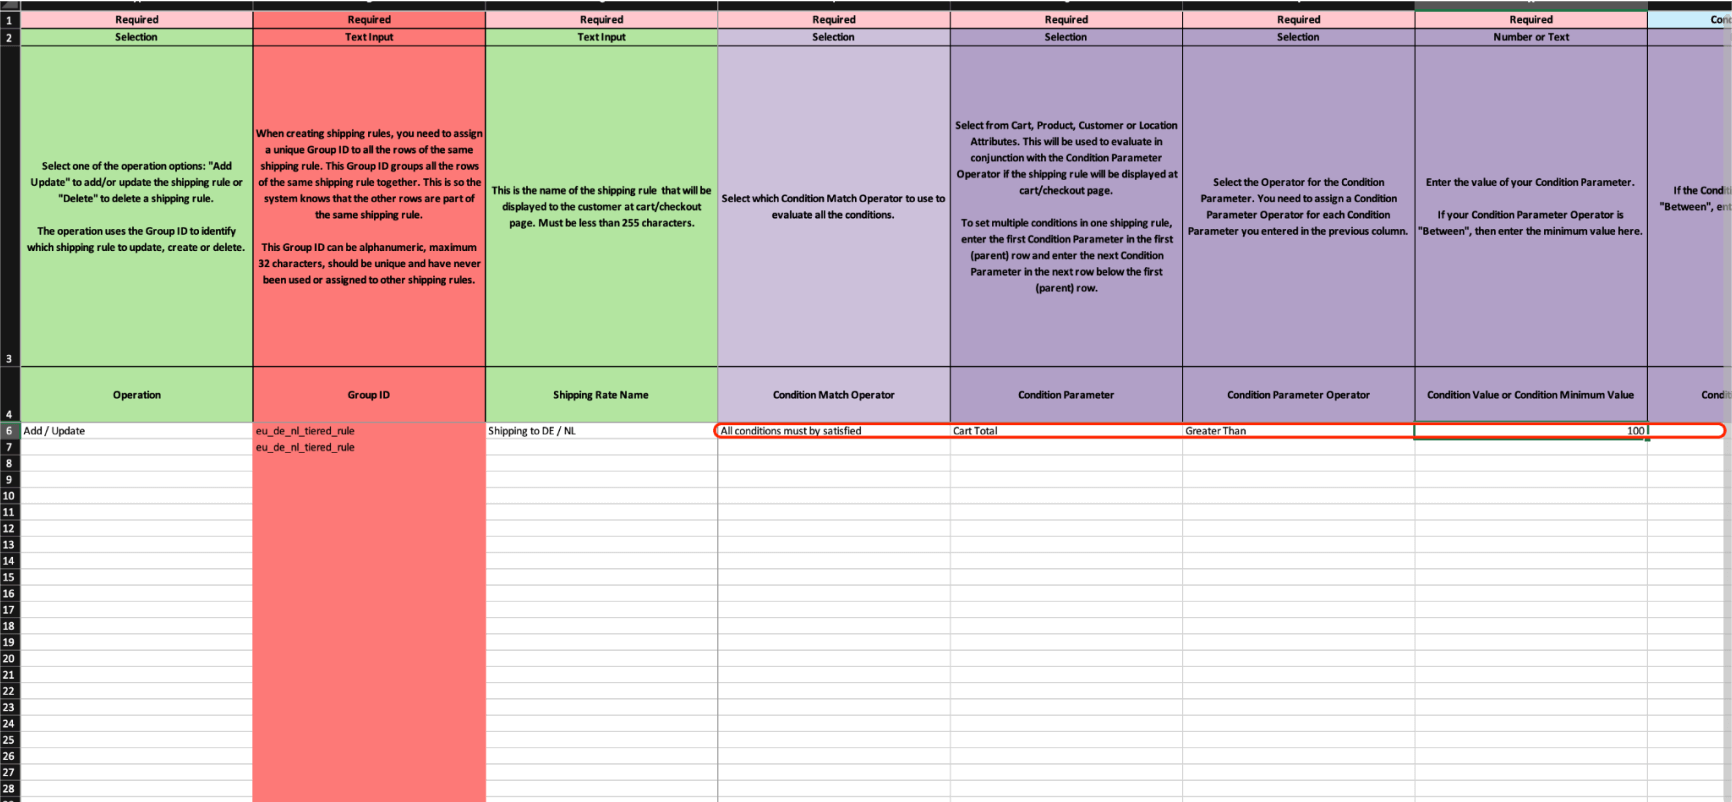
You must then set at least one condition that must be met for this rate to be offered during checkout. For example, let’s create a condition that the cart value must be over 100 USD.
The next step is to create the calculation configuration. We need to specify the base rate value and the calculation parameter that will define our tiers.
Now, we can create the calculation tiers. For this example, we will create five tiers based on the distance between the sender and the recipient.
Note that when adding a new row, you should also add the group ID to that row.
Then, determine whether the tier will be calculated as a fixed amount or a percentage.
In the next step, if your calculation parameter configuration meets the conditions for the shipping rate to be calculated based on the number of products, you can set “Multiply Product Shipping Value By Product Quantity” to “Yes.” The default value for this field is “No.” If you’d like to learn more about how to use this feature, read this article.
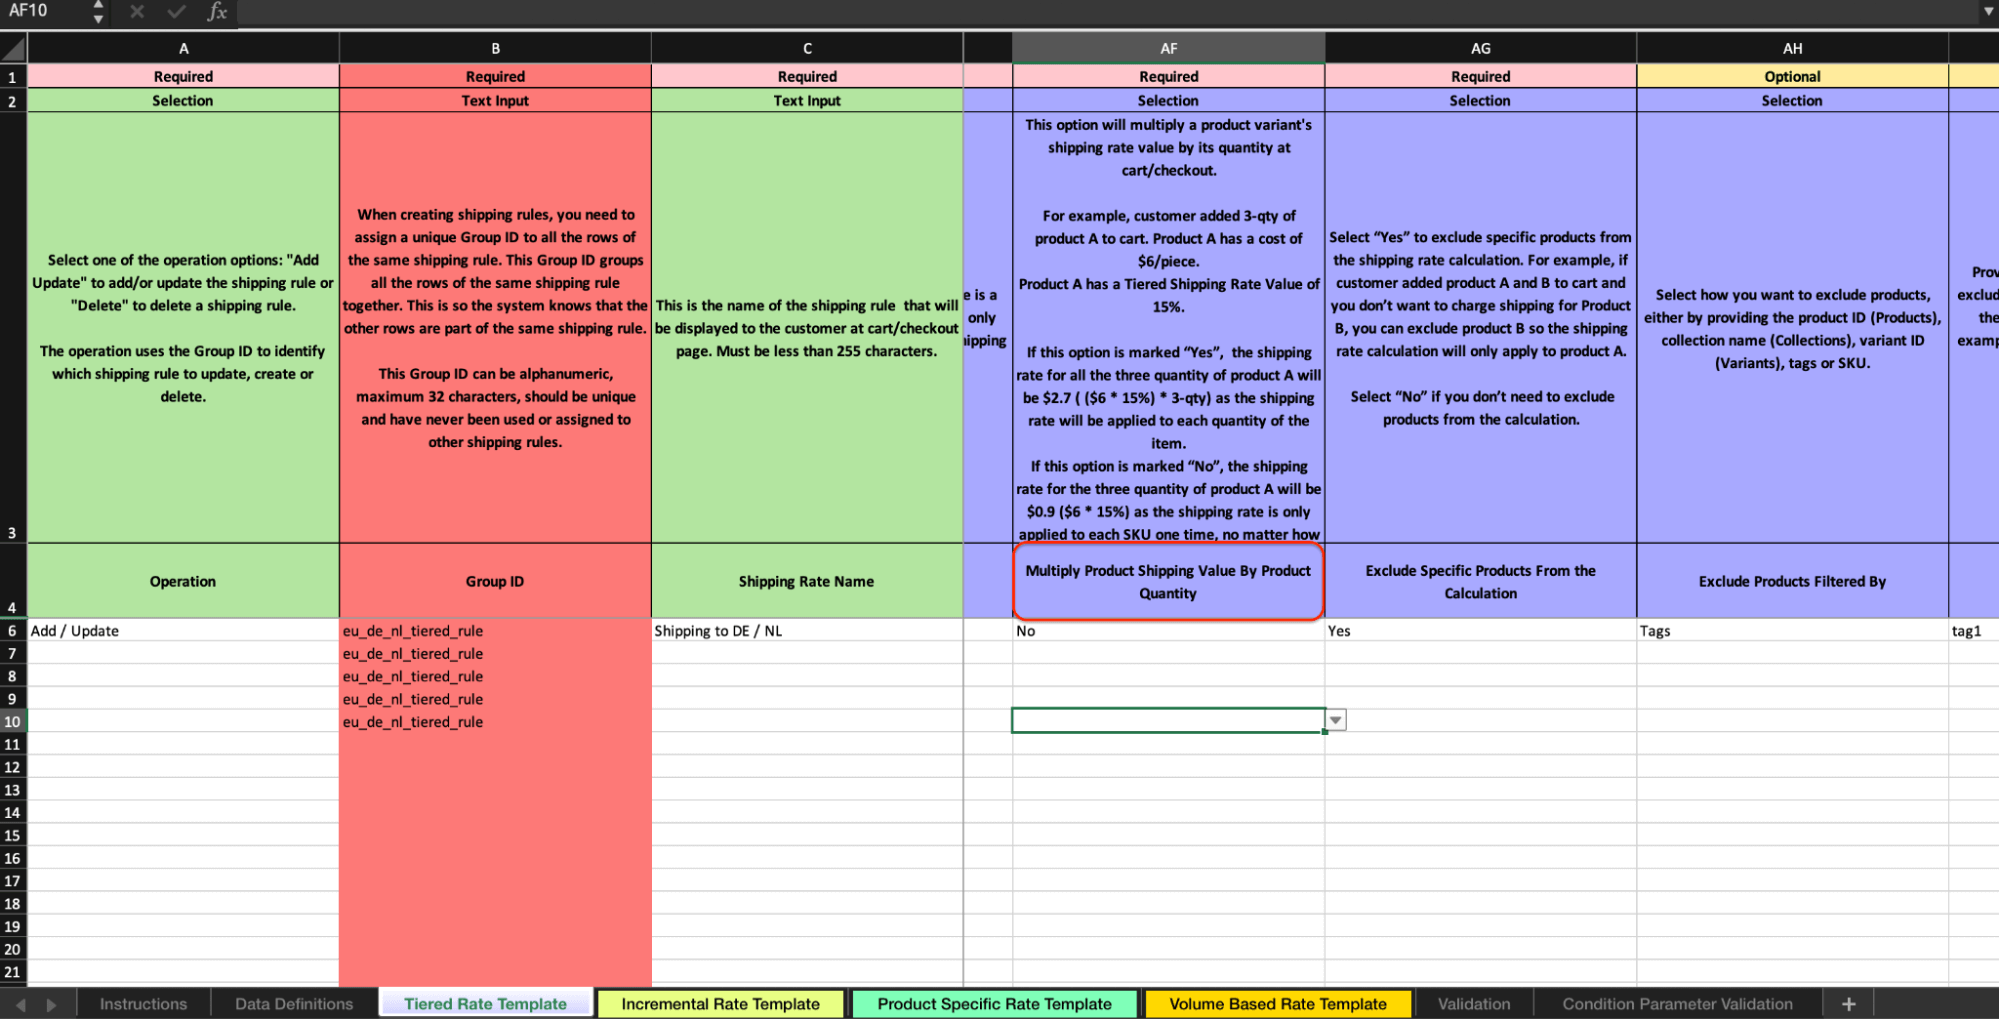
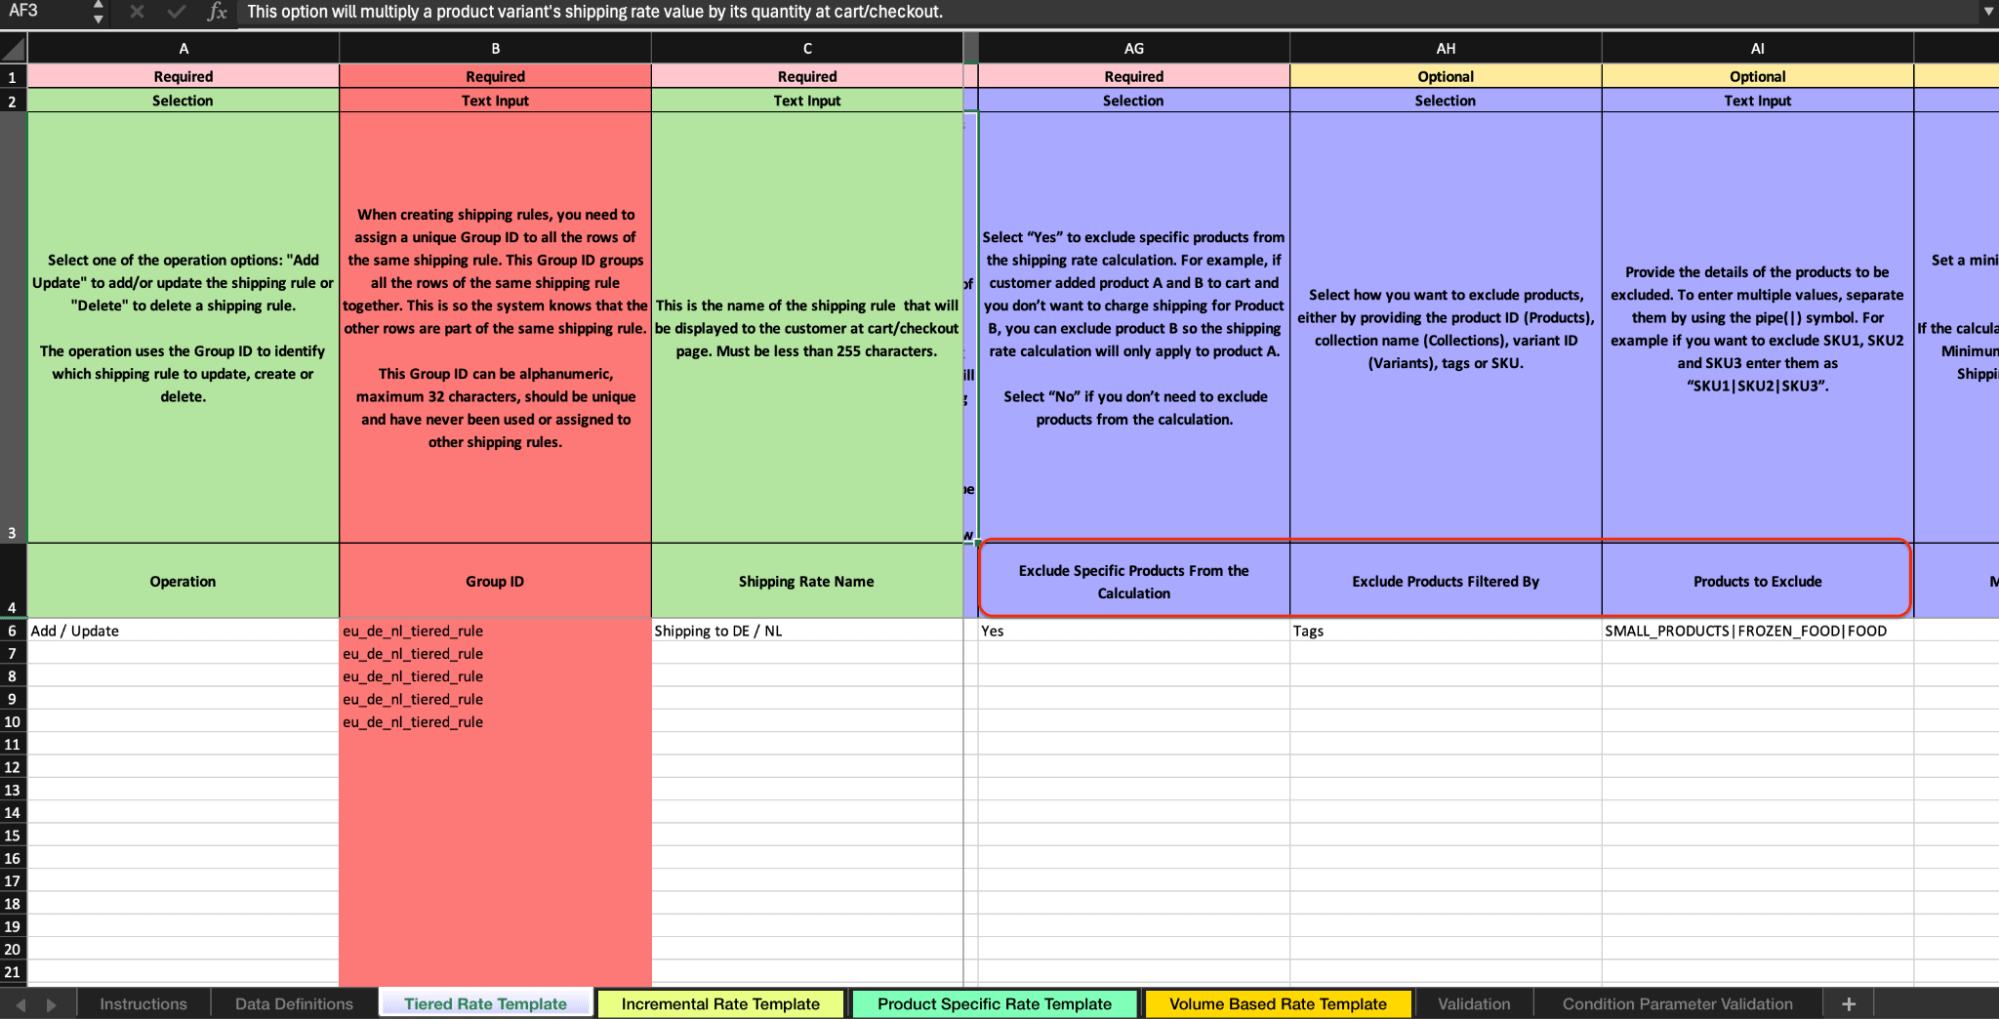
Next, you can use the option to exclude products from the calculation. There are 3 fields available for this:
- Exclude Specific Products From the Calculation (Yes / No)
- Exclude Products Filtered By (Products / Variants / Collections / Tags / SKUs)
- Products to Exclude (list of resources)
If you selected “No” in the “Exclude Specific Products From the Calculation” field, you do not need to define the remaining fields. If you selected “Yes,” you will also need to specify the filter type and list of values. For example, “Tags” and in the excluded products, you can enter “SMALL_PRODUCTS|FROZEN_FOOD|FOOD.” If you want to learn more about this feature, read this article.
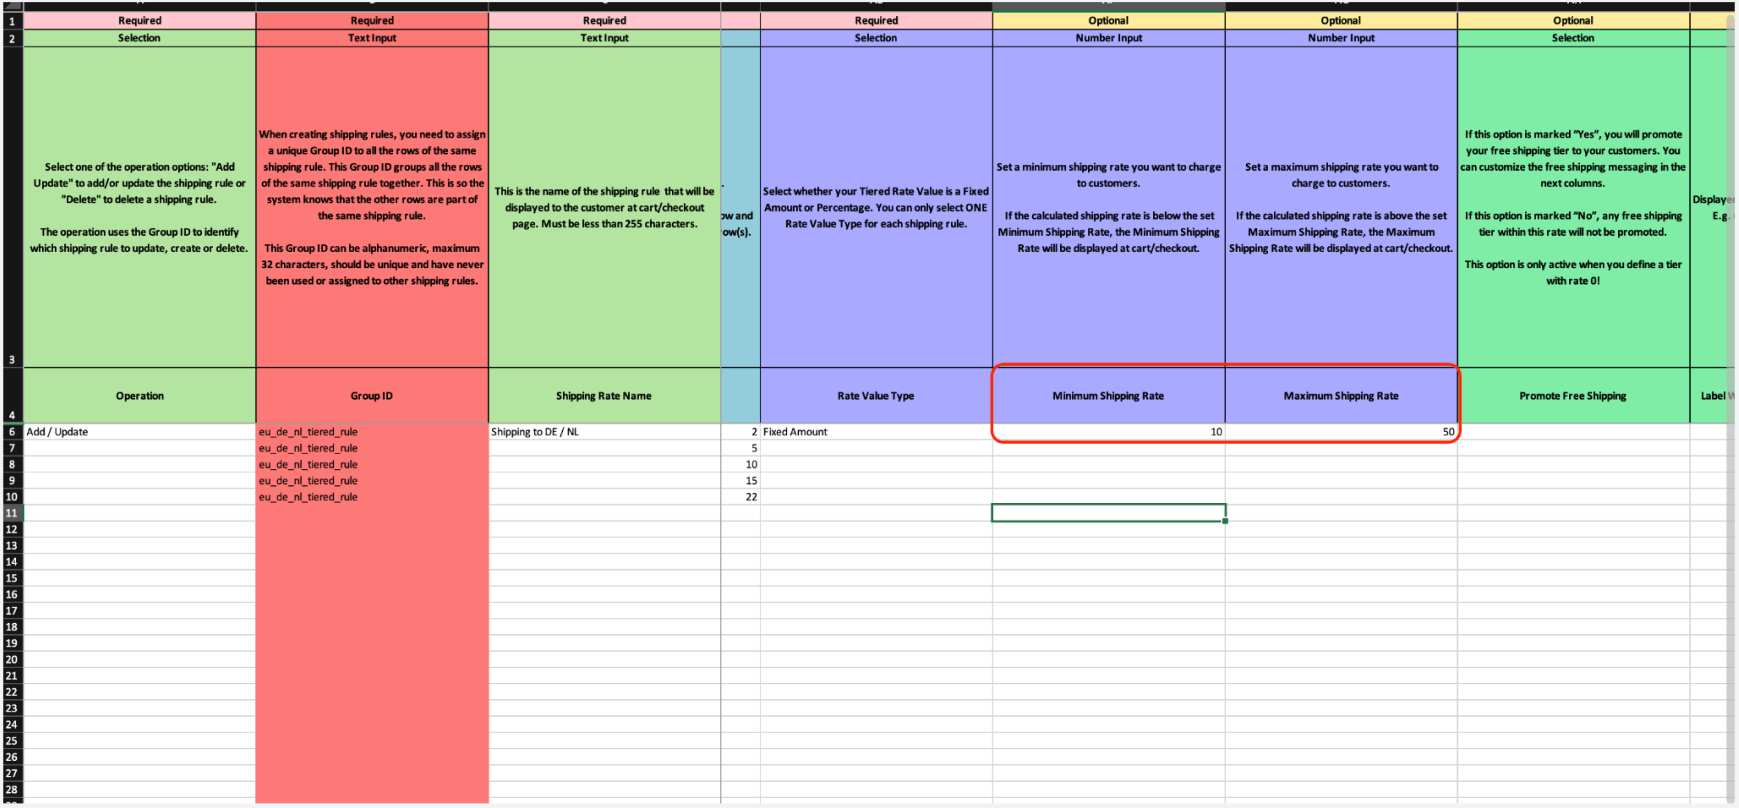
Next, you can specify the minimum and maximum shipping rates.
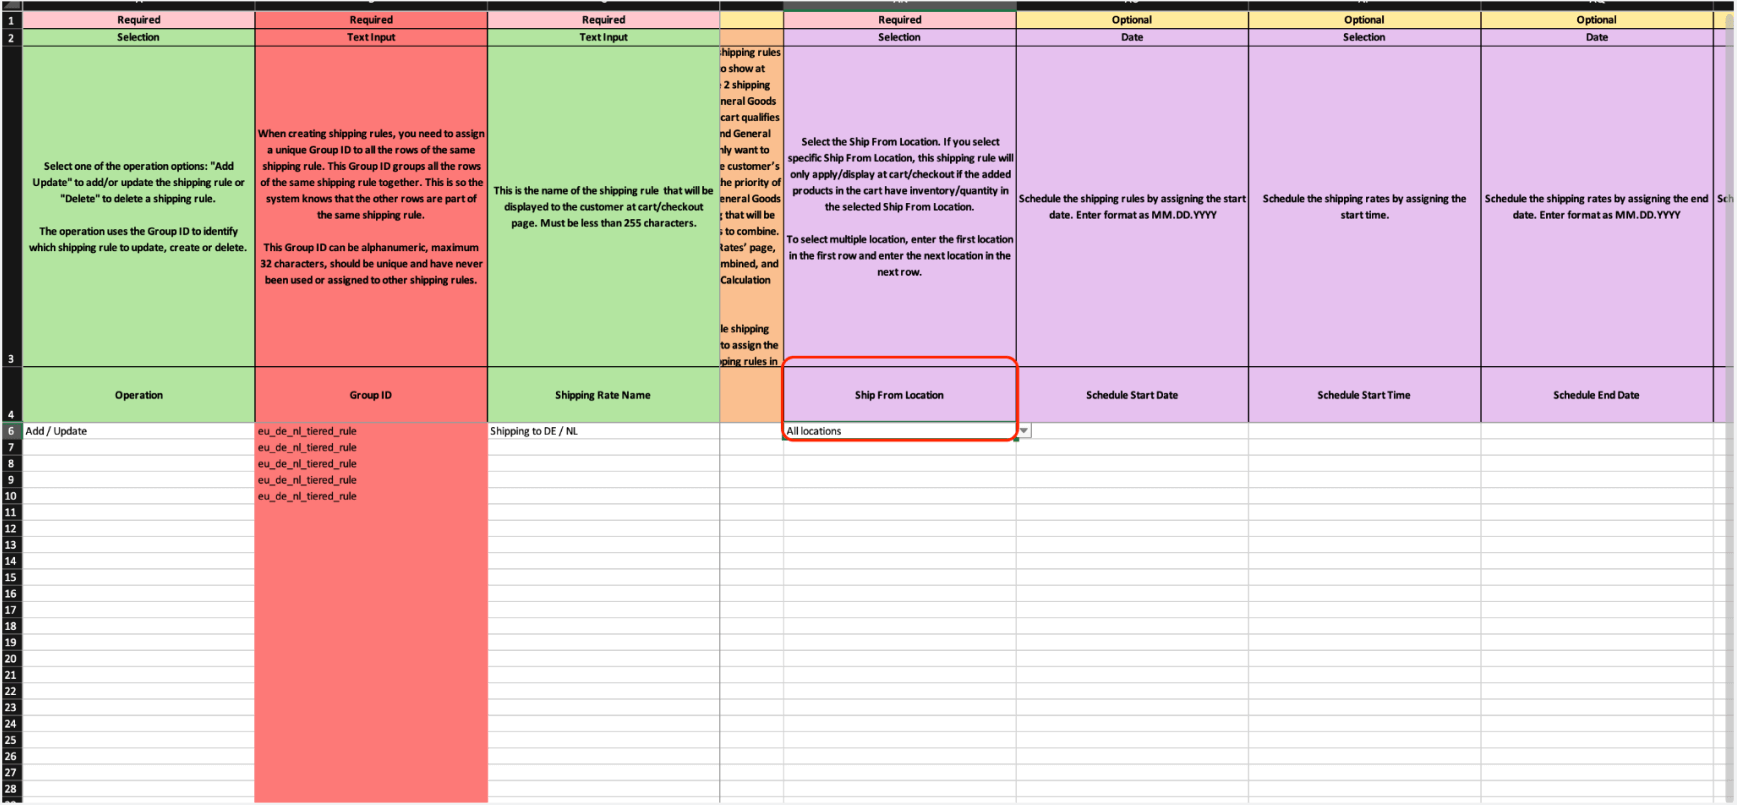
A required element is selecting the starting addresses from which this rate will be available. In this example, we will choose all locations.
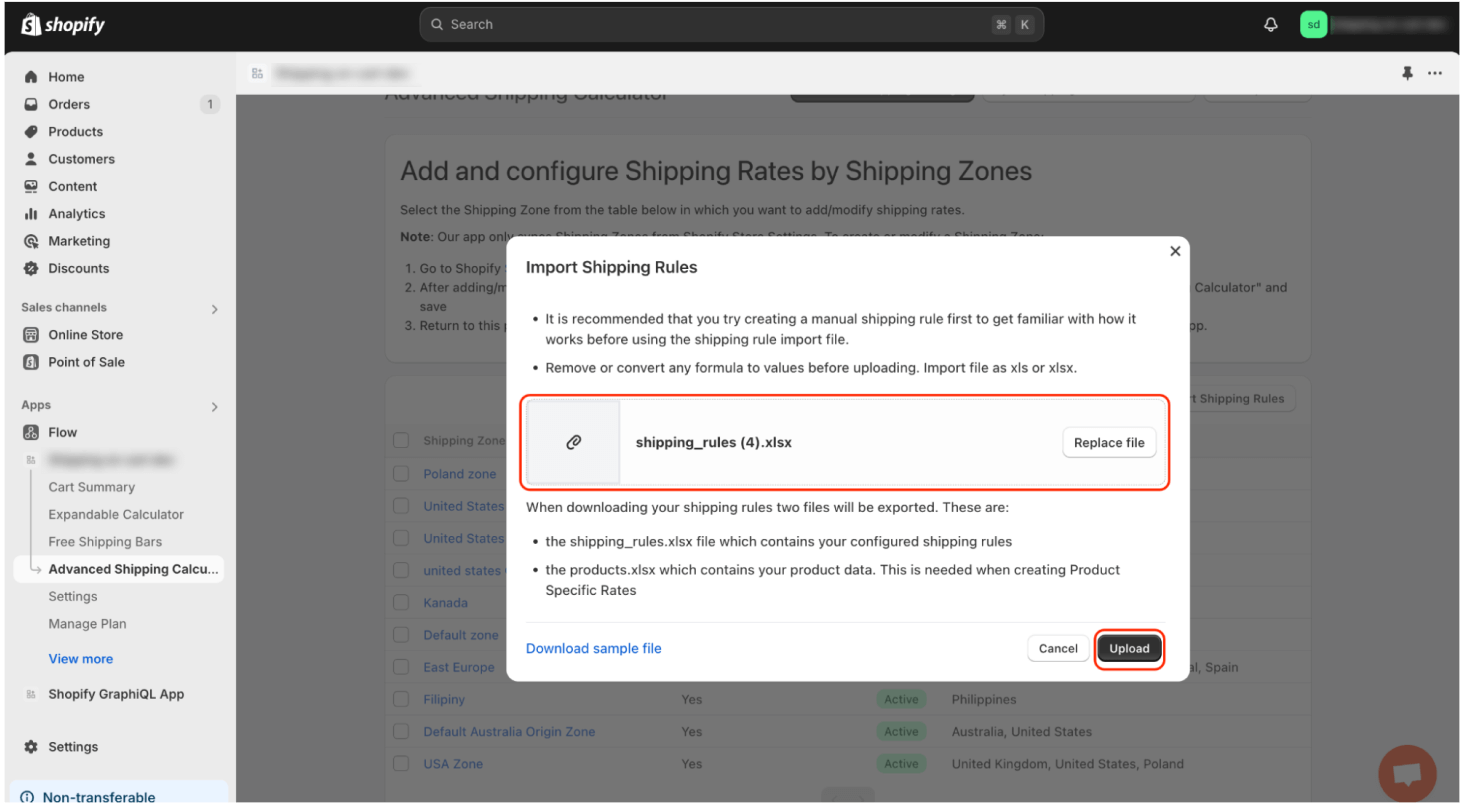
Once the file is configured, you can save it and upload it through the import option in the application.
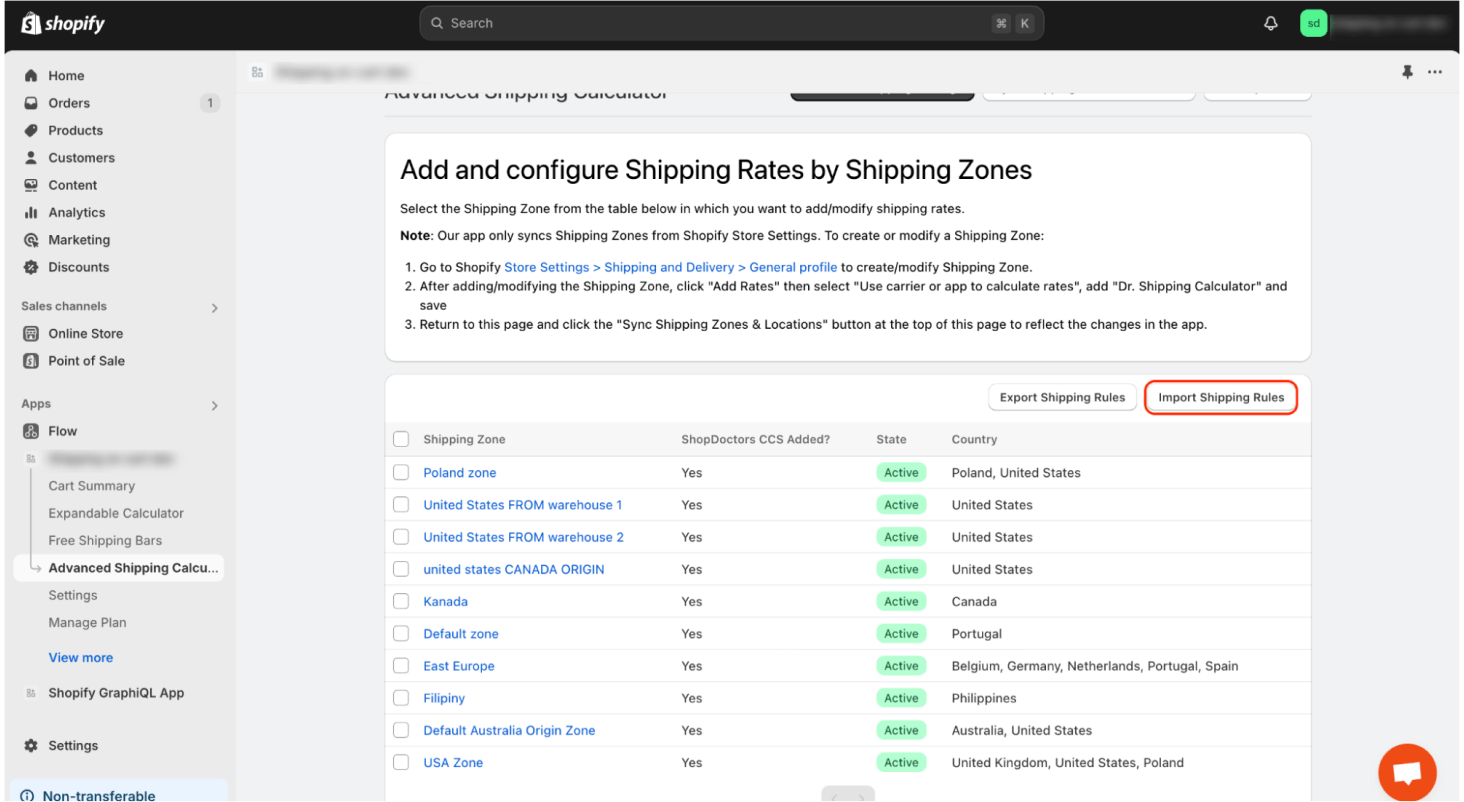
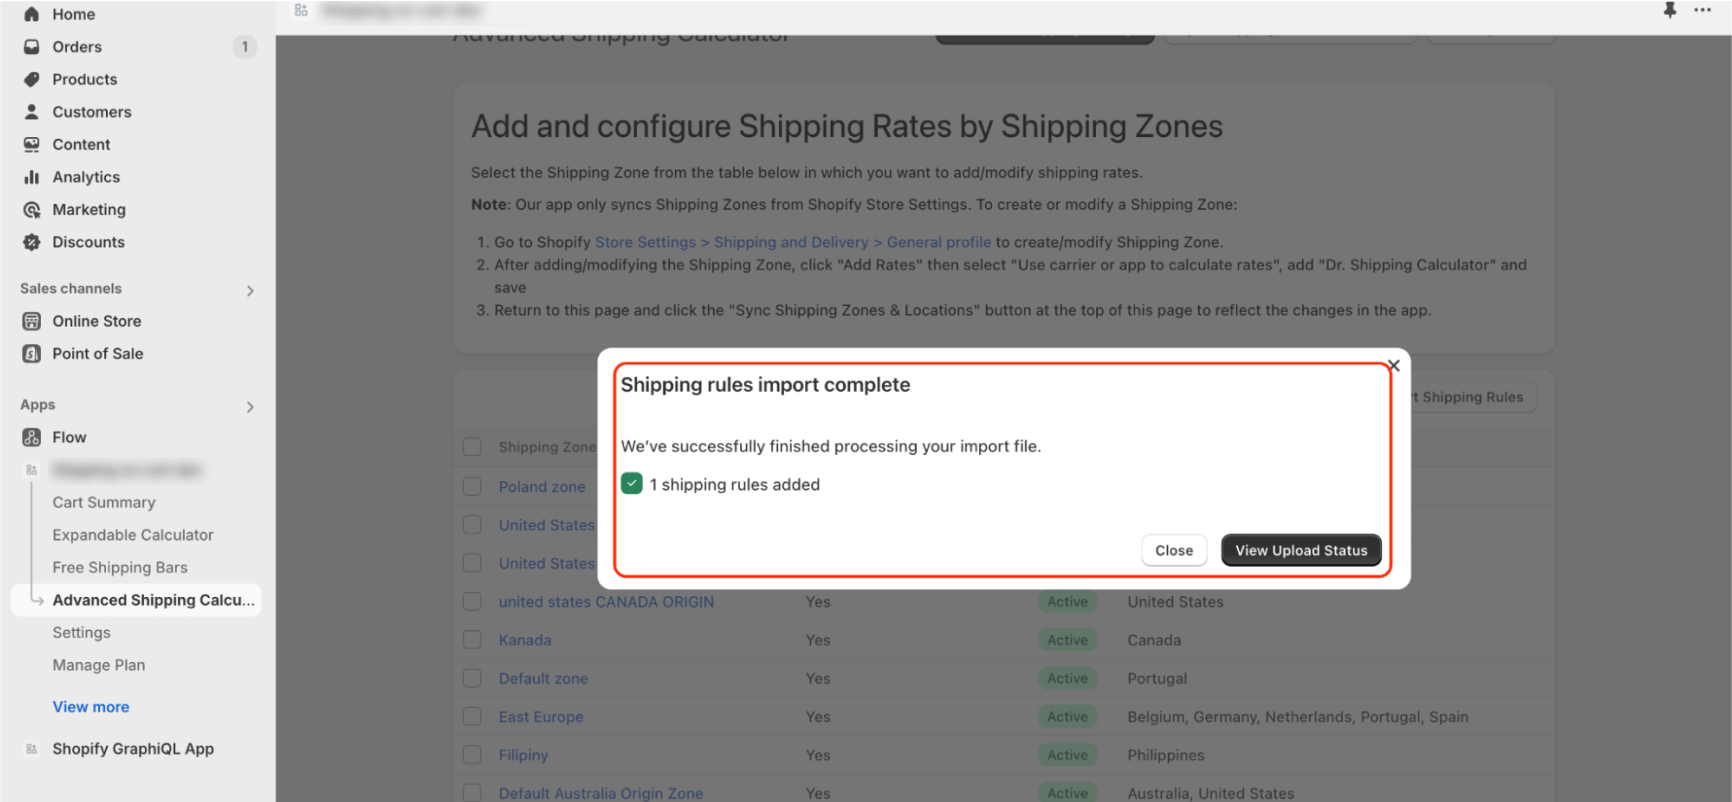
When the import is complete, you will be notified of the changes that have occurred during the import process. To learn more about the import summary, read this article.
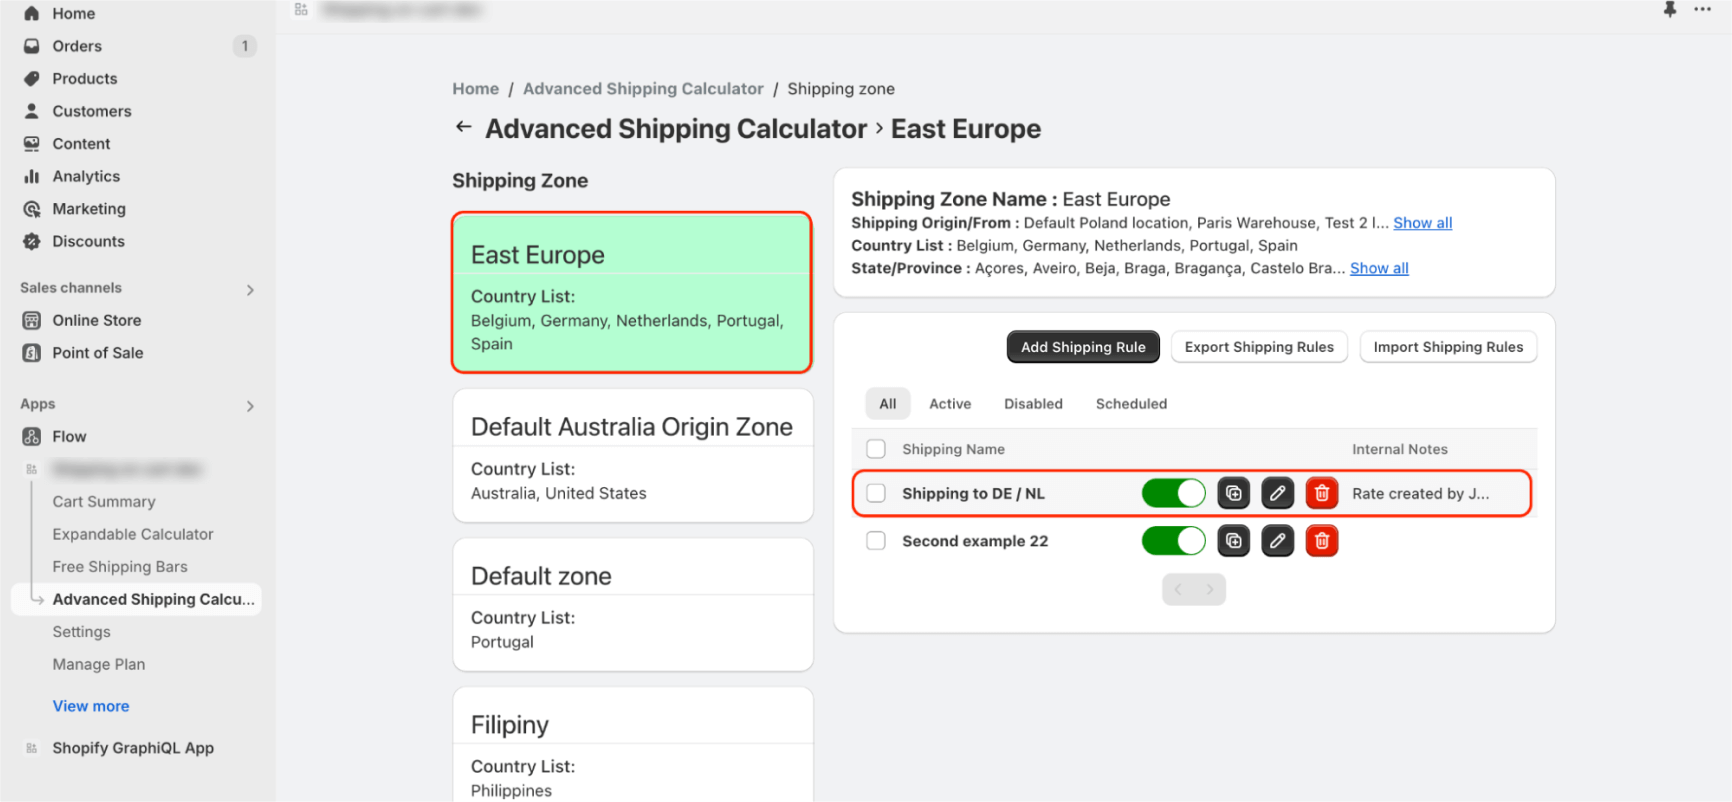
As you can see, our imported rate was successfully created in East Europe zone.
Conclusion
Creating tiered shipping rules using the import feature allows you to efficiently manage complex shipping rate structures by defining specific tiers based on various parameters like distance or order value.
By following the steps outlined in this guide, you can accurately reflect your import data within the admin panel, ensuring that your shipping rates are configured correctly. Always remember to review the imported data and test the rates to confirm they function as expected during checkout.