
Understanding the Shipping Rules Import File in Shopify Advanced Shipping Calculator
GENERAL
ADVANCED SHIPPING SETTINGS
SHIPPING PROFILE & ZONES
SHIPPING RULE/RATE SETUP
SHIPPING RULE/RATE SETUP USING CARRIER RATES INTEGRATION
SHIPPING RULES IMPORT/EXPORT FUNCTIONALITY
MERGING MULTIPLE SHIPPING RULES
PRODUCT DIMENSIONS SETUP
HISTORY/AUDIT TRAIL
COMMON ISSUES & FAQs
Table of Contents
Understanding the Shipping Rules Import File in Shopify Advanced Shipping Calculator
In this article, you will deepen your knowledge about importing and exporting Shopify shipping rates. We’ll address the following questions:
- What should you know before starting the export/import process?
- What is the purpose of importing/exporting shipping rates?
- How can you export your current shipping rate configuration?
- How to open the import file?
- What do the tabs in this file represent?
- Why can’t I edit certain fields?
- Why does the country field have a zone prefix?
- What are the limitations of importing?
- Why does the import file contain shipping rates that I never created?
- Understanding the concept of “parent” and “child” rows.
- Examples and explanations of specific imports.
What should you know before starting the export/import process?
Before you begin reading this article or using the export/import feature for shipping rates, we highly recommend creating a few sample shipping rates in our panel. This will help you better understand the structure of shipping rates and the various configuration options available. You can learn more about the anatomy of a shipping rate.
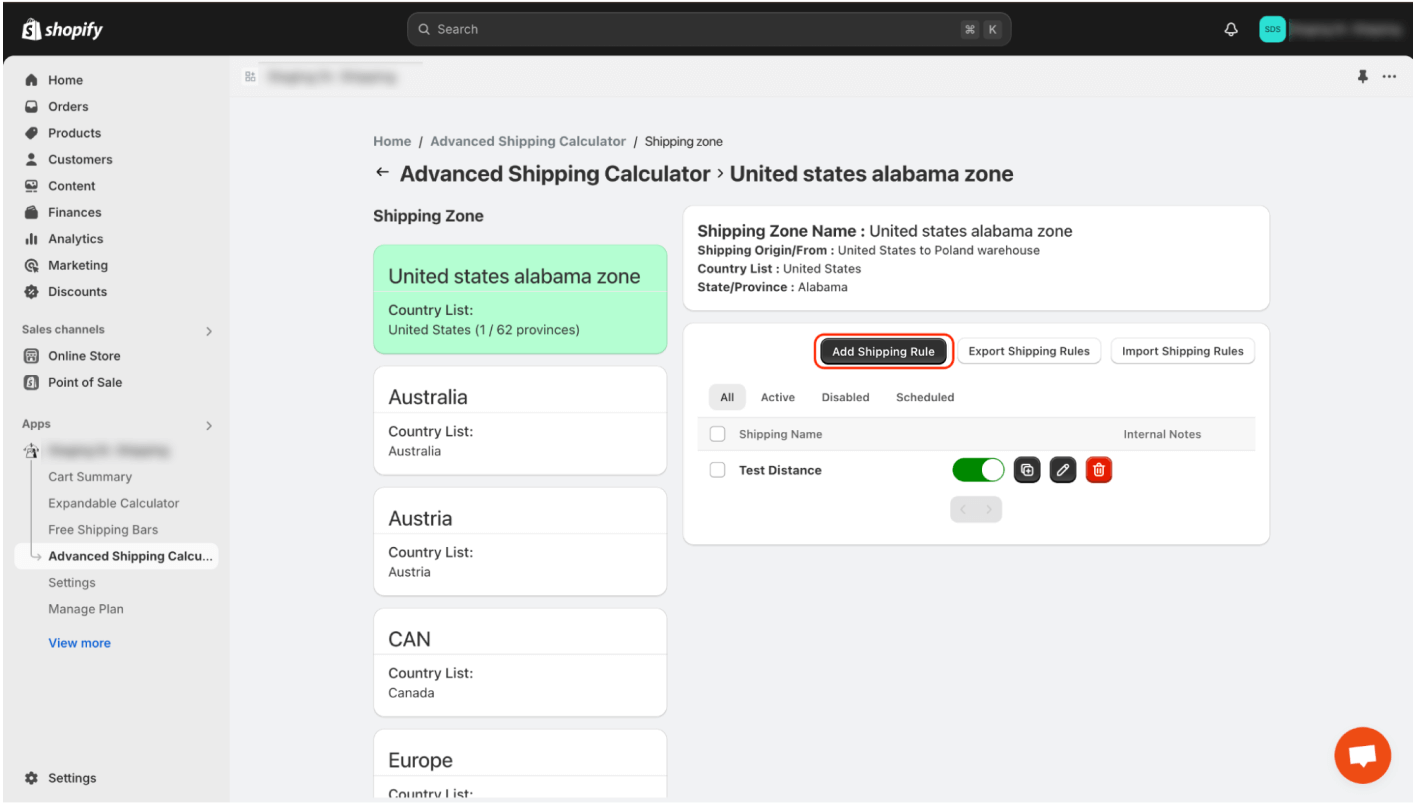
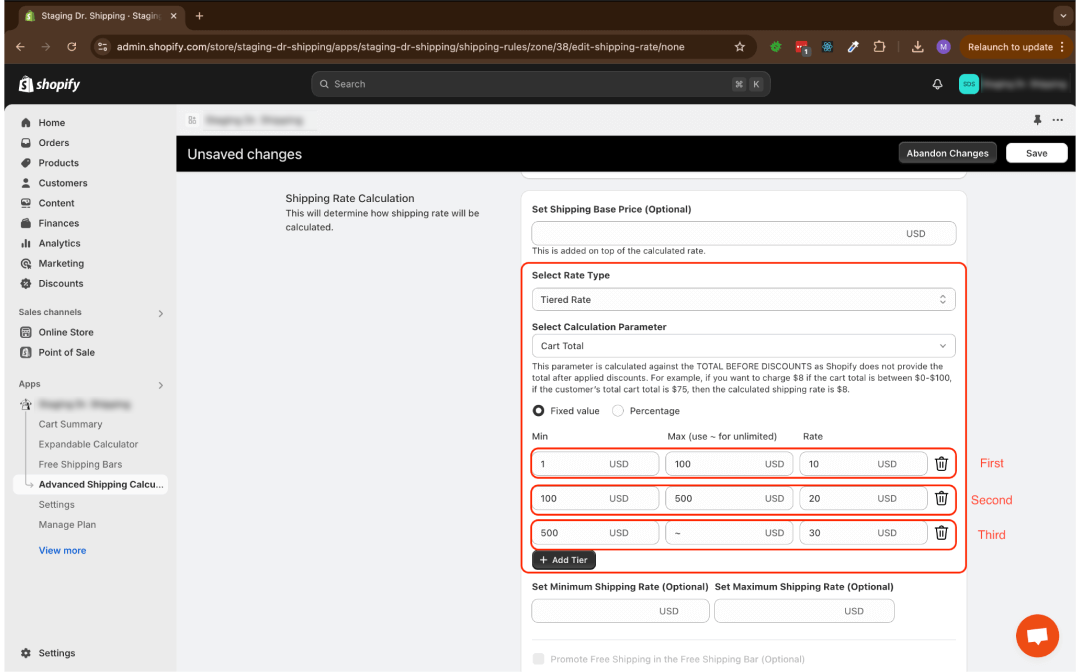
To manually create a shipping rate, select the specific shipping zone
Then click the “Add Shipping Rate” button:
Note: We believe that attempting to import without first familiarizing yourself with the manual creation of shipping rates in our panel can be very challenging, if not impossible.
What is the purpose of importing/exporting shipping rates?
Exporting shipping rates serves as a backup of your shipping settings in our app. However, please note that only rates with the following calculation types will be included in the file: Tiered, Incremental, Product Specific. Currently, shipping rates based on integrations with external providers are not exported.
The export file also acts as a base file for preparing the data you want to import back into our app.
Importing is used for bulk creation, editing, or deletion of shipping rates in our system. At the moment, shipping rates based on integrations with external providers cannot be imported. This tool is especially useful if your business has various complex shipping configurations. Instead of creating these configurations manually in our panel, you can simply import them.
How can you export your current shipping rate configuration?
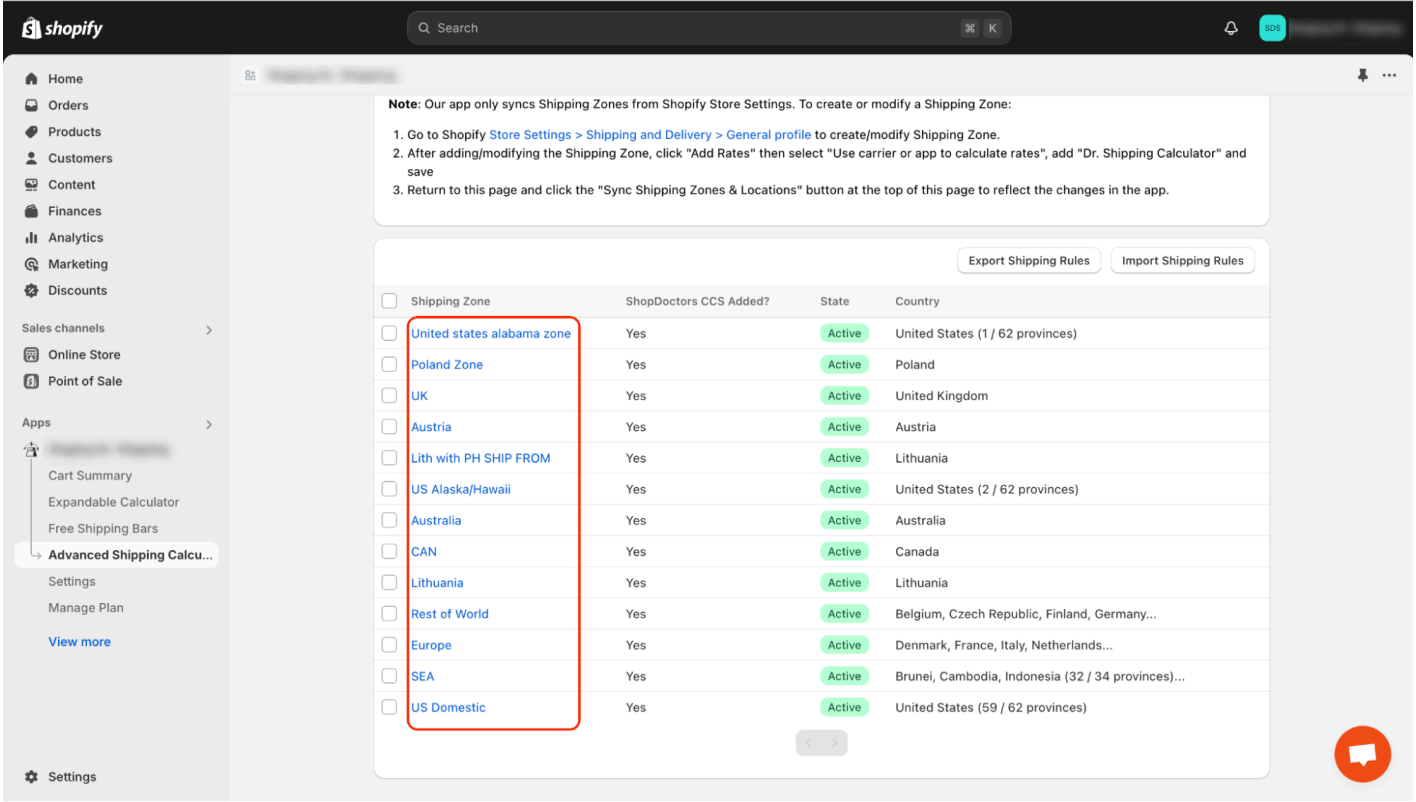
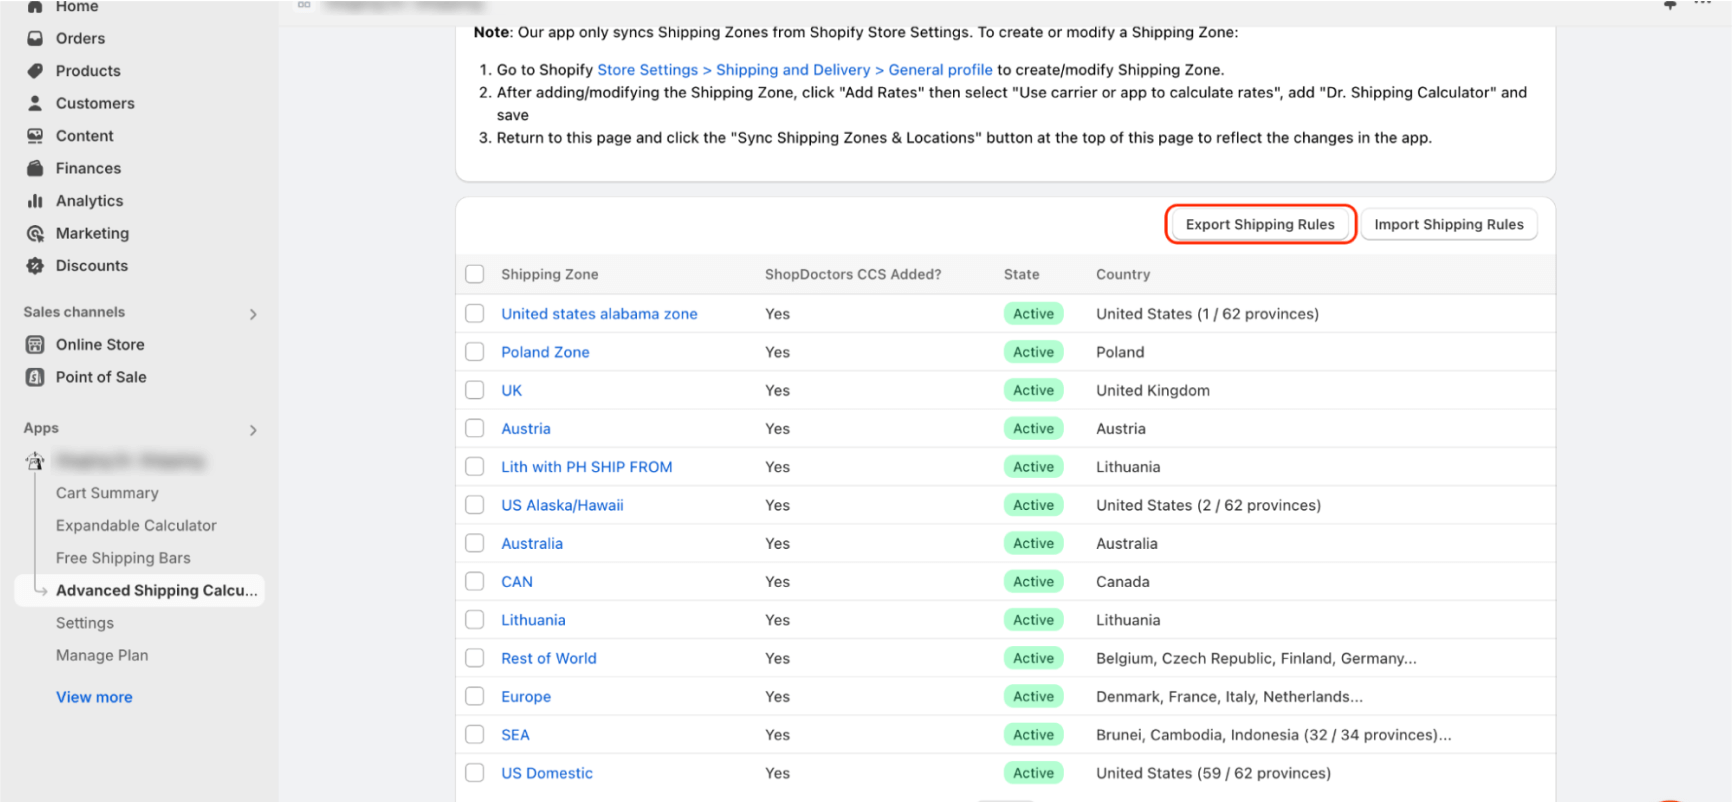
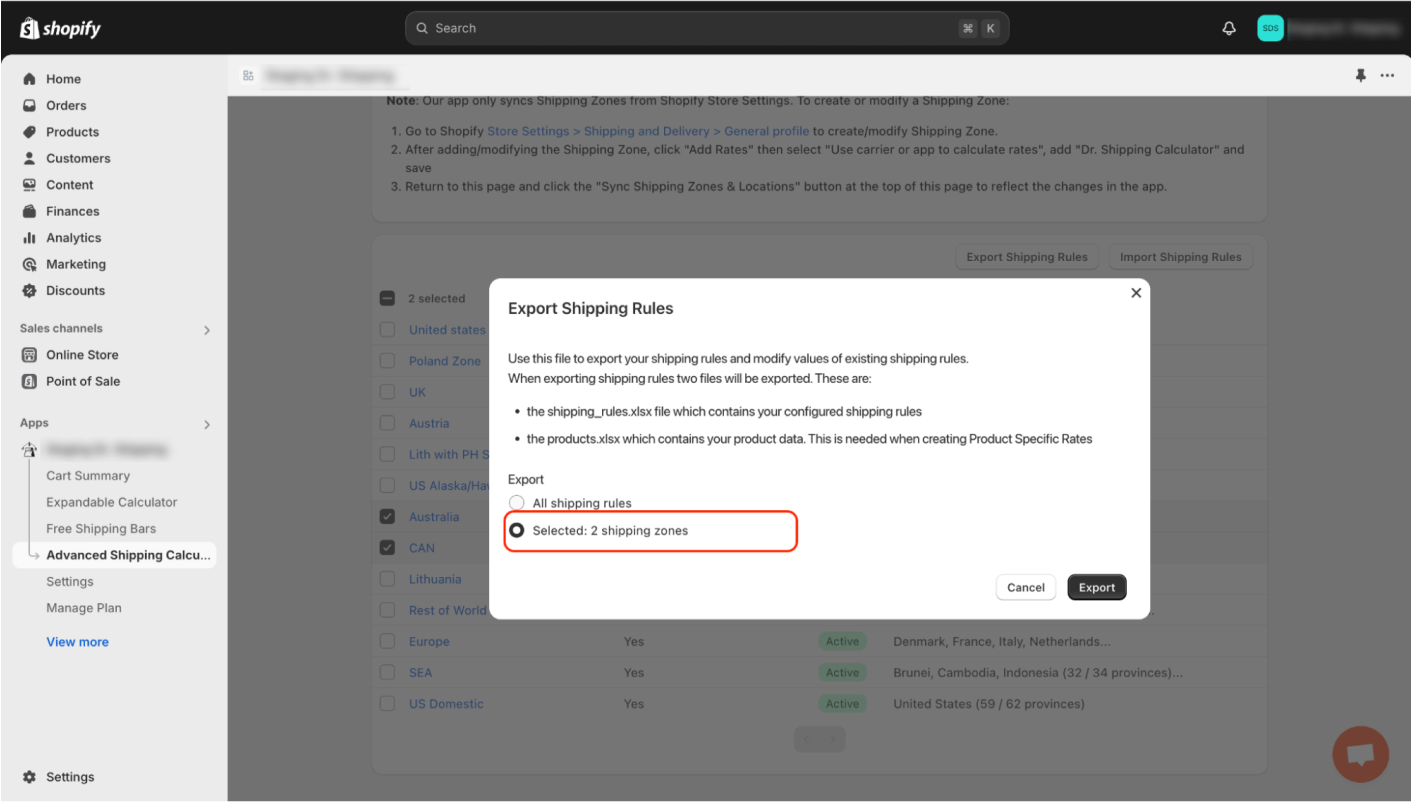
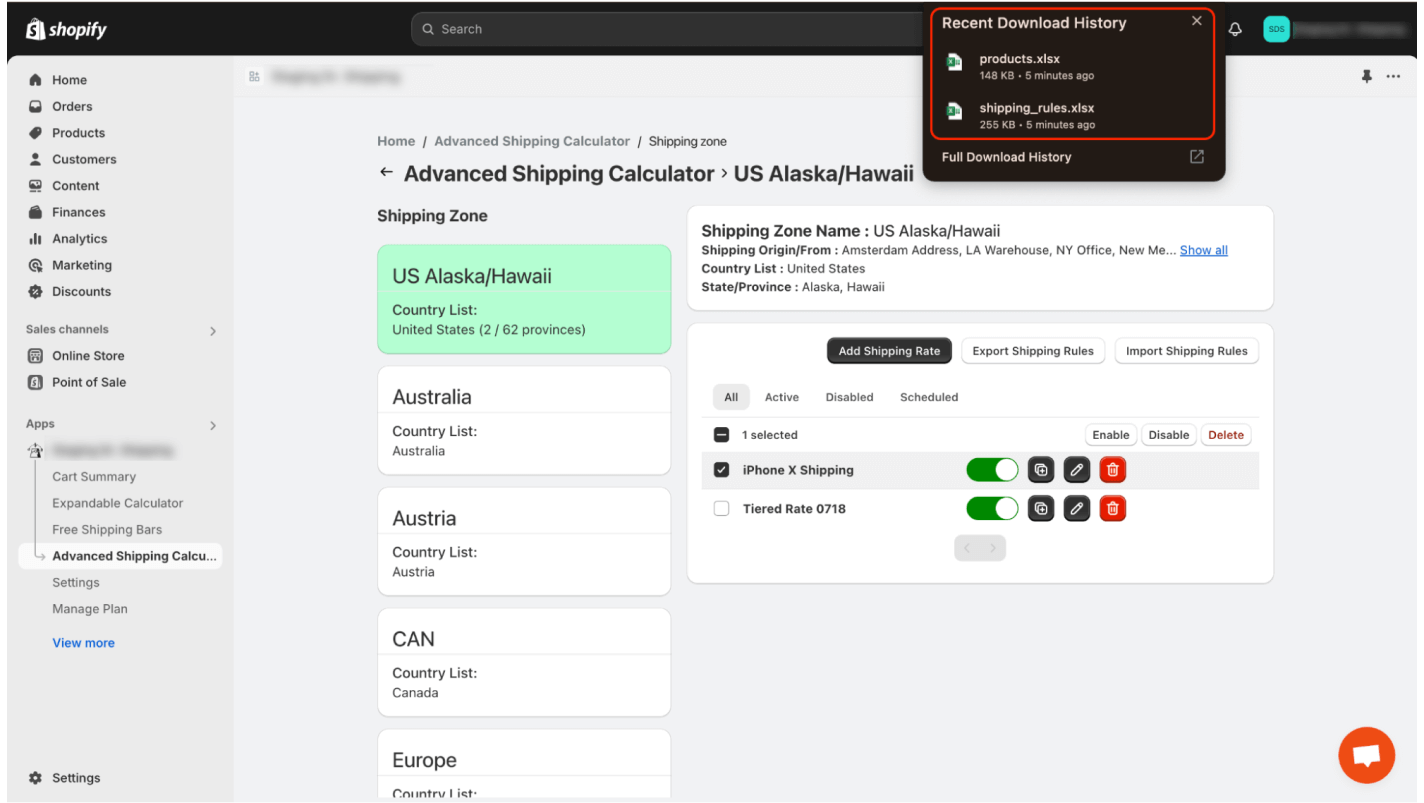
To export your current shipping rate configuration, go to the “Advanced Shipping Calculator” page and click the “Export Shipping Rules” button:
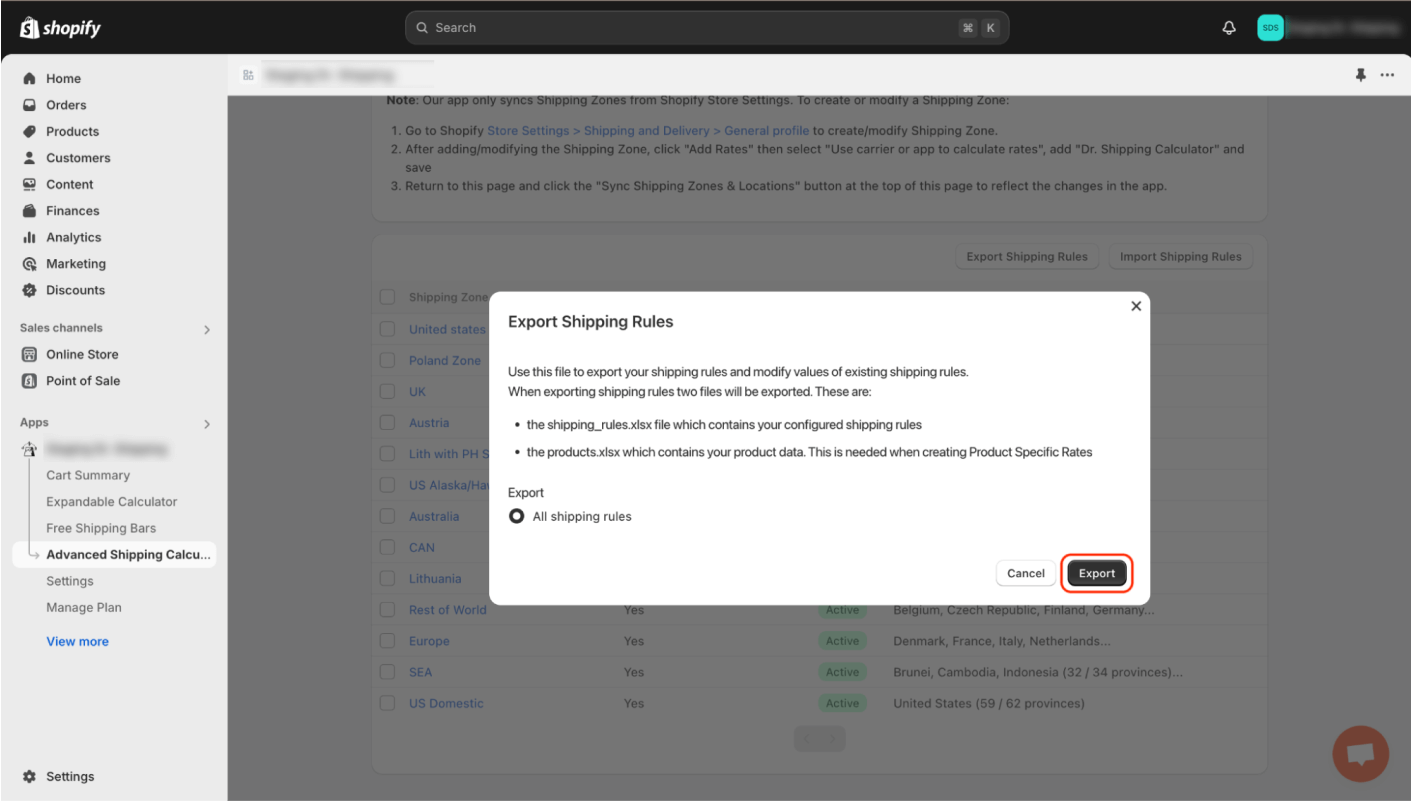
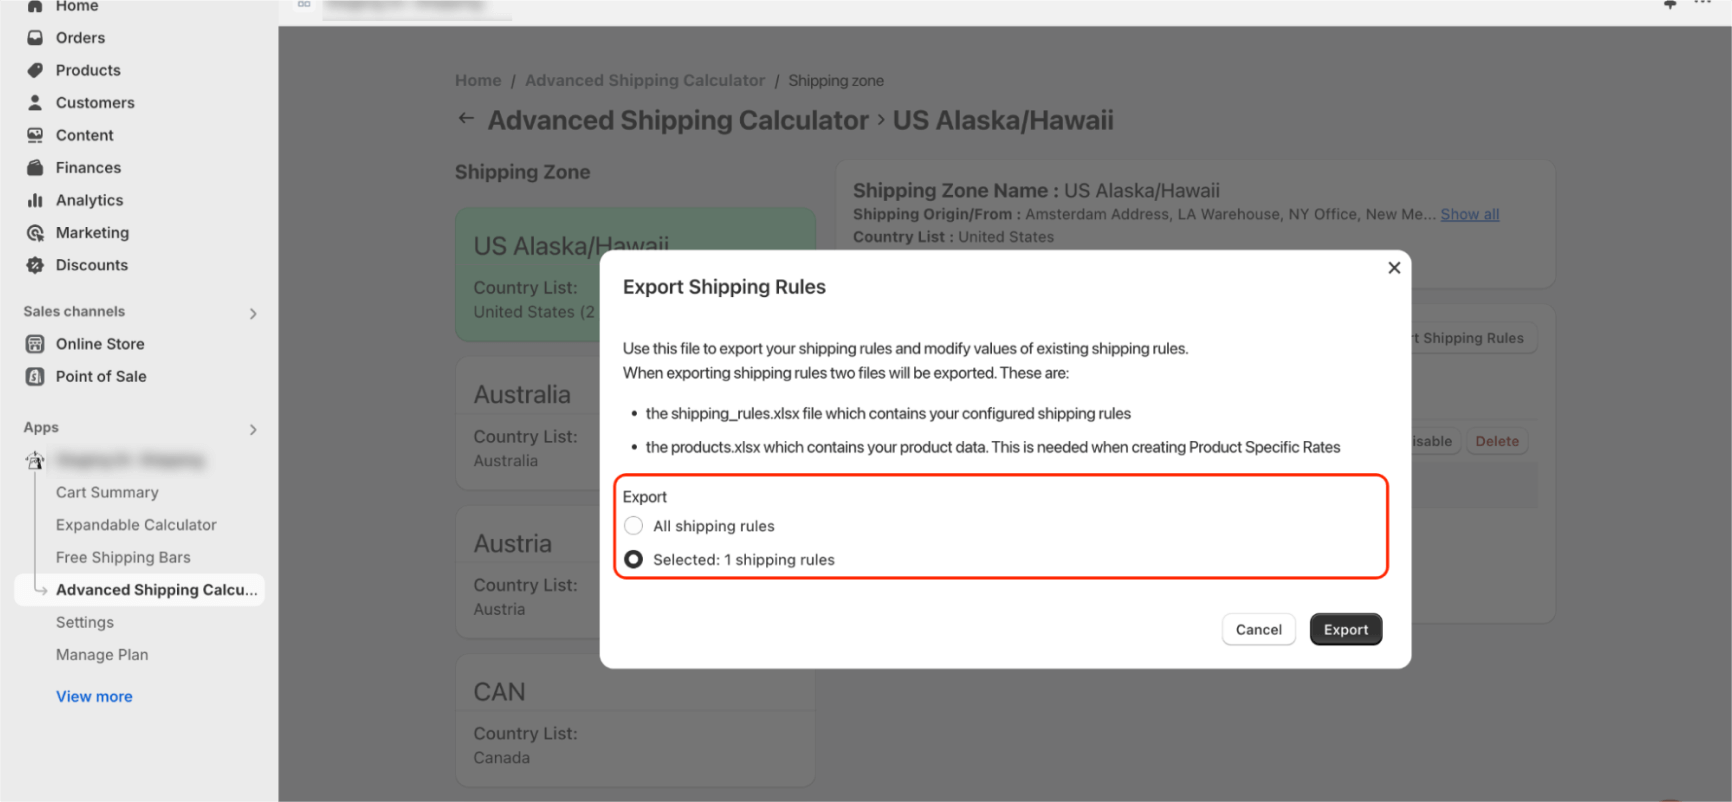
Next, click the “Export” button:
If you select one or more shipping zones on the shipping zone list page, you’ll have the option to export only the rates from the selected zones.
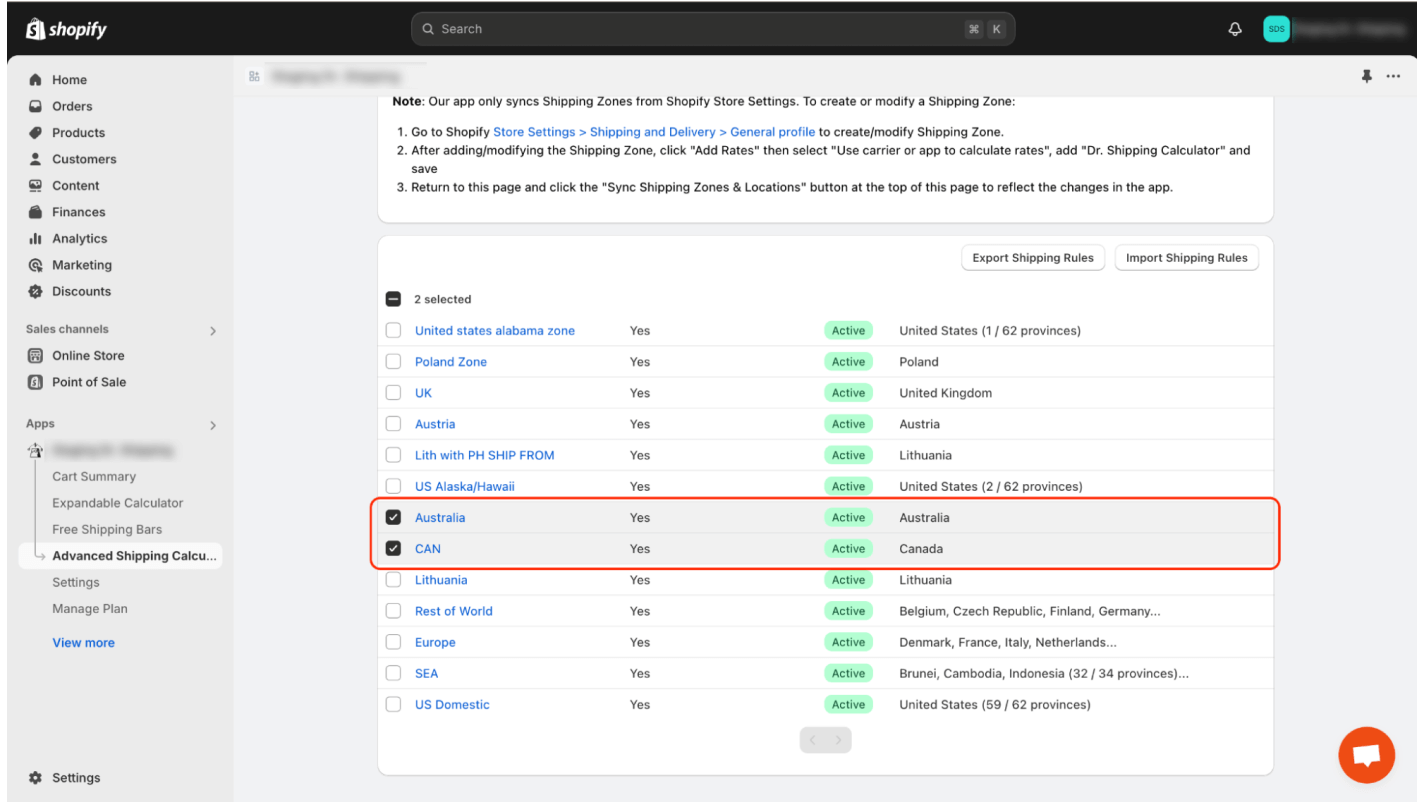
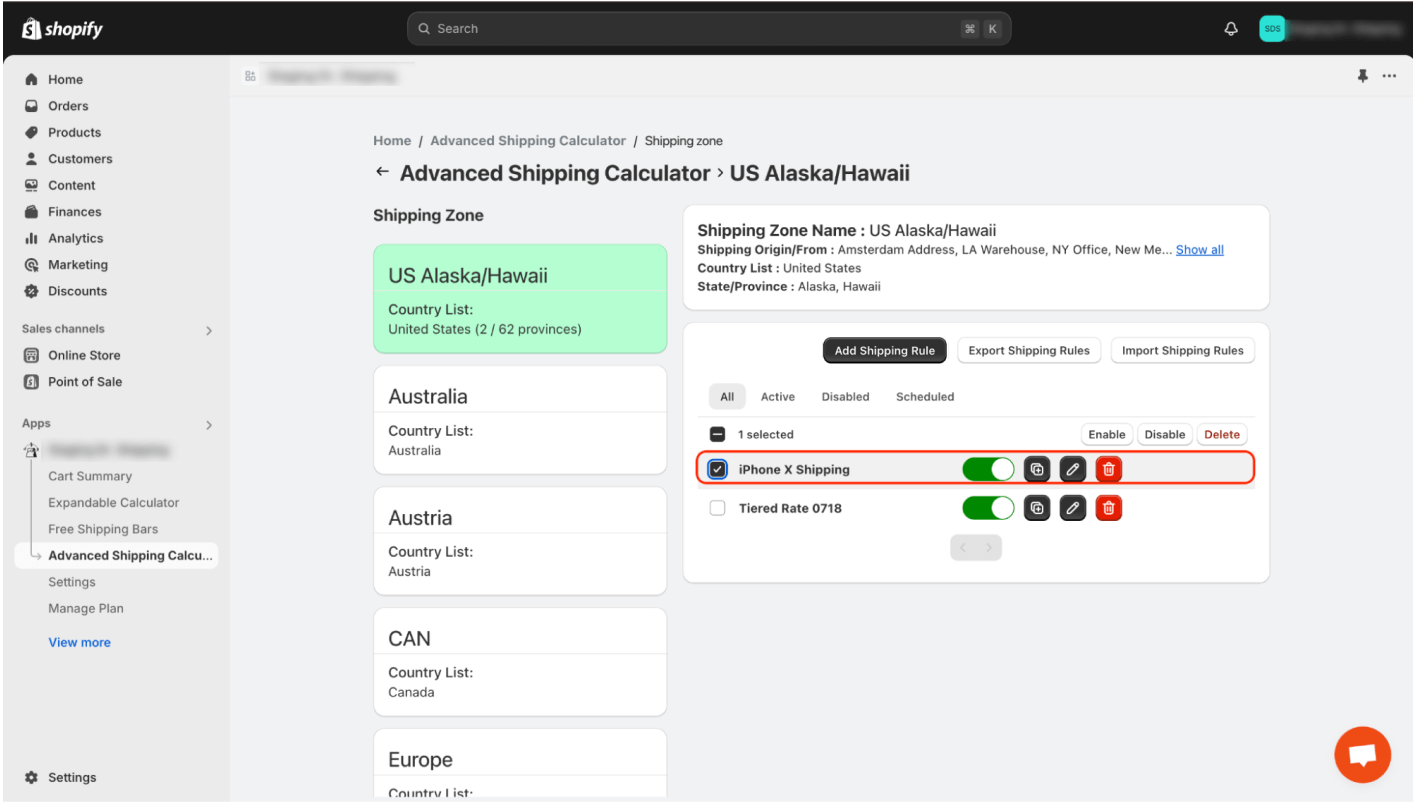
You can also export rates directly from within a shipping zone. To do this, go to the specific shipping zone and click the “Export Shipping Rules” button.

From this view, you can export all shipping rates assigned to the current zone, or only those you select from the list.
After clicking the “Export” button, the export process will begin. Do not close the export window while the process is ongoing. The files will be automatically saved to your disk. Keep in mind that exporting your shipping rates may take some time depending on the number of rates created and the number of products in your store. The more data you have, the longer the export will take. For smaller data sets, it should only take a few seconds, while larger sets may take up to 10 minutes.
Two files will be exported. The first file, named “shipping_rules.xlsx,” is the main import file:
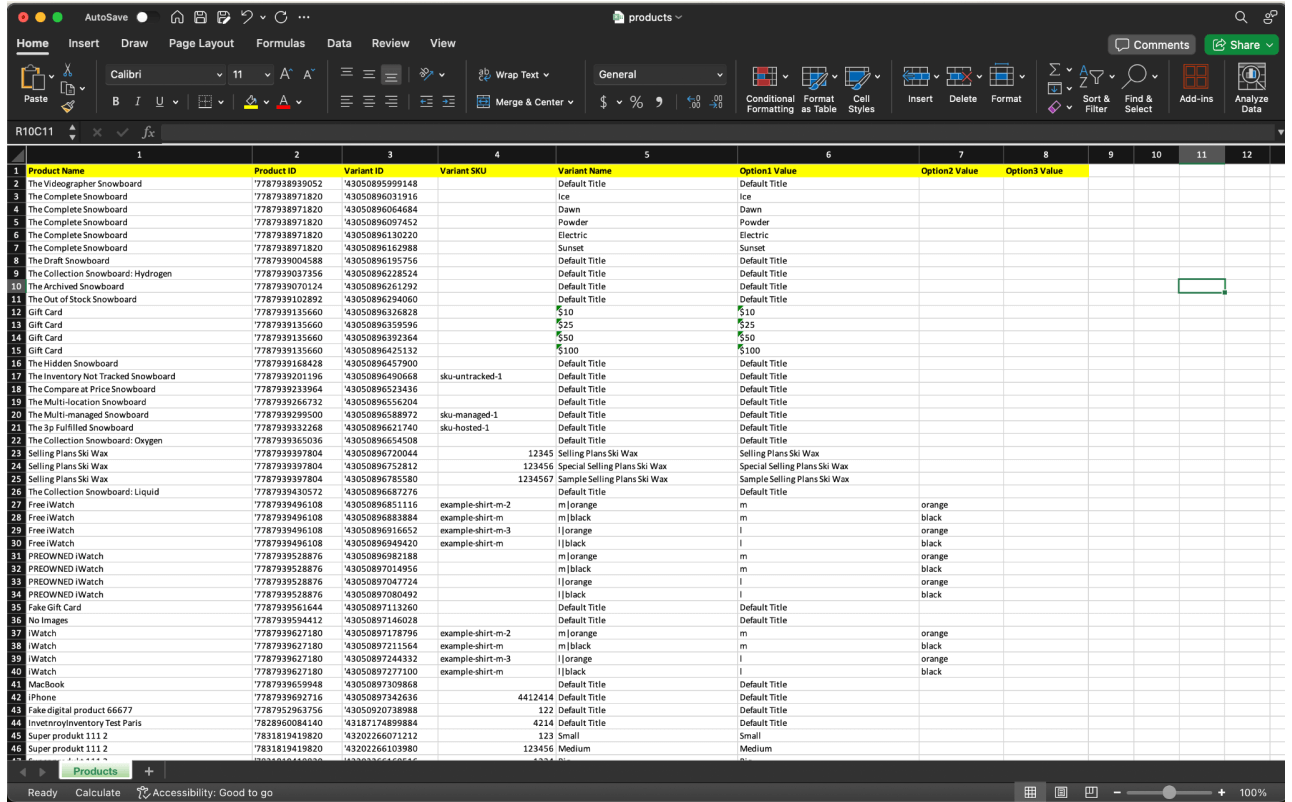
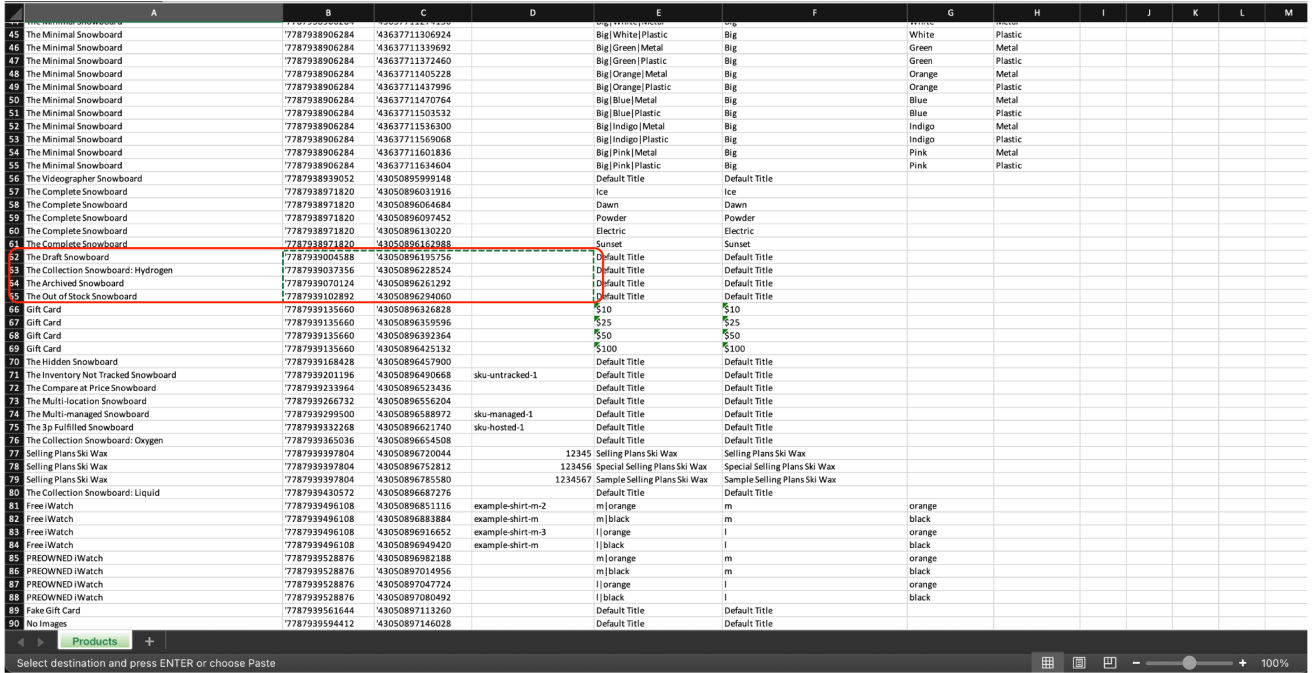
Additionally, a secondary file “products.xlsx” will be exported. This file is not used in the import process but serves as a reference if you need to import rules based on specific products. It contains information about your products such as “Product Name,” “Product ID,” “Variant ID,” “Variant Name,” “Variant SKU,” “Option 1 Value,” “Option 2 Value,” and “Option 3 Value.”
How to open the import file?
To open the import file, you will need Excel or LibreOffice (which is natively available on Linux platforms). You can also use the browser version of Excel available on the Google platform.
We recommend opening the document using the desktop version of Excel.
Our document utilizes various Excel features such as:
- Protecting certain columns from editing.
- The ability to select values from a list (to avoid entering incorrect data).
- Validation of the type of value entered.
- Hiding certain columns/rows.
- Freeze important rows / columns.
Remember that not all of these features are available in other programs, which may make editing the file more difficult.
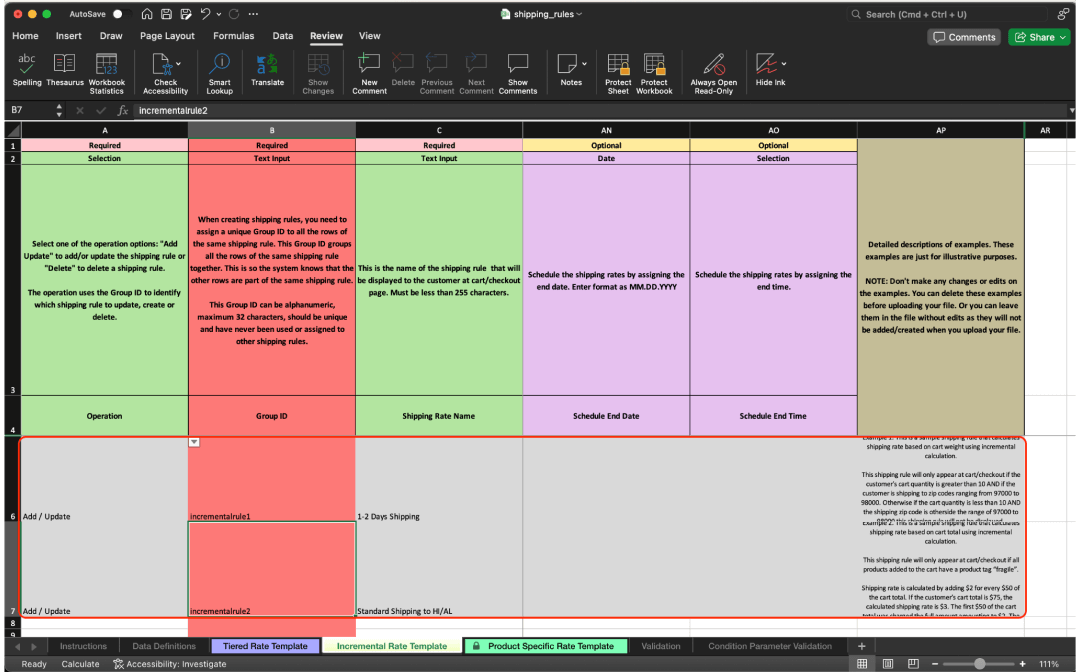
What do the tabs in this file represent?
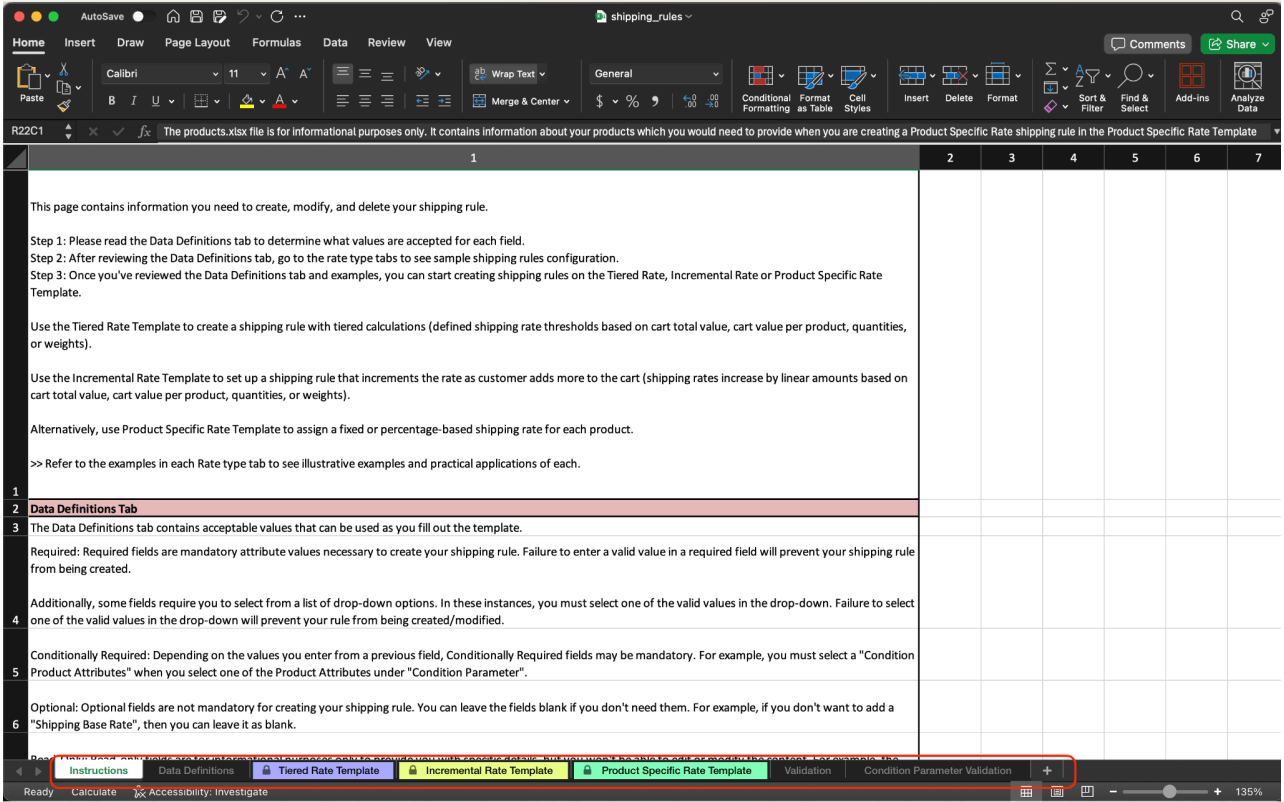
“Tiered Rate Template,” “Incremental Rate Template,” “Product Specific Rate Template” Tabs:
- “Tiered Rate Template” – Calculation type: “Tiered Rate”
- “Incremental Rate Template” – Calculation type: “Incremental Rate”
- “Product Specific Rate Template” – Calculation type: “Product Specific Rate”
In these tabs, you can define new shipping rates, edit existing ones, or delete rates that are no longer needed.
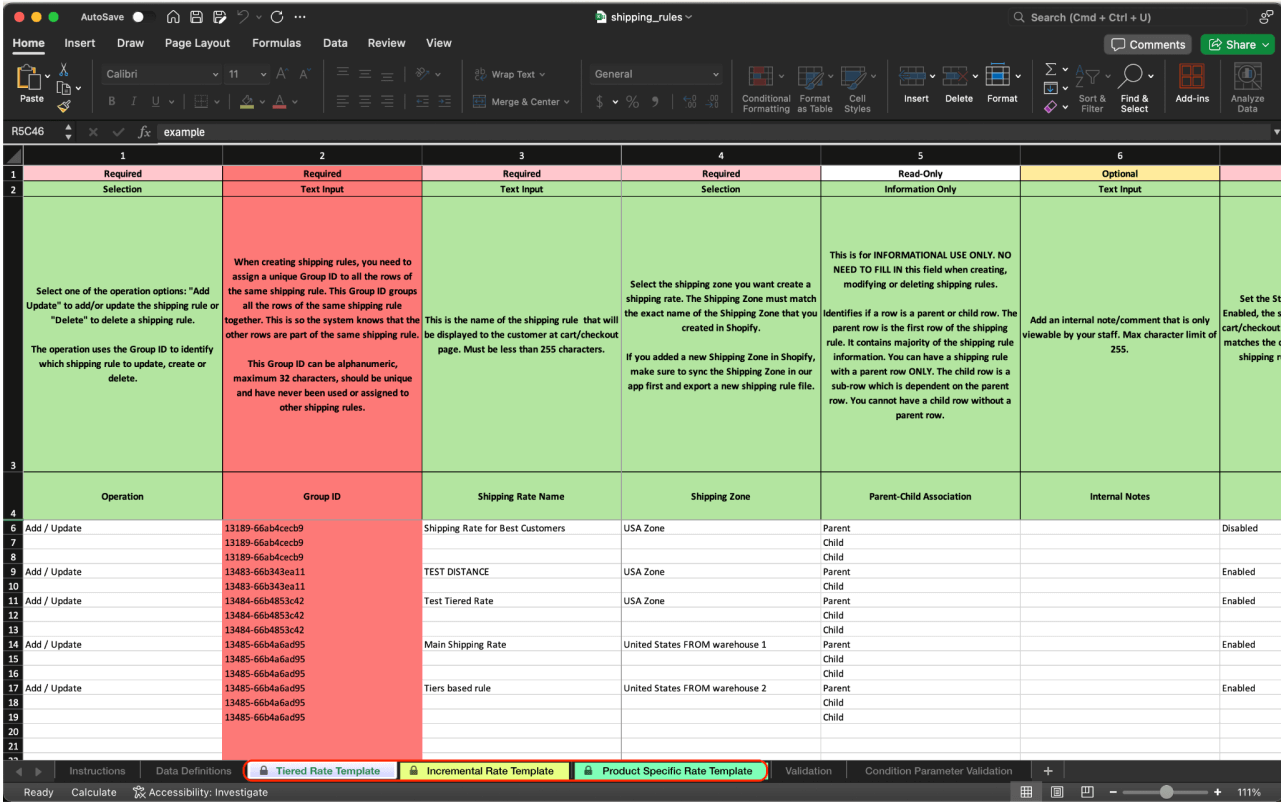
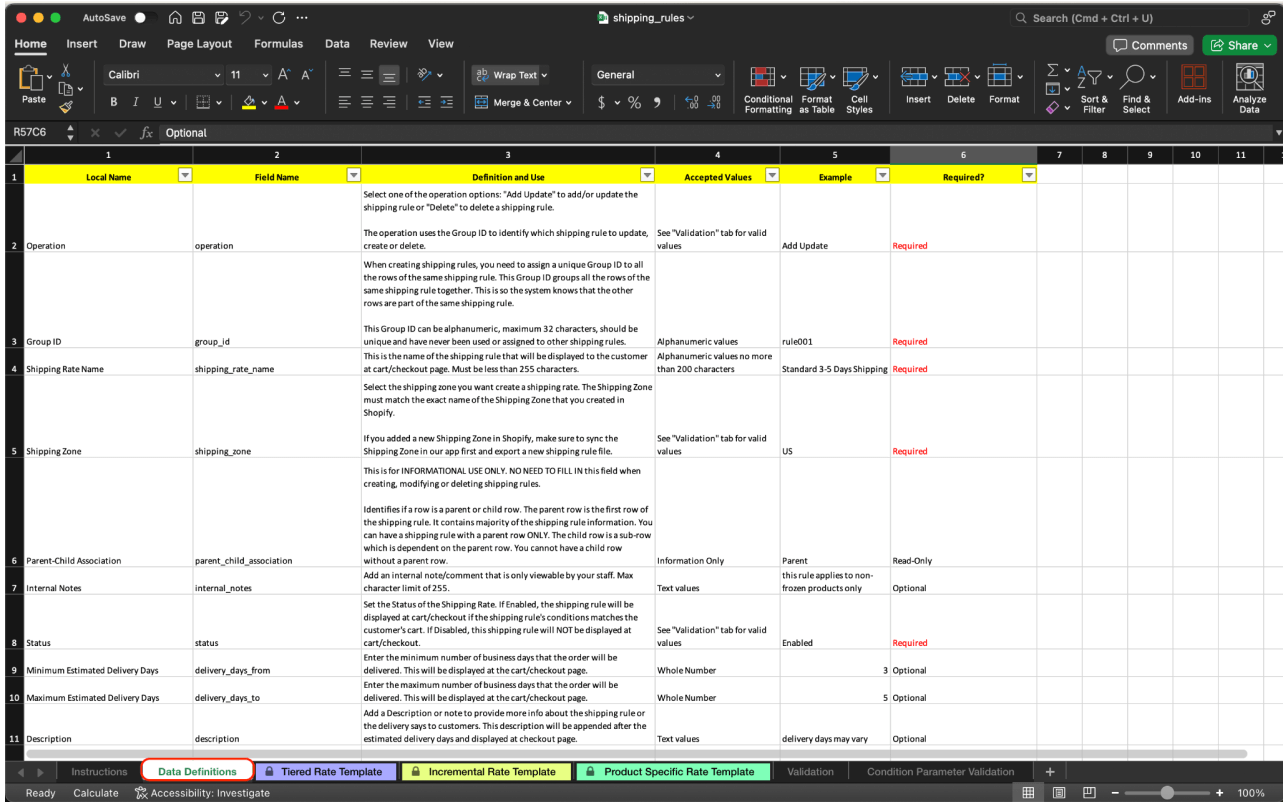
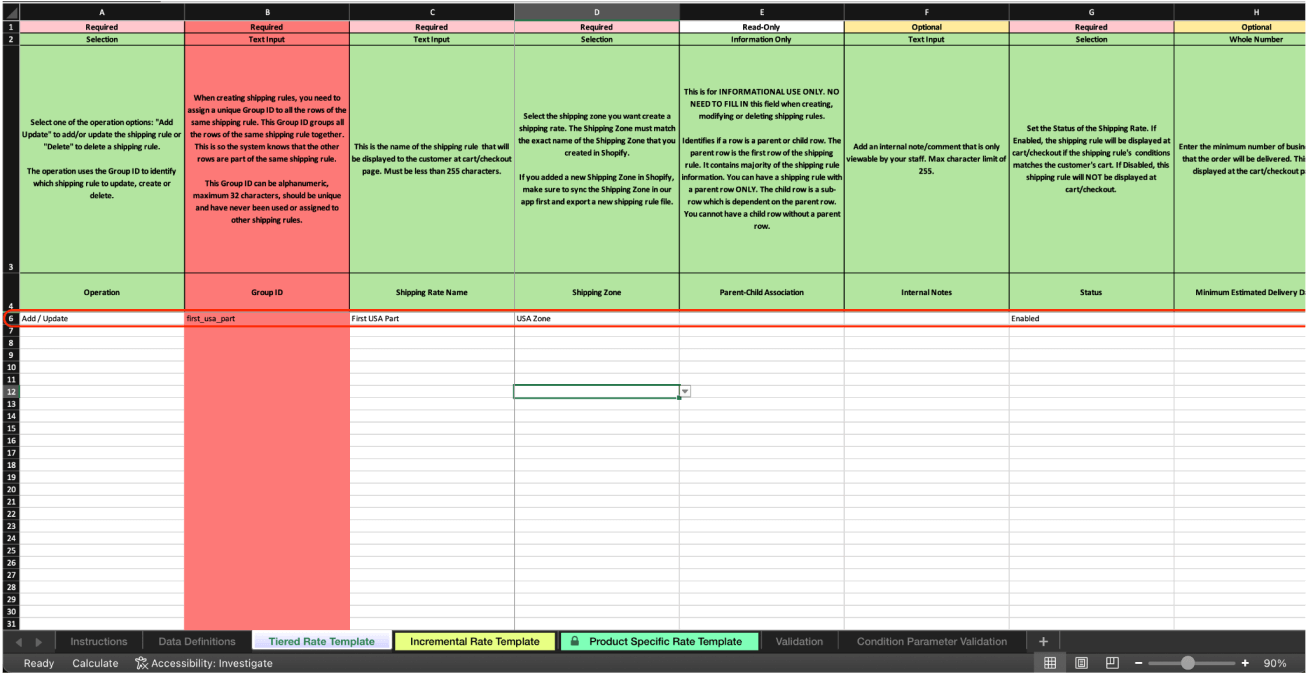
Each of these tabs contains four headers:
- Field type header (e.g., Required, Read-Only, Optional, Conditionally Required).
- Field value type (e.g., Selection, Text Input, Number, Information Only).
- Field description – this is a very important section. Be sure to read each description to understand the purpose of the column.
- Field name.
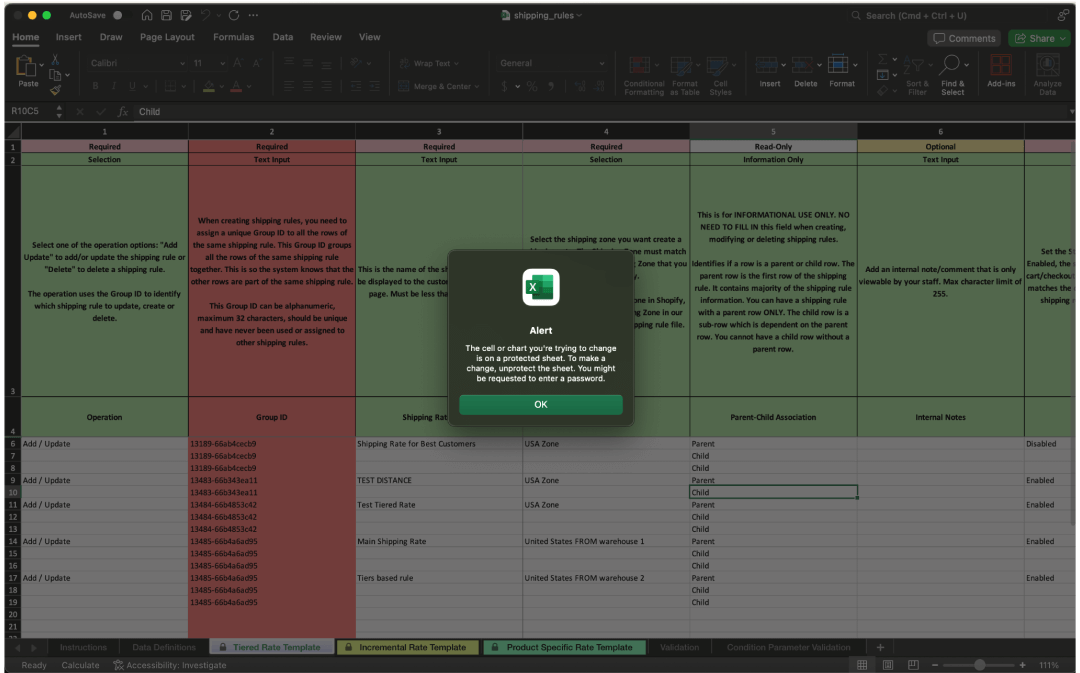
Why Can't I Edit Certain Fields?
Certain fields, particularly those labeled as “Information Only” in the header, are non-editable. These fields are designed to provide information about specific properties of a row, and the values in these fields should not be altered. If you attempt to edit such a field, the application will display a notification indicating that the field is protected.
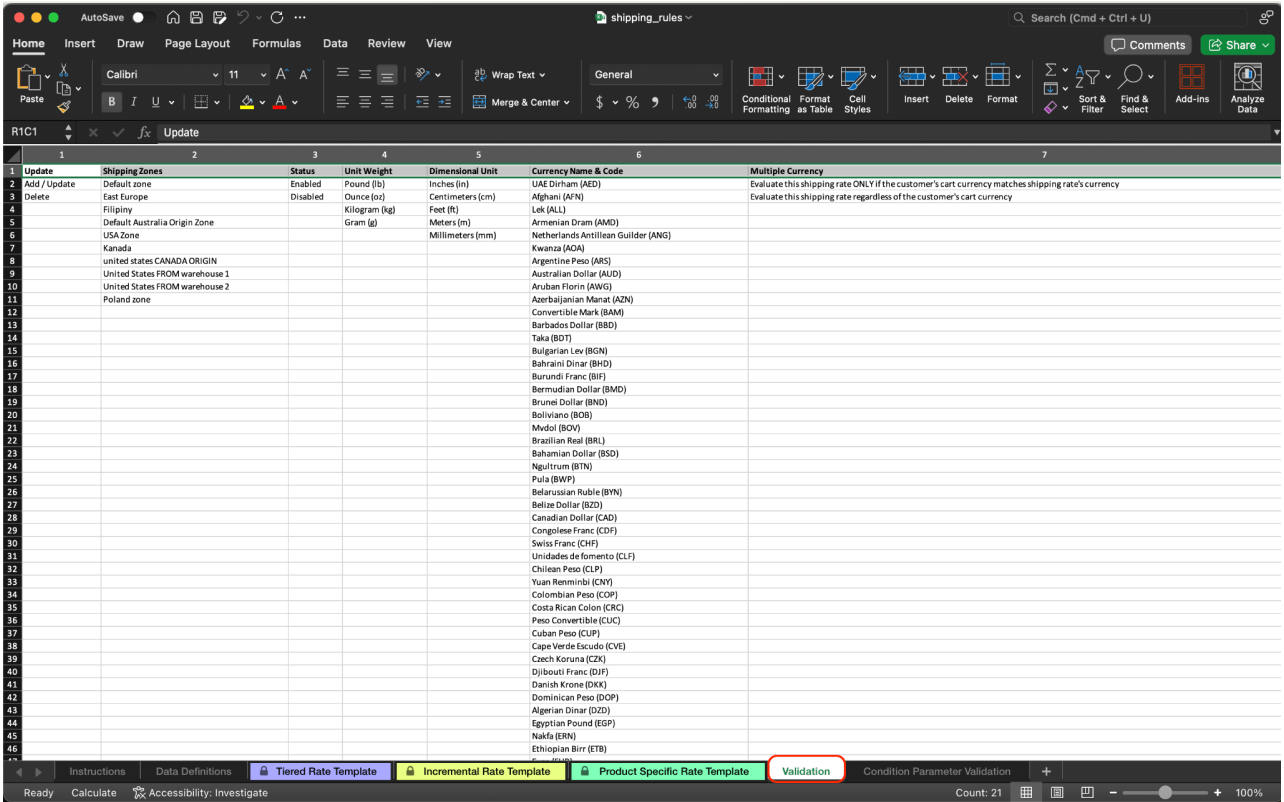
Why does the country field have a zone prefix?
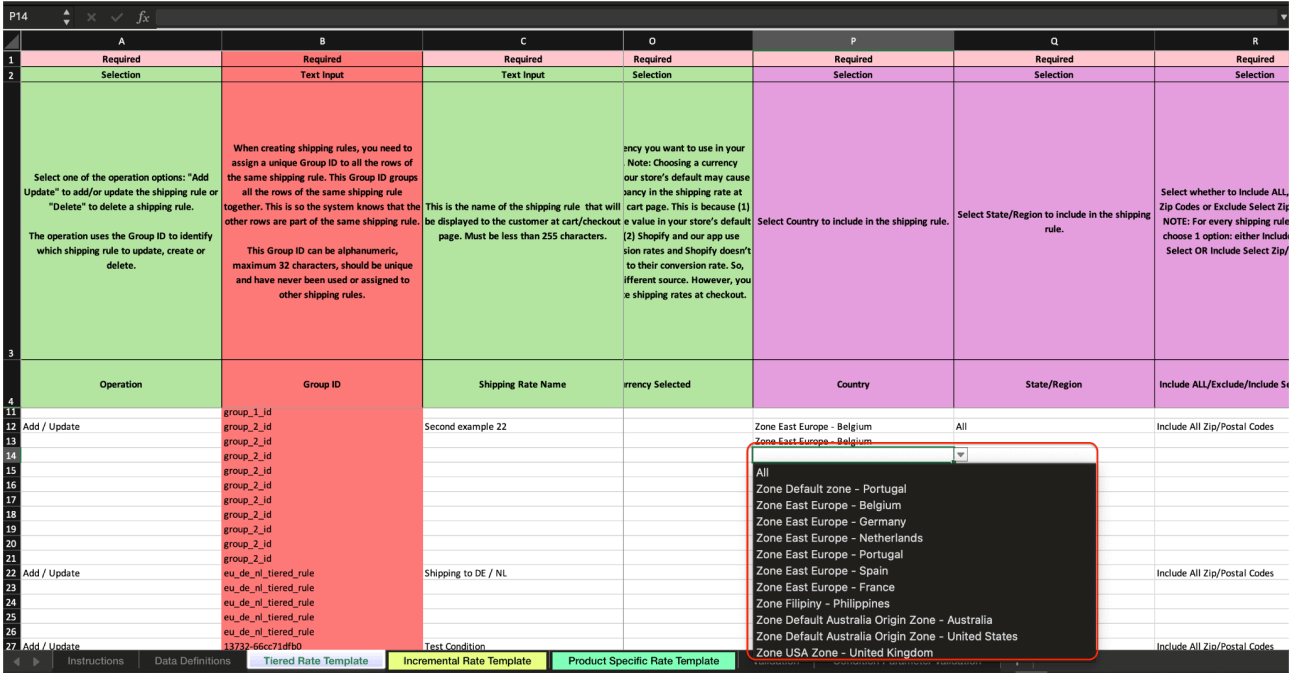
Shopify allows you to create multiple shipping zones with the same name, and even with the same country/region configuration.
If your zones have similar or identical country/region configurations, identifying the correct value will be easier for you during import. If you know which zone you want to assign a specific shipping rate to, you can easily find only the options that are correct for that zone.
Note: Remember that when configuring shipping countries during import, you should only select the countries assigned to the zone in which you are currently editing/creating a shipping rate.
The same applies to Origin Locations, although in this case, we cannot directly assign shipping zones to them. Therefore, you need to ensure that you are assigning only those Origin Locations that are correct for the given shipping zone. If you assign an incorrect country/region/Origin Location, you will be notified after the import is completed. The incorrect rate will not be imported.
What Are the Limitations of Importing?
The primary limitation when importing is the maximum number of rows allowed in a single file. It’s recommended not to exceed 20,000 rows in your import file. If your file is too large to be processed, you can remove informational tabs such as “Instructions,” “Data Definitions,” “Validation,” and “Condition Parameter Validation.” If this does not resolve the issue, you can import each calculation type separately.
For instance, you could import the “Tiered Rate Template” in the first file, the “Incremental Rate Template” in the second file, and the “Product Specific Rate Template” in a third file. If the file size is still an issue, consider splitting the import into several separate files. For example, if you have 50,000 rows to import, create one file with up to 20,000 rows, another file with another 20,000 rows, and a third file for the remaining 10,000 rows .
Note: If you encounter any issues with importing, please contact our support team. We are happy to assist you with importing your file.
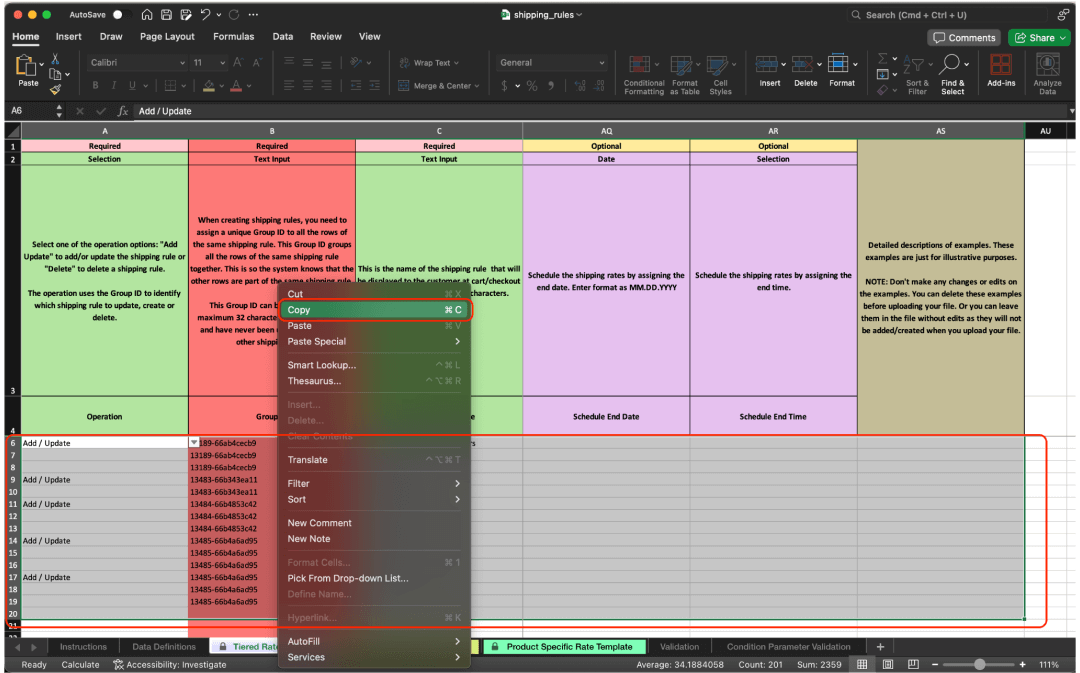
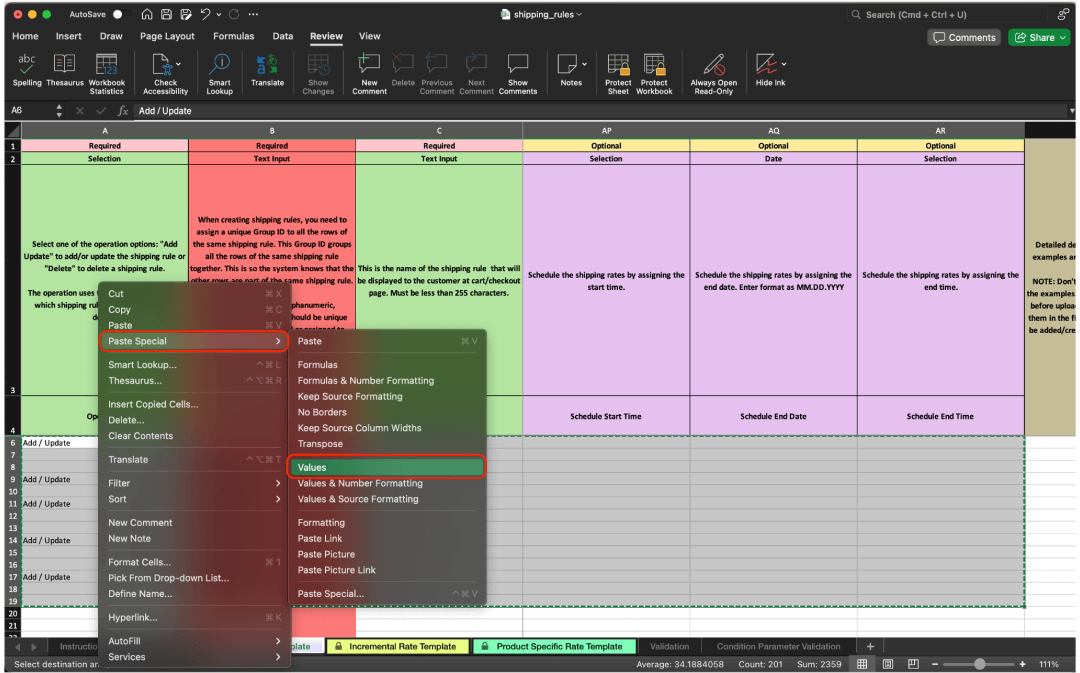
Another limitation is the inability to process formulas. If your Excel file contains formulas in fields that are to be imported, you must convert these to calculated values. For example, if the base value for your calculation is dependent on another cell in the sheet, you need to transform the sheet so that the cells contain the final calculated value. To do that you can copy all values from sheet and past it (Paste special => Values)
Why Does the Import File Contain Shipping Rates I Never Created?
If your account doesn’t have any shipping rates created for a specific type or if the number of such rates is less than three, we generate sample shipping rules that you can use as a reference. These sample rules will not be imported. If you wish to use them as a “base” for your new rules, simply copy them to new rows.
Sample rows are highlighted in gray. At the end of each row, you’ll find a detailed description of the resulting shipping rule in that example.
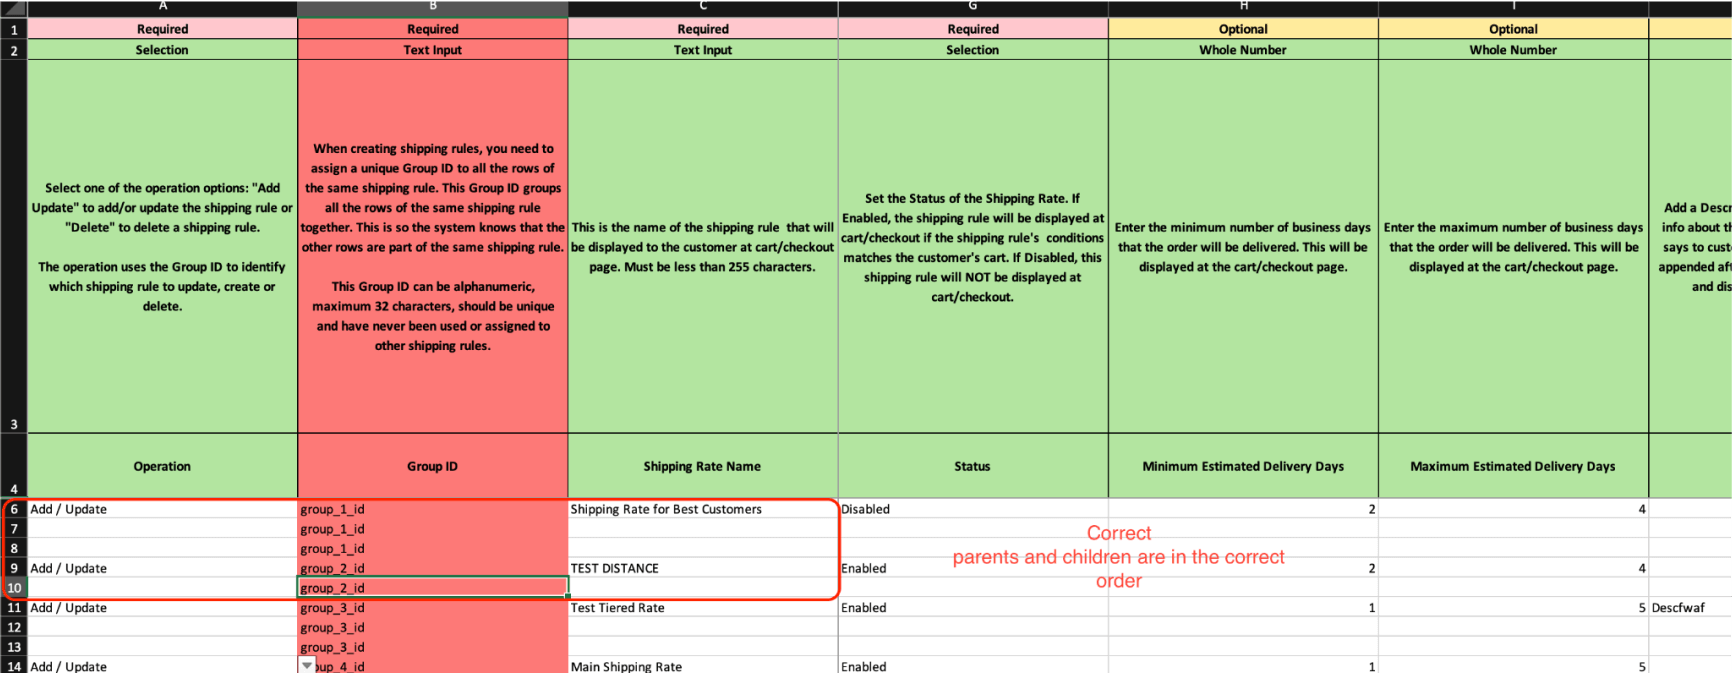
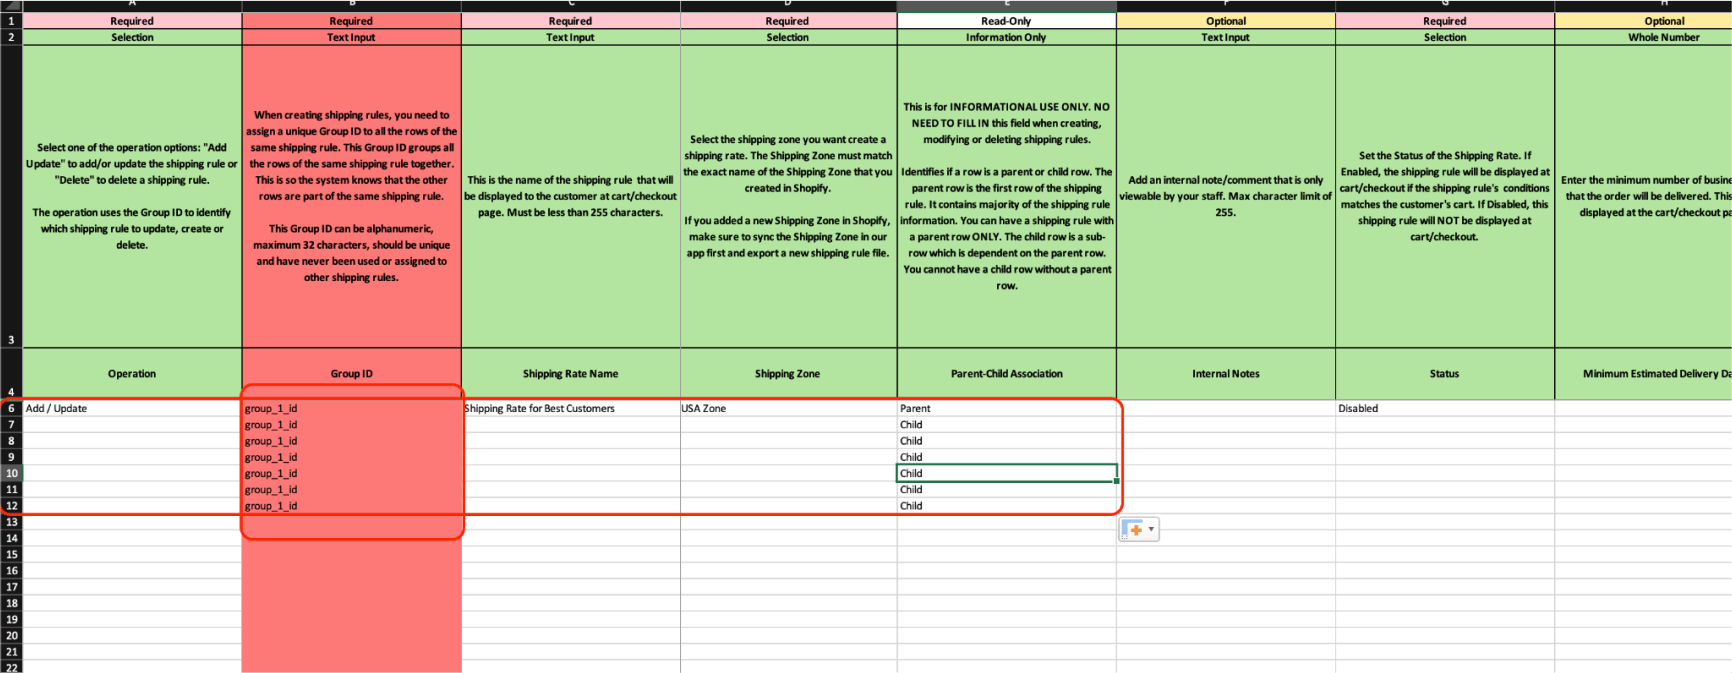
Understanding the Concept of “Parent” and “Child” Rows
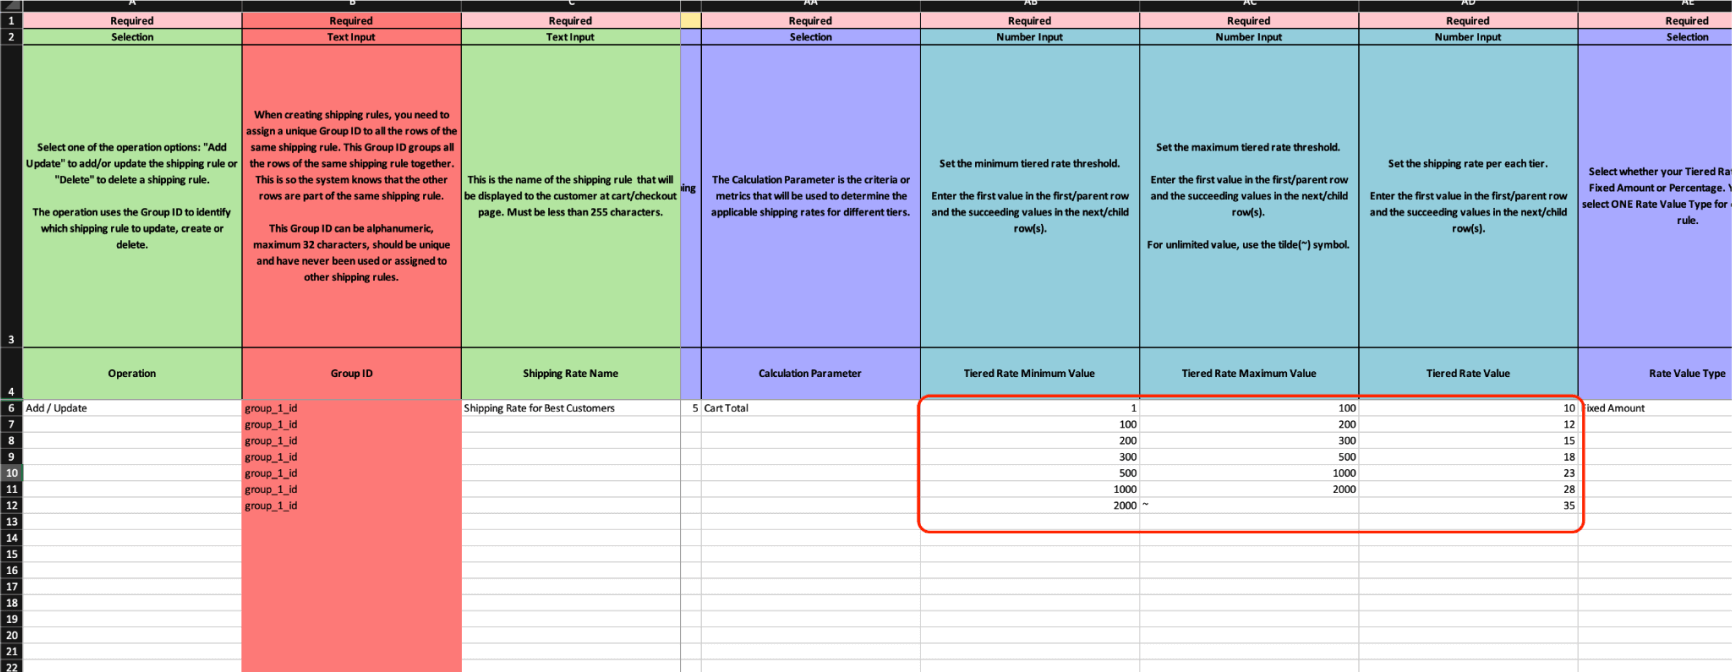
Each shipping rule can consist of one or more rows. This happens because some rules have a set of information regarding a particular setting. For instance, take the “Tiers” setting in a shipping rule with the “Tiered Rate” type.
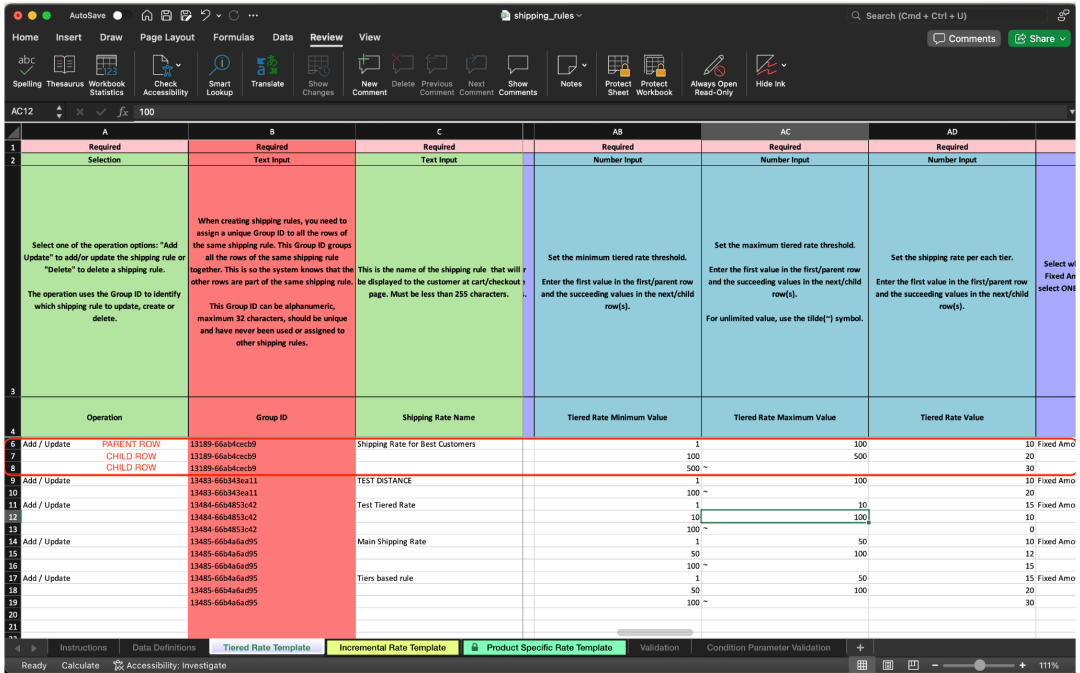
As you can see, each rule can have multiple “tiers,” making it difficult to create or edit it in a single row in an Excel sheet.
To address this, we introduced the concept of parent and child rows. But what exactly are they?
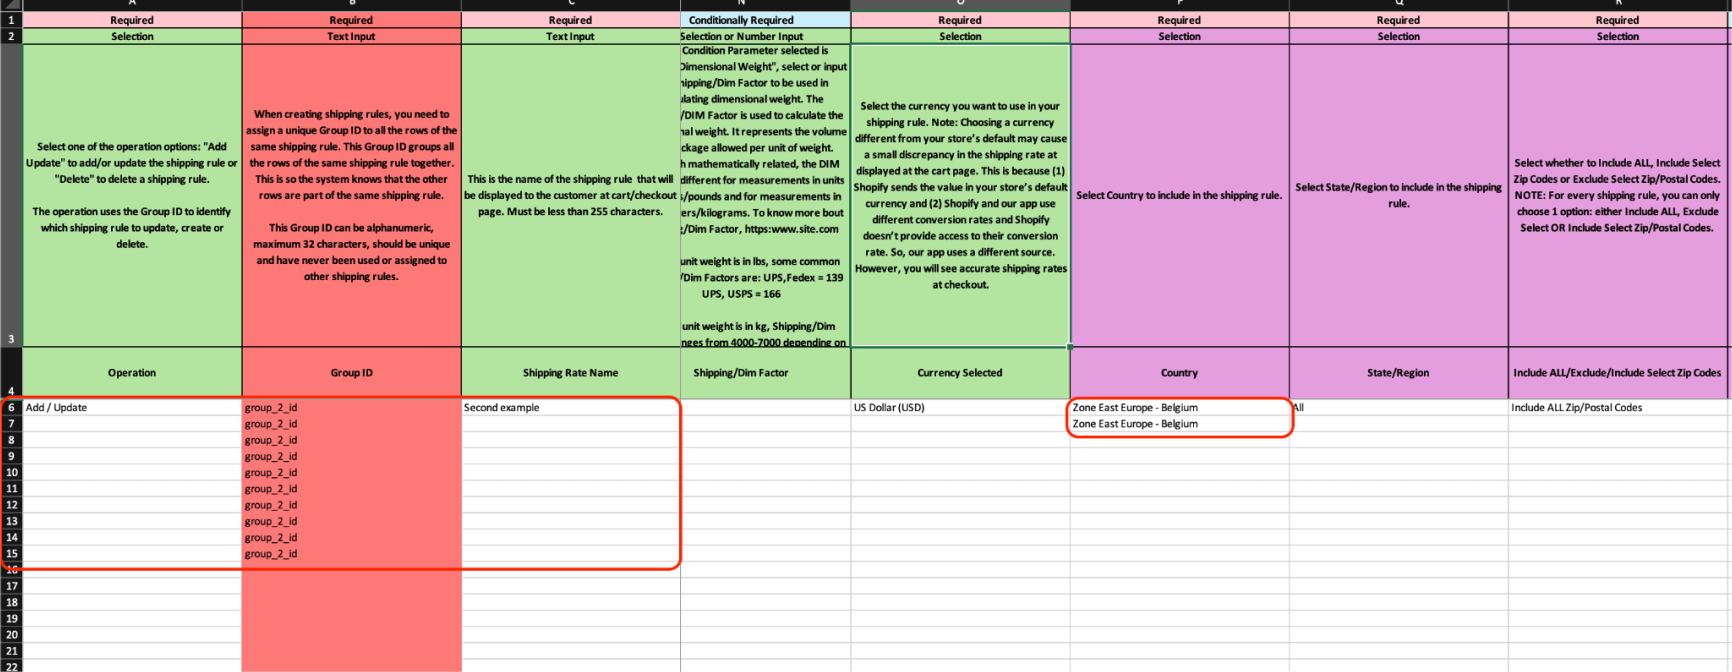
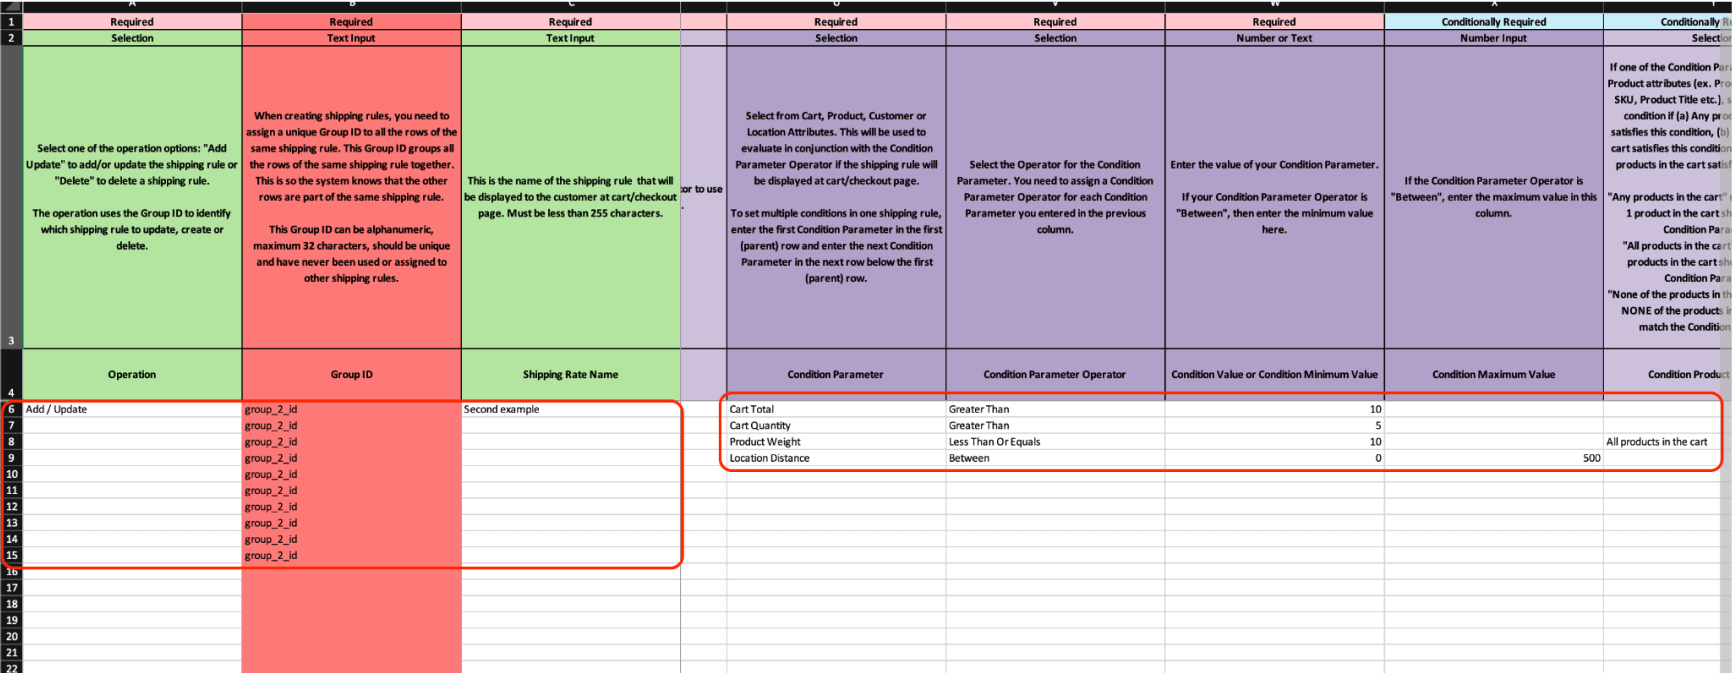
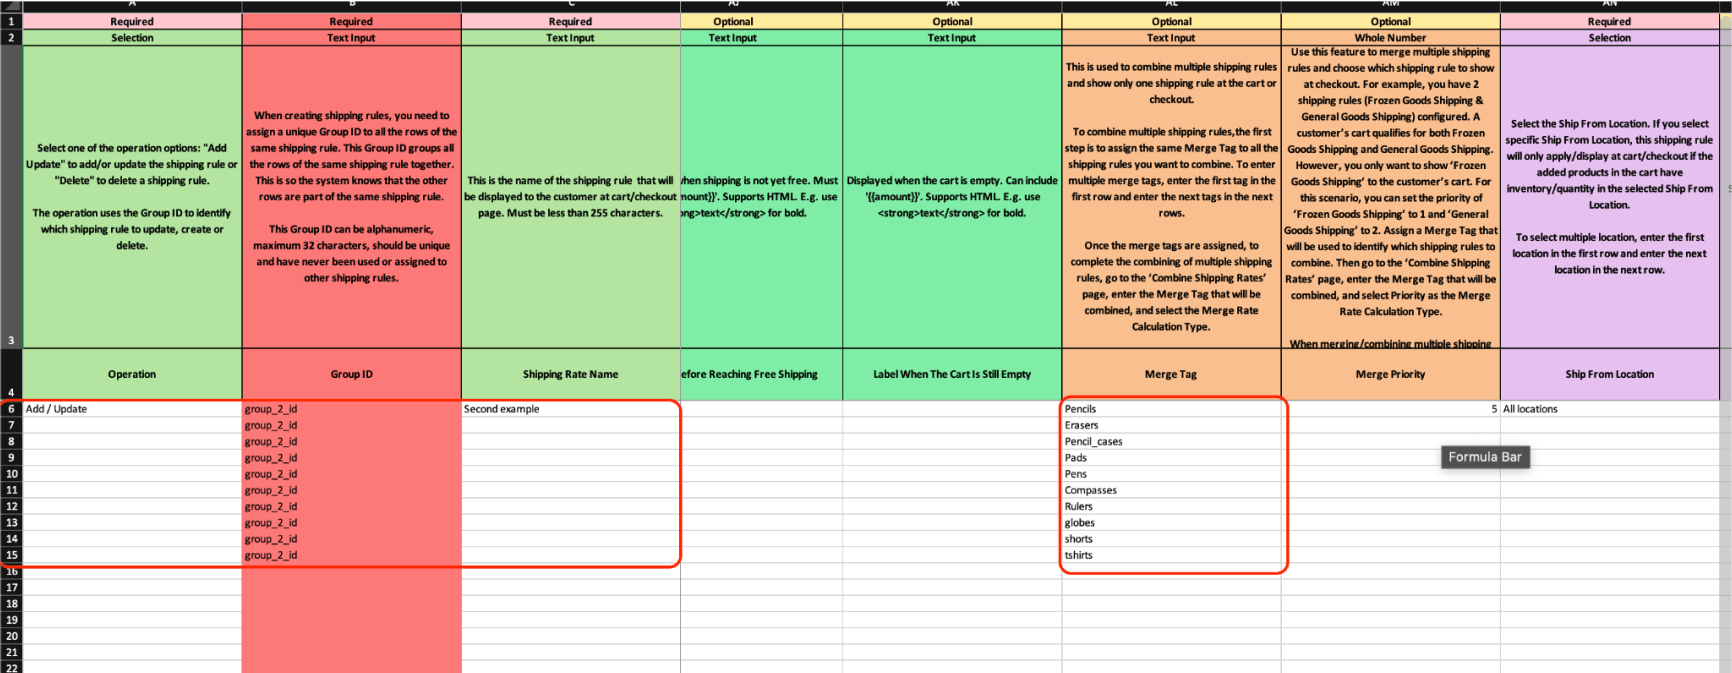
- Parent Row: This row contains the overarching information about your shipping rule, such as the name, assigned shipping zone, description, status, etc. These are single values.
- Child Row: If your shipping rule should include more than one element in a value that can be a collection, such as “Tiers,” the parent row should have as many child rows as there are elements in the collection. Child rows do not overwrite values in the parent row. In practice, this means that if you define a shipping rule name in both the parent and child rows, only the value in the parent row will be considered. A good practice is to leave fields empty in child rows where multiple values are not accepted.
Each parent/child row should be part of a group that identifies them as a single shipping rule. Make sure that your parent rows appear first, followed by the corresponding child rows. Do not separate them with rows that belong to another shipping rule.
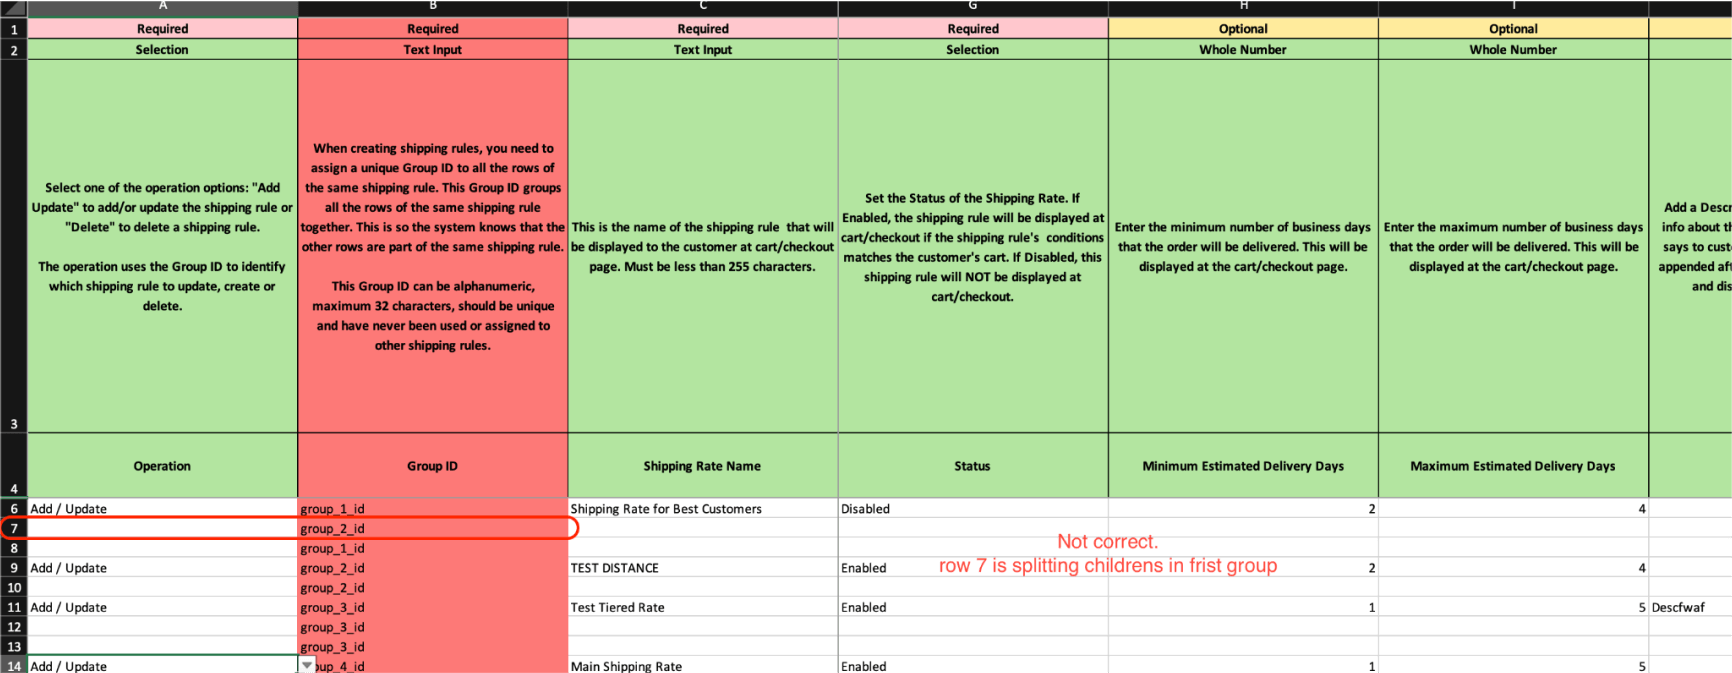
Let’s look at a simple example. You’re creating a shipping rule that has five conditions and seven calculation tiers. Therefore, your import file should contain one parent row (this is mandatory) and six child rows (7 – 1).
In another scenario, if you’re creating a rule with two selected countries, four conditions, and ten tags, the number of rows for that rule would be ten (one parent and nine children).
If this concept is unclear at the moment, don’t worry. You’ll understand it better through practical examples.
Examples and Explanations of Specific Imports
In this section, I will explain some real practical import examples to help you understand how it works.
Example 1:
Let’s start with an example using the “Tiered” type.
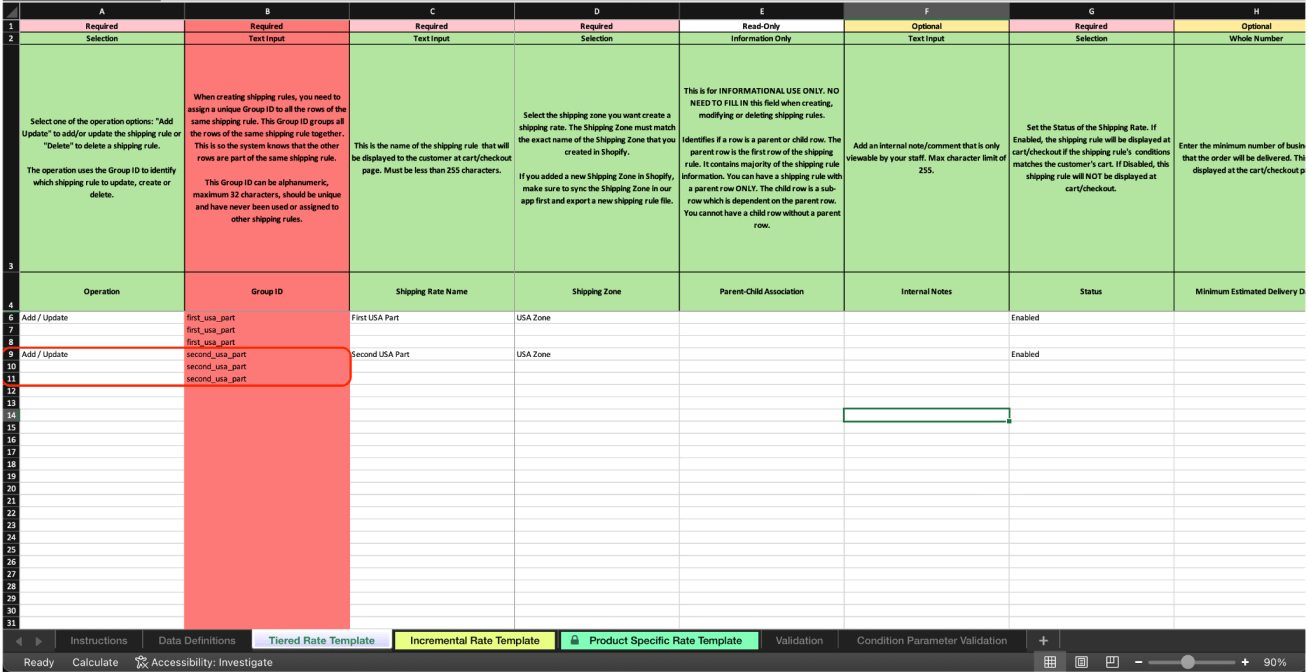
We want to create two separate shipping rules for the same zone. The first rule will cover the states like Alabama, Georgia, Mississippi, and the second will cover states like Arkansas, Tennessee, Kentucky. Additionally, each of these rates will have three calculation tiers.
Start by creating the first “parent” row for the first shipping rate.
Fill all required data in the parent row.
Next, add the “child” rows to the first shipping rate, ensuring that it meets our requirements.
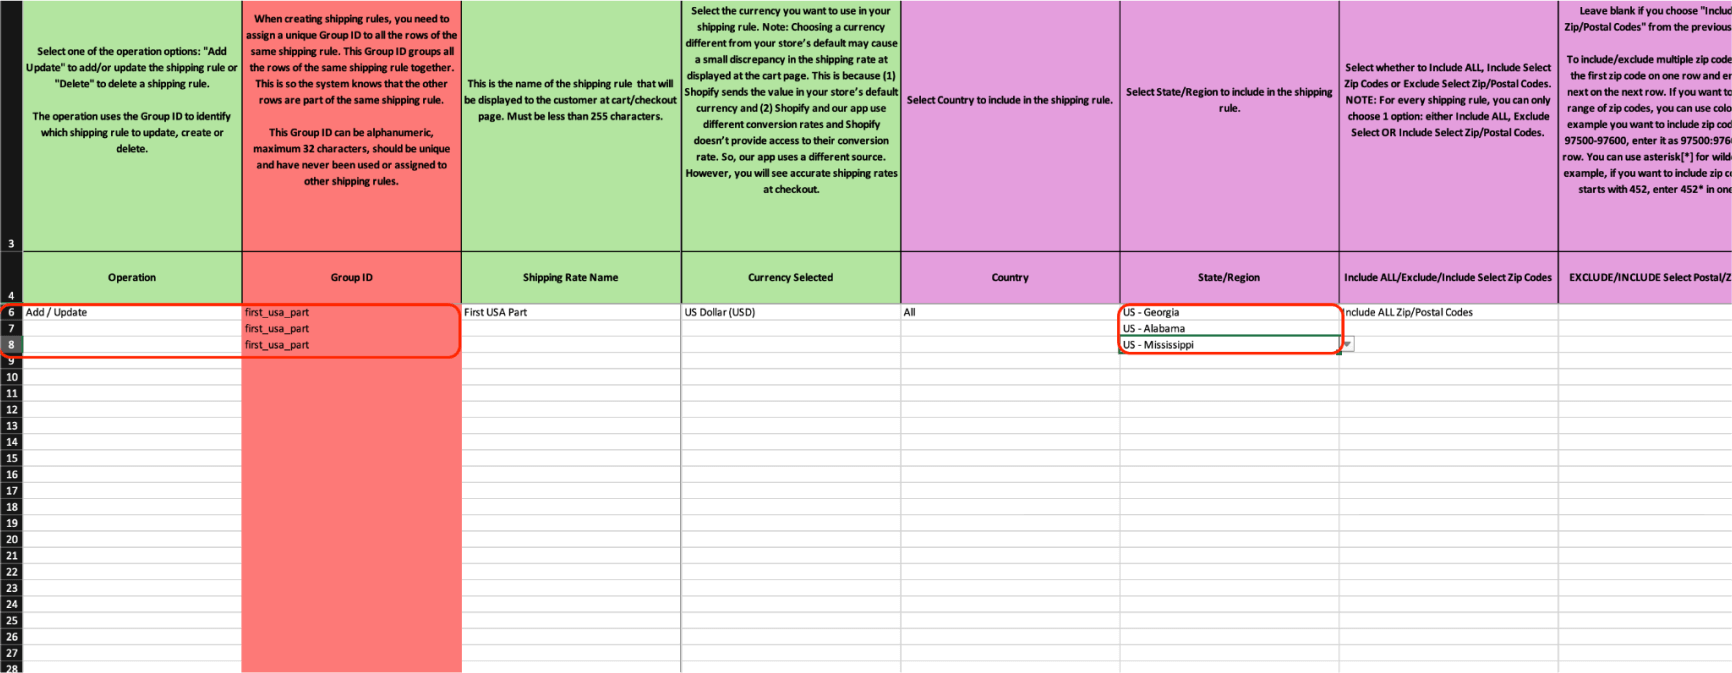
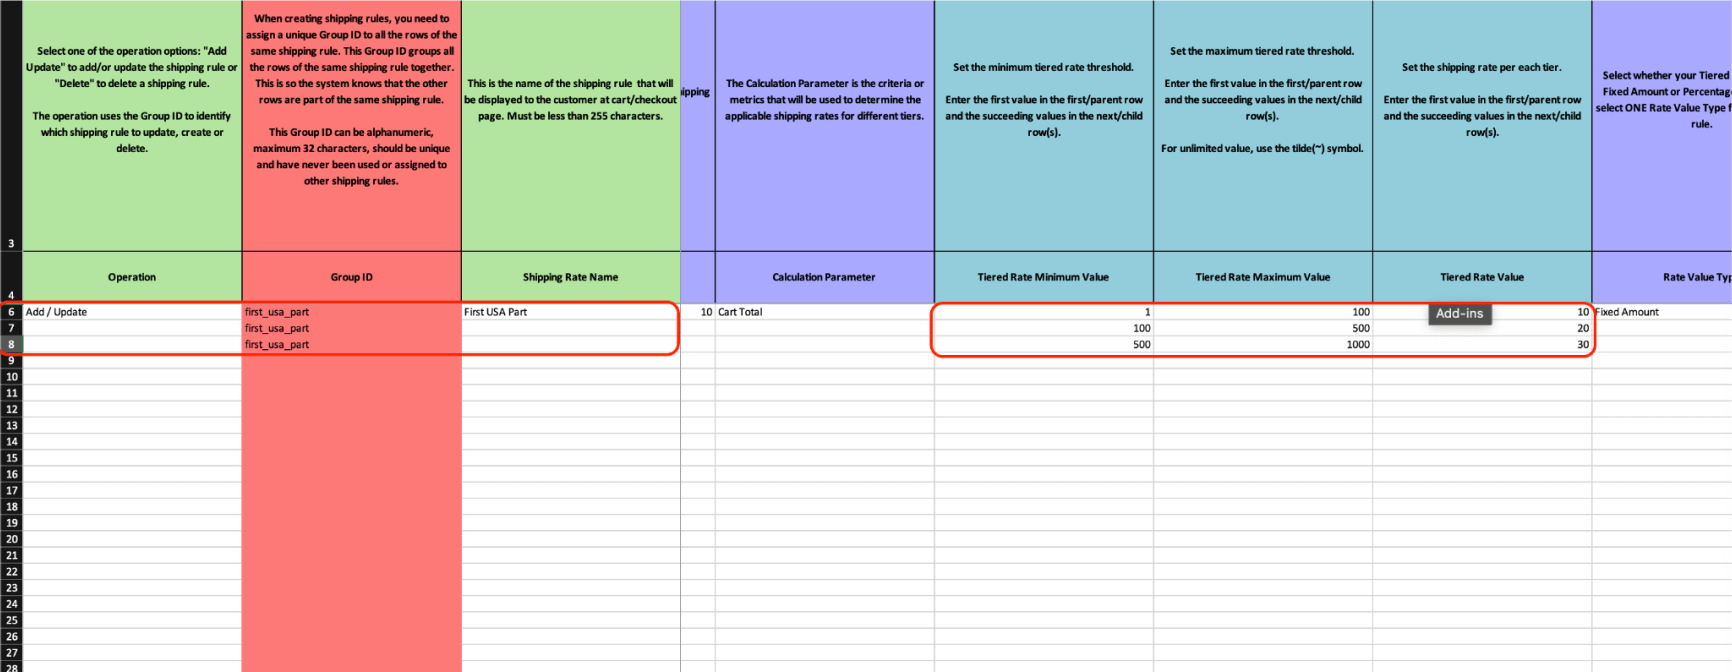
Repeat these steps for the second shipping rate, noting the group ID assigned when creating these rates.


Example 2:
Let’s create a product-based calculation. For this, we’ll use the “Product Specific Rate Template” tab.
Create the main row that will contain all the basic information about this rate.
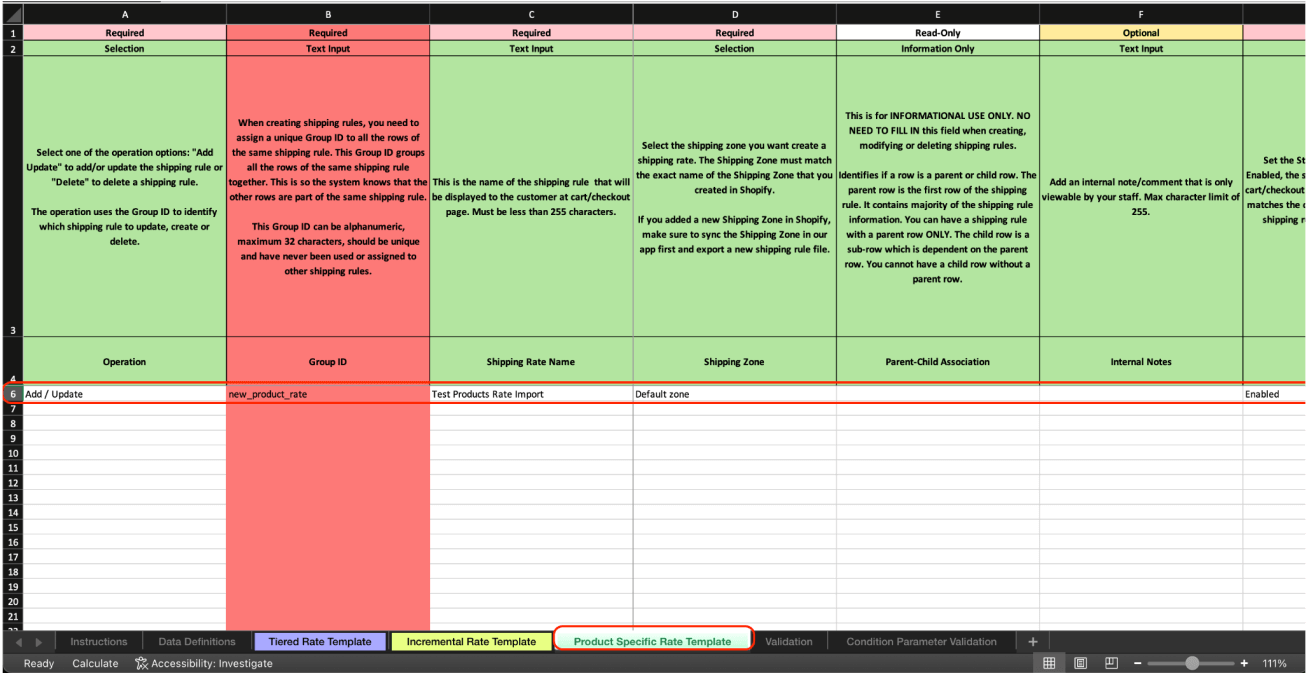
Next, add rates for several example products. We’ll use the helper sheet (products.xlsx) where product names and IDs are available.
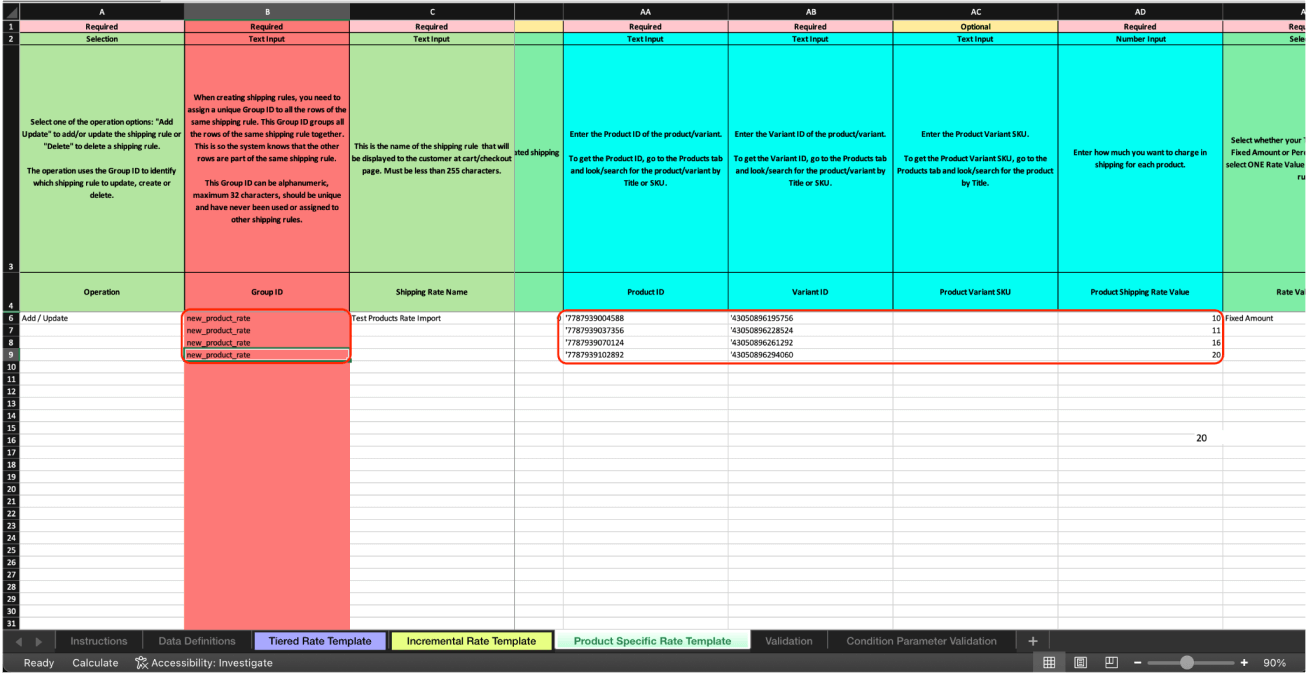
Notice how the structure of these three calculation types differs. Most fields in the import are common to all of them, with the only difference being in the calculation fields.